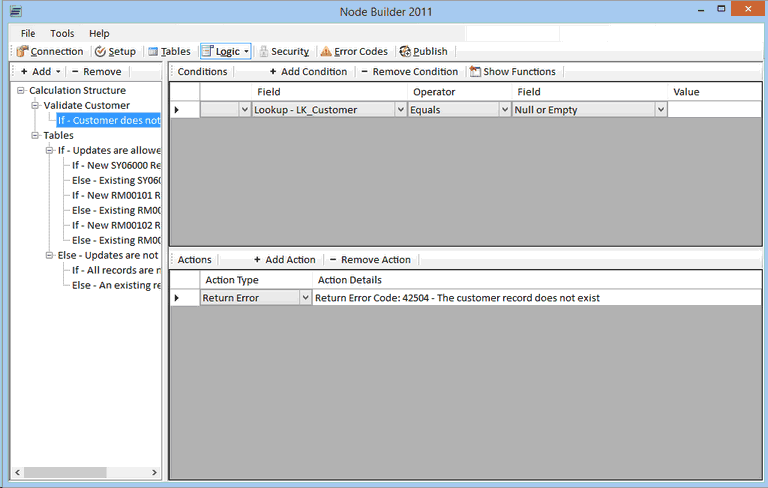
The calculations window is split into three main parts. On the left is a list that shows the full structure of the calculations that currently exist.
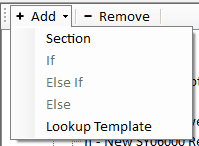
The top level in the structure is always a section. These sections can be added by highlighting the “Calculation Structure” item in the list and then clicking the Add -> Section button.
The name of a section can be changed when adding, or at any point later in time, by double-clicking the section name and entering a new name.
![]()
In the example below we have now changed the section to be Check Checkbook.
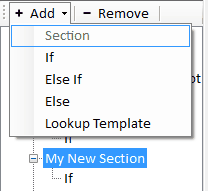
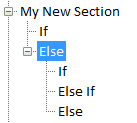
When a section is added, it automatically creates an “If” item below. If the section is highlighted, additional items can be added by clicking on the Add button and selecting either the “Else If” or “Else” option from the dropdown. These options may be disabled depending on which items already exist. For example, “Else” cannot be added as an item unless an “If” item already exists (and possibly some “Else If” items at that level).
Additionally, every item can have items added below it. Just like “If”, “Else If”, and “Else” items can be added to a section, all of those items can be added to an existing “If” item (or an existing “Else If” or “Else” item). The items will be added to the current item that is selected in the list. This allows users to create any possible combination of conditions and checks to ensure they can create the custom logic needed.
An additional section called Lookup Template can be added. This contains a set of templates that add Lookups, Error Codes and Logic for many of the standard records you would want to check to see if they exist in Dynamics GP.
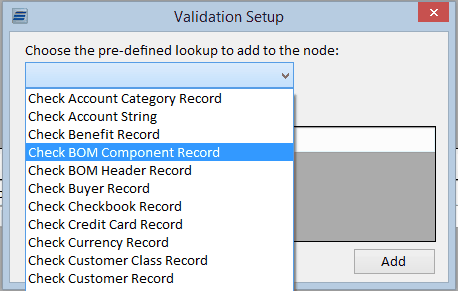
All of the logic is built in for you and there is a great variety of standard lookups from Payroll to Checkbooks to Bill of Materials and everything in between. Each of these lookups may have one to five keys depending on what the keys fields are on the underlying table.
When an item is selected on the left, it will affect what is displayed on the right half of the screen. When an “If” item or an “Else If” item is selected, the right side of the screen will display a Conditions grid and an Actions grid. If a section item or an “Else” item is selected, then only the Actions grid will be displayed.
The conditions grid allows users to set what conditions need to be met in order to execute the actions for that item. Each row has two Field columns, an Operator column, and a Value column. Once the fields are entered in each of their columns, an operator needs to be chosen depending on the type of comparison being performed. Lookups and user defined fields can be used in the condition comparisons as well.

If the “Constant” option is selected as the second field, then a value must be entered in the value column for comparison. The other unique option that can be chosen for the second field is the “Null or Empty” option. This option can be used to check if a particular field or lookup is either an empty string or does not have a value at all (null).

When more than one row is added to the condition grid, the first column in the grid will have an “And” and an “Or” option. These options can be used to determine whether all the conditions need to be met (And), or if only one of them needs to be met (Or).

If the Show Functions is clicked, it enable functions for the conditions. A function column will become visible just before each field column in the grid. If the user double-clicks the function cell, it will pop up a window where the user can select the function that they want to perform on the selected field. When that window is closed, the chosen function will appear in the cell, which can be changed by double-clicking it again and selecting a different option.

The action grid lets the user add actions to any item in the calculation structure. If the actions are added to an “If” or an “Else If” item, then the conditions need to be met on that item before the actions are executed. No matter which item is selected, there are two actions that can be chosen.
The first action is the Return Error option. When the user tabs off the first field after selecting this action, a window will pop up that contains the error codes the user has created for this node. The user can selected any of the error codes that have already been created and can even modify the error message in this window before confirming the error message they want to return.

When the Return Error window is closed, the error that was selected will be stored in the Action Details column. If the error code that is being returned needs to be changed, the user can double-click on the Action Detail field to re-open the Return Error window. The current error that is being returned will be populated into this window, which the user can change.

The second action type is the Set Value option. Upon tabbing off the Action Type field after selecting this action, a window will pop up that will let the user build their own Set Value statement. When the user submits this window, the statement will appear in the Action Details column. If the user wants to modify that statement, they can double-click the Action Detail field to re-open the Set Value window. The statement created before will populate back into this window, which the user can edit.

The third action type is the Run SQL option. This will allow for typing in your own SQL statement allowing you to set values and execute stored procedures. Upon tabbing off the Action Type field after selecting this action, a window will pop up that will let the user build their own SQL statement.
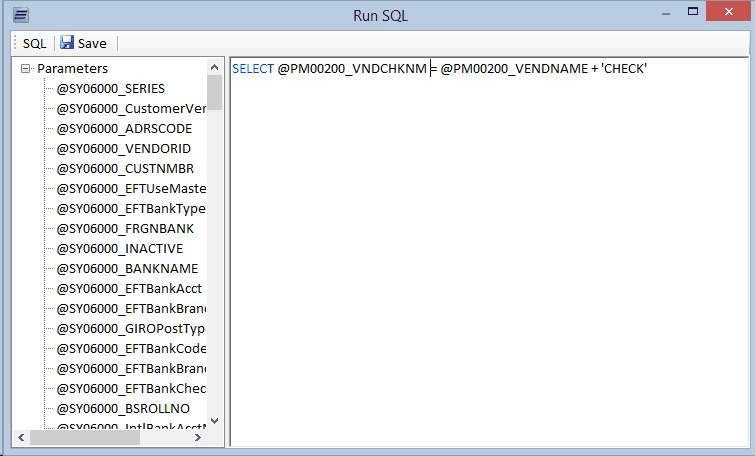
When the Save button is selected it will populate the Action Details with the text entered.

There is a section called “Tables” in the calculation structure. All of the items in this section are generated automatically by Node Builder as tables are added and removed from the program. The items in here perform the standard checks that determine whether the record already exists in the specified tables, and whether or not the node should update that record if it finds one or throw an error instead.
This section is locked down to ensure that the final operations that Insert or Update the tables are formatted correctly.