In this exercise, the user will create a node that integrates into vendor items and add logic to check if the Vendor and the Item already exist. Additionally, the user will provide the option to update the Purchasing UofM on the Item and include logic for this. There is a similar eConnect node that does this particular integration, but the purpose of this example is to show how to use Node Builder and the concepts in creating a node with familiar tables.
Create Connection
| 1. | Launch Node Builder |
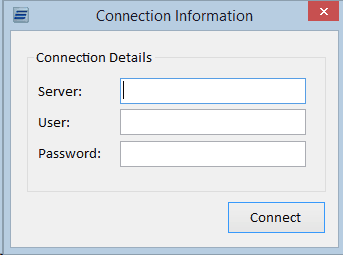
| 2. | Enter the needed credentials to connect to the SQL Server that has Dynamics GP installed on it. Make sure that a SQL Server user is entered in the connection details and is not an AD user. |
Configure Setup
| 1. | On the Setup screen, enter “VendorItems” for the Node ID and Description and “TWO” as the default database. |
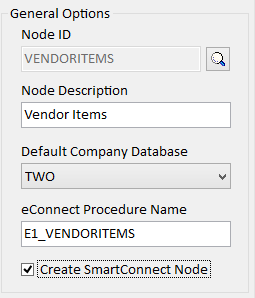
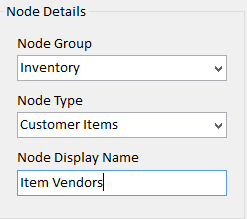
| 2. | If SmartConnect is installed on this system, check the Create SmartConnect Node option. Select “Inventory” as the Node Group and then type in “Custom Items” as the Node Type in the Node Details section. By entering in the Node Type, a new category is created in SmartConnect – this could be done for the Node Group as well. For the display name of the node, enter “Item Vendors” or another name to be displayed when using SmartConnect. |
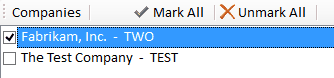
| 3. | For the Companies list, check the companies that will have the procedure created in them when the node is published. If no registration keys have been entered, the node will only be created in Fabrikam, so for this example we will only select “Fabrikam, Inc. – TWO” as the destination company. |
Add Tables
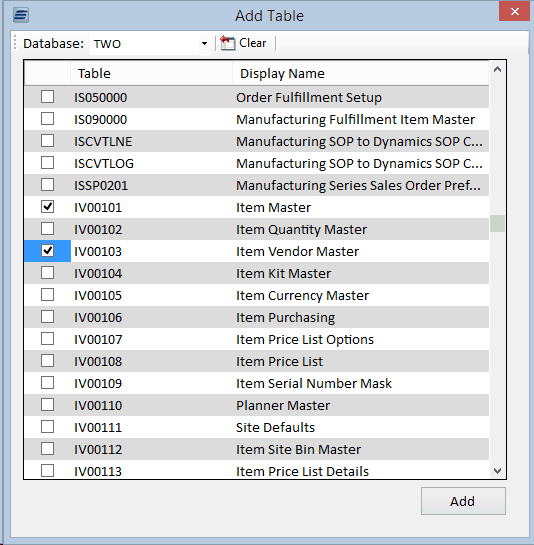
| 1. | Switch to the Tables screen after setup has been completed in order select the table that we will be integrating into. Click the Add button to bring up the Add Tables window. |
| 2. | If a default database was selected on the Setup screen, the Add Tables will already have filled in the Database field and will be listing the available tables. If the Database field does not have a database selected, choose “TWO” from the list. |
| 3. | Navigate to the IV00101 and IV00103 tables and select them, and then click the Submit button to add those tables to the current node. Note that the user can quickly skip around in the list by typing in the first letter of the table that needs to be added. |
| 4. | The added tables should appear in the list on the left side of the Tables screen. Select the IV00103 table in order to see a detailed list of all the fields in the table. |
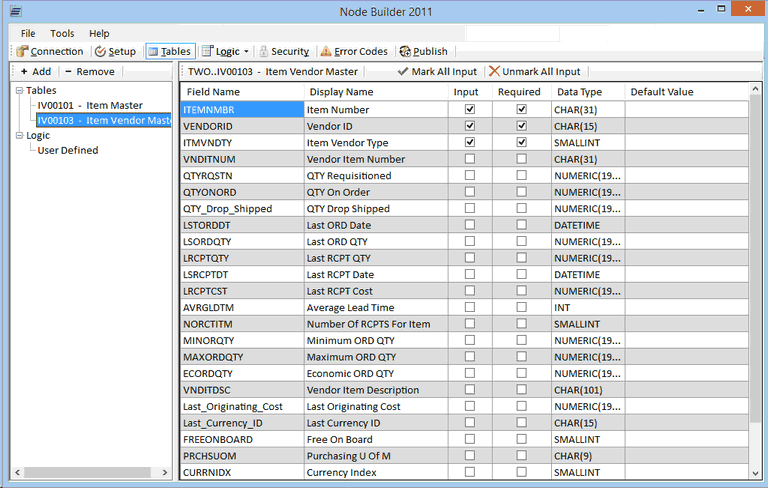
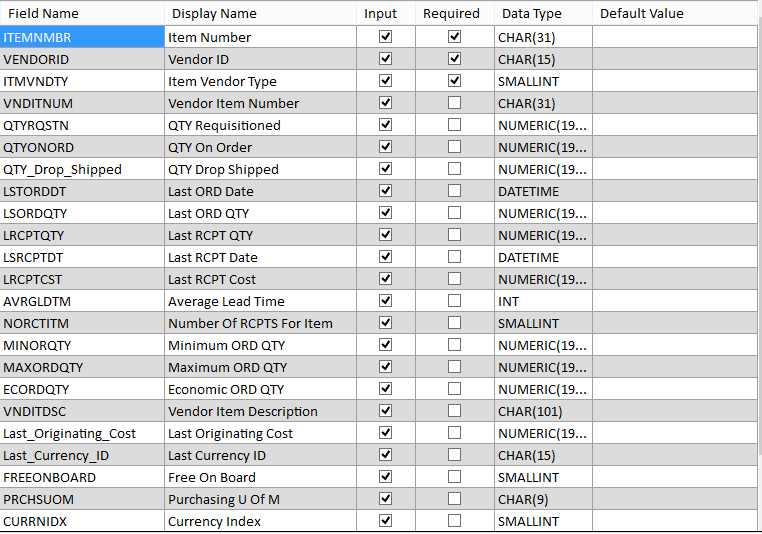
| 5. | The ITEMNMBR, VENDORID, and ITMVNDTY fields will already be marked as input fields and required fields. This is because they are key field in the table, so any insert or update done to the table must provide values for any key fields on the table. |

| 6. | Click the Mark All Input button to make all the fields on that table input fields. When the node is used in SmartConnect, every field on the table will then be an input parameter that can be mapped. |
| 7. | The Display Names can also be changed on any field if desired. The display names are what are displayed in SmartConnect when mapping to those fields. |
| 8. | We will not mark any of the fields in the IV00101 table as input fields. Rather, we will use a couple of user defined fields and calculations to automatically update specific fields if the user wants. |
Add User Defined Fields
| 1. | Switch to the User Defined screen by selecting the User Defined option from the Logic button dropdown list. There will already be an automatically generated field that exists. This UpdateIfExists field is used to determine if the node should update existing records based on the value that is passed into it. |

| 2. | The next step will be to add two additional fields to determine whether the node should update item information in the item master table. |
| 3. | Click the Add Row button twice to add two new user defined fields. For the first field, change the Display Name to “Update Master Item Purchasing UOFM”. Then switch the Data Type to “int” and set the Default Value to 0. |

| 4. | For the second field, change the Display Name to “Update Master Item Description”. Then switch the Data Type to “int” and set the Default Value to 0. |

| 5. | The user defined fields can then be mapped to in SmartConnect. If nothing is passed in, they will default to 0. If the user passes in a 1, there will be additional code later to update the master records based on the values passed in to the vendor item fields. |
Add Lookup
| 1. | Navigate to the Lookups screen by clicking on the Logic button and then selecting the Logic option after the tables have been added so that a couple custom lookups can be created to ensure the data being passed in is valid. In this section we will show how to create a lookup and also use the built-in Lookup Templates. |
| 2. | When the Lookups screen is displayed, there will already be existing lookups. A lookup is automatically created for each table that is added in order to check for existing records. |
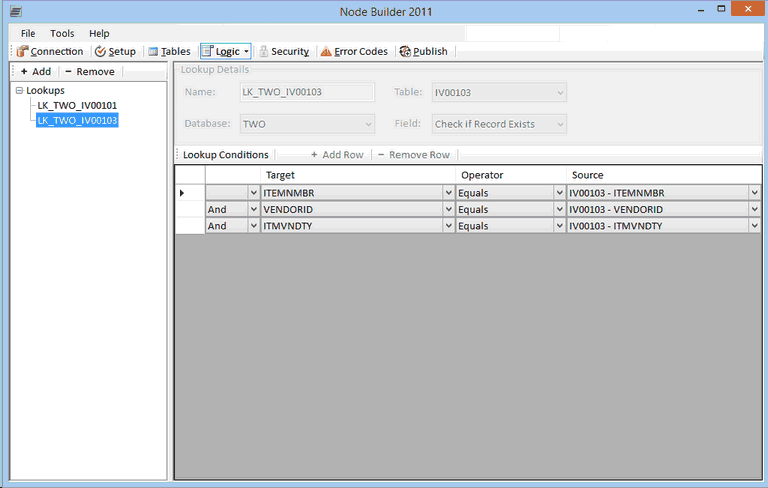
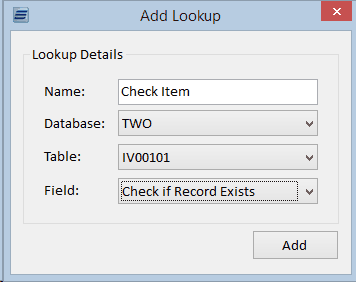
| 3. | To create a new lookup click the Add button above the list of lookups. In the lookup details window enter “Check Item” as the Name, and then choose “IV00101” as the table and “Check if Record Exists” for the field. Once those fields have been entered, click the submit button. |
| 4. | Now that the lookup has been created, conditions will need to be added to it to ensure the user is looking for the correct record. Click the Add Row button to add a new condition. |
| 5. | Select “ITEMNMBR” from the Target field as the field the user is going to be comparing from the IV00101 table. The operator should be set to “Equals”, and then the Source should be set to “IV00103 – ITEMNMBR” since that is the field our item number will pass through. |
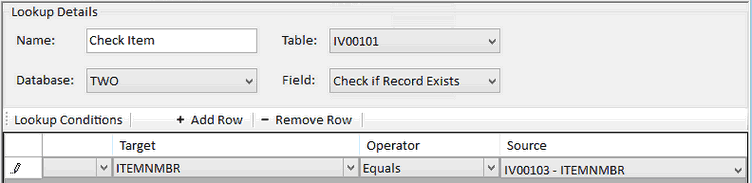
| 6. | This condition is comparing the item number supplied in the node to the item master table. If a match is found, the lookup will return a 1 since the field is set to simply check if a record exists. |
| 7. | We also need to create a second lookup to check whether the vendor being passed in exists. This time the Lookup Template will be used. Under the Logic menu select Calculations and then click on the Add Button and choose Lookup Template. Select the Check Vendor Record template and then choose the IV00103 – VENDORID as the Source field you are passing in. |

| 8. | Once these lookups are complete, move on to create a couple of new error codes that will be used in conjunction with the lookups to design the custom node’s validation process. A nice feature of the Lookup Templates is that the error code has already been created for you for our second lookup. |
Add Error Code
| 1. | Click on the Error Codes button to hop to the next screen. There should be four error codes in the grid already. The first three error codes are automatically generated and returned by the node if a record is found and the node isn’t set to update existing records or there are errors in the Pre or Post procedures. The fourth error code was created by the Lookup Template. |
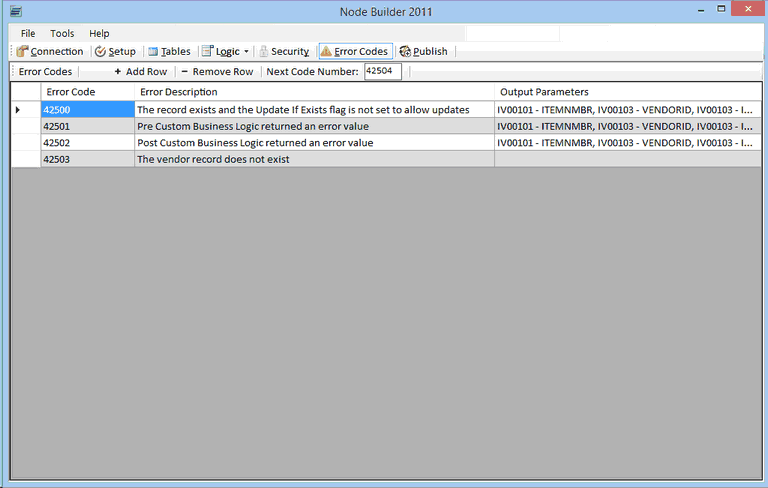
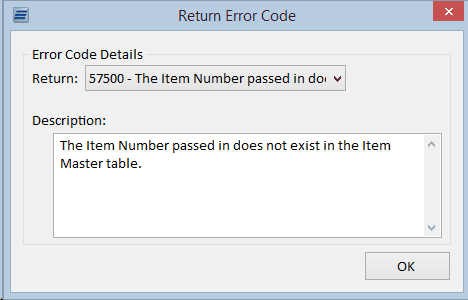
| 2. | The next step is to add the last error code. The next code number in the toolbar can be changed if desired. This number just sets the next error code number if available. For this example, change it to 57500. |
![]()
| 3. | After that, click the Add Row button to add a new entry that we will enter an error description into. For the description, enter “The Item Number passed in does not exist in the Item Master table.” Then, double click on the Output Parameters field to open a new window where we can select the output fields for this error. |
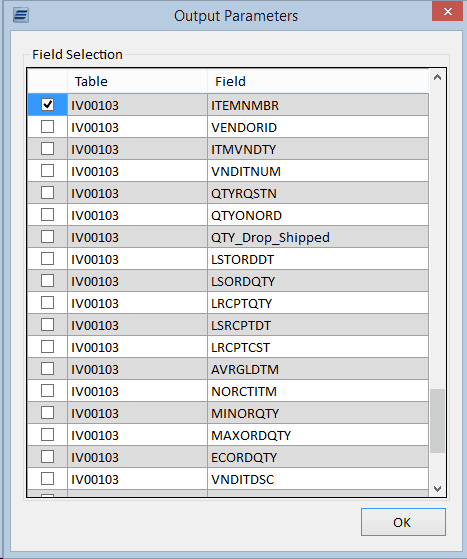
| 4. | In this case, just select the “IV00103 – ITEMNMBR” field and click the OK button. This will add the selected field to the output parameters cell. If this error is ever returned, it will also return the values in each of the output parameters so the user can see what values were being processed when the error occurred. |
| 5. | For the Output Parameters field on the error added by the Lookup Template choose the IV00103 – VENDORID field. |

Add Calculation
| 1. | Click on the Logic button and then select the Calculations option from the dropdown to open the Calculation window. This window allows the user to add any series of conditions in order to make sure the node follows the business logic desired. In this example, use the lookups created to ensure there are valid records being passed in through the node. |
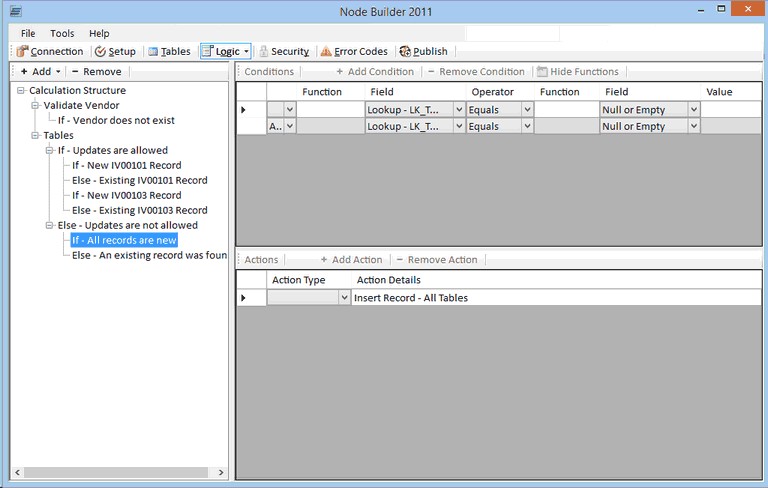
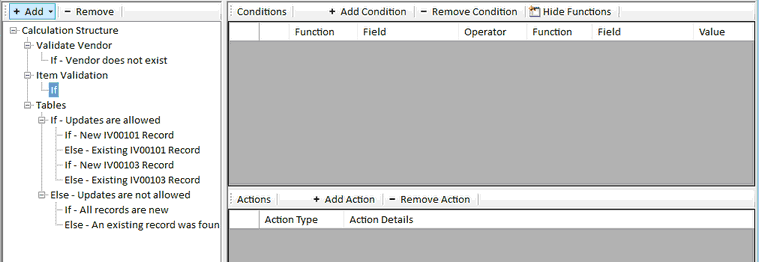
| 2. | The list on the left side of the screen should already contain a section called “Tables” and another section called “Validate Vendor”. The Tables section and all the items under it are automatically generated by the system. The logic in those items check to see if a record already exists in the table(s) being integrated into and then insert or update those records – or throw an error. The logic in the Validate Vendor was generated from the Lookup Template. |
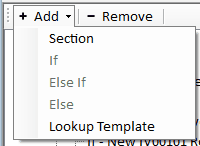
| 3. | In this next step we will create a new section. Highlight the “Calculation Structure” label and then click the Add button to open the dropdown list. |
| 4. | Select the Section choice under the Add menu. That will add a new section to the logic that can be renamed. Name this section “Item Validation”, and then tab off of it. To rename, simply double-click on the section name. |
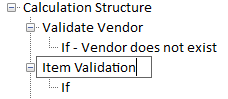
| 5. | An “If” item was automatically added when the user added the section. We could create additional items in this section by selecting the “Item Validation” label in the list and then clicking the Add button and selecting the needed item from the list. However, we just need the “If” item to perform the check. |
| 6. | Select the “If” item under the Item Validation section, then click the Add Condition button to add a new condition row. This will be used to check the result of the lookup created earlier for the items being passed in. |
| 7. | Click Add Condition |
| 8. | Select “Lookup –Check Item” from the first Field dropdown list and then select “=” from the Operator list. Next, pick “Null or Empty” from the second Field list. |

| 9. | This condition will check the result of the item lookup. If the lookup does not find a record matching the lookup’s conditions, then it won’t return anything – in that case the lookup result will be null or empty. If that happens, then the created condition will be true and any actions added to this item will execute. |
| 10. | Now that the conditions for this “If” item have been set, click the Add Action button to add a new action row. Select “Return Error” from the Action Type list and then tab of the field to open the Return Error window. |

| 11. | In the Return Error window, choose the error created that states that the item doesn’t exist in the item master table. In this example it should be the 57500 error. Once the error is selected, click the OK button to save the results. |
| 12. | The calculation to check whether the item exists is now complete. We won’t need to repeat this step for the Vendor because we used the Lookup Template to automatically populate the Calculation section for us. |
| 13. | The calculations ensuring valid data is being passed through have been created. Now create a couple of sections to update the item master records. |
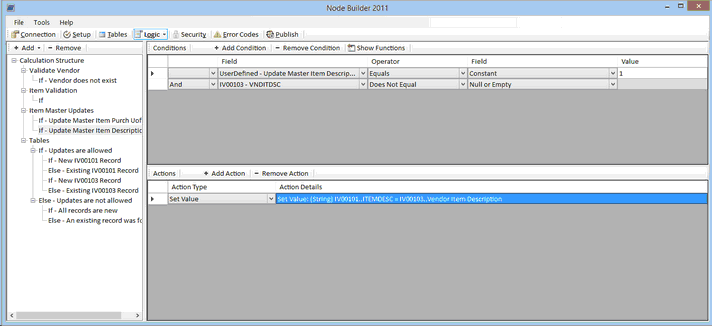
| 14. | Create another section to hold the master record update logic. Highlight the “Calculation Structure” label and then click the Add button to open the dropdown list and choose Section. This will add a new section to the logic that can be renamed. Name this section “Item Master Updates”, and then tab off of it. |
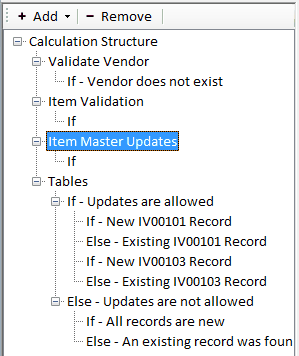
| 15. | Add another item to this section by highlighting the Item Master Updates section and click the Add button and select the “If” option. |
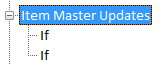
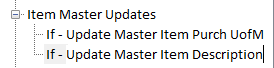
| 16. | Double-Click the first “If” item under the Item Master Updates section. This will allow editing of the name. Change the first one to “Update Master Item Purch UofM” and the second “if” to “Update Master Item Description”. Now select the first “If” and click the Add Condition button to add a new condition row. This will be used to check the user defined field and whether or not a value was actually passed in for the needed field. |
| 17. | Highlight the If - Update Master Item Purch UofM item. Click the Add Condition button. Select “UserDefined – Update Master Item Purchasing UOFM” from the first Field dropdown list and then select “Equals” from the Operator list. Next, pick “Constant” from the second Field list and enter “1” in the Value field. |
| 18. | After the first condition is set, select “IV00103 - PRCHSUOM” from the first Field dropdown list and then select “Does Not Equal” from the Operator list. Next, pick “Null or Empty” from the second Field list. |

| 19. | Those 2 condition lines will ensure the user passed through the value 1 to the user defined field indicating that they want to update this item record, and that there is actually a value passed through to the parameter that will update the master record. |
| 20. | Now that the conditions for this “If” item have been set, click the Add Action button to add a new action row. Select “Set Value” from the Action Type list and then tab of the field to open the Set Value window. |

| 21. | In the Set Value window, select “IV00101..PRCHSUOM” for the Field dropdown in the toolbar. Then choose “String” as the data type for this calculation. |
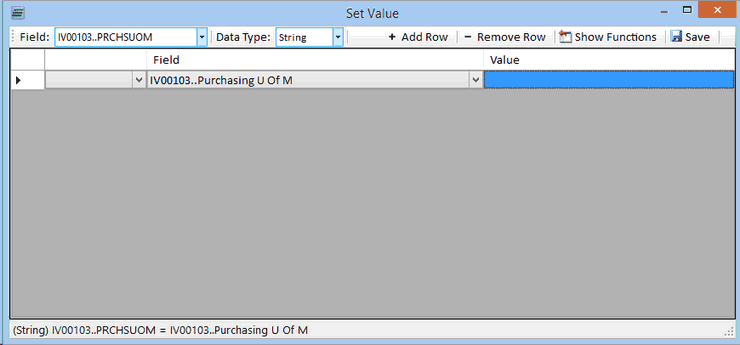
| 22. | In the first row of the grid select “IV00103..Purchasing U Of M” for the Field cell and tab off of it. The status bar should show what the calculation will be performing when it runs. In this case, the user is simply setting the unit of measure parameter for the item master record equal to what was passed in for the purchasing unit of measure on the vendor item. |
| 23. | Once that is set, click the save button to return to the calculation screen. The new set value calculation will be displayed in the Action Details field and that cell can be double-clicked if any changes are needed. |

| 24. | Now do the same steps for the item description as well. Select the second “If” item under the Item Master Updates section. Then click the Add Condition button to add a new condition row. This is used to check the user defined field and determine whether or not a value was actually passed in for the needed field. |
| 25. | Select “UserDefined – Update Master Item Description” from the first Field dropdown list and then select “Equals” from the Operator list. Next, pick “Constant” from the second Field list and enter “1” in the Value field. |
| 26. | After the first condition is set, select “IV00103 - VNDITDSC” from the first Field dropdown list and then select “Does Not Equal” from the Operator list. Next, pick “Null or Empty” from the second Field list. |

| 27. | Now that the conditions for this “If” item have been set, click the Add Action button to add a new action row. Select “Set Value” from the Action Type list and then tab of the field to open the Set Value window. |
| 28. | In the Set Value window, select “IV00101..ITEMDESC” for the Field dropdown in the toolbar. Then choose “String” as the data type for this calculation. |
| 29. | In the first row of the grid select “IV00103..Vendor Item Description” for the Field cell and tab off of it. The status bar should show what the calculation will perform when it runs. In this case, it is simply setting the item description parameter for the item master record equal to what was passed in for the vendor item description on the vendor item. |
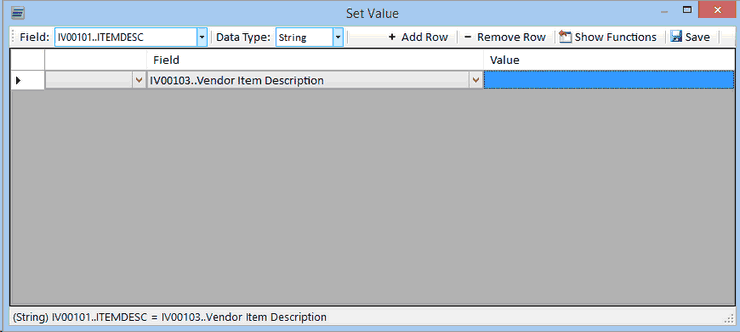
| 30. | Once that is set, click the save button to return to the calculation screen. The new set value calculation will be displayed in the Action Details field and that cell can be double-clicked if any changes are needed. |
| 31. | Once these sections are complete, the node’s custom logic is done. It will now check to make sure that both the vendors and the items being passed in exist in GP before creating the vendor item. |
Publish
| 1. | Now that we have added the table and created custom logic, click the Publish button to create the eConnect node on the SQL Server and create an entry in SmartConnect. Once again, if Node Builder is not registered the nodes will only be created inside of Fabrikam. |
SmartConnect
| 1. | Once the node has been published, it will be available for mapping inside of SmartConnect. Inside of GP go to Tools -> SmartConnect -> Map to open up the Map Setup window. |
| 2. | In the map setup window enter a map id and description, and then choose Inventory as the node group and Custom Items as the node type – the node type created in the exercise. The custom node created, Item Vendors, should be displayed in the nodes list. |
| 3. | If the node is opened to map to it, all the fields that were marked as input fields can be seen. Any fields that were marked as required should also be shown in red. |
| 4. | To test the logic, try to pass through a bad vendor id or item number that does not exist. The custom logic will catch it and throw the appropriate error that was created. |