Through virtual integration with Popdock, it is entirely possible and easy to leave old systems behind, turn off old SQL Servers, and have quick access to historical data whenever you need it without having to transfer that data to your new system.
In our previous article of this series, we showed you a couple of examples of how to access historical Dynamics GP data inside the NetSuite interface, along with how to embed it inside a customer dashboard.
In this article, we will demonstrate how to bring data from an on-premise system to an Azure Data Lake, and how to use the Popdock Data Lake Upload Tool.
How do you get data from the on-prem system to the Azure Data Lake?
One of the most important steps in the process of viewing old Dynamics GP data inside your NetSuite interface is to first move that historical data over to an Azure Data Lake. But the question is, how do you accomplish this?
Popdock’s Data Lake Upload Tool can help you achieve this task effortlessly. We’ll show you how to connect to your historical data and transfer it with ease.
With this Popdock feature, you can not only connect to all your SmartLists and favorite settings, but also move them to the Azure Data Lake. Once there, you can easily utilize them within NetSuite.
First, let’s start by learning how to connect to your historical data.
Connecting to the data: Connect to SmartLists and favorites to move to an Azure Data Lake
Here are some key points to consider:
- This process doesn’t require you to expose your SQL Server to the internet or punch holes in your firewall, which is a significant security concern. In the past, we used a gateway to mitigate this concern, but with this updated process, we no longer need to do that. The updated process allows you to run it right from your network and push it out instead of pulling it.
- This process enables you to transfer all historical Dynamics GP SmartLists, including the ones built with SmartList Builder and Microsoft’s less robust version of SmartList Builder, Designer. These lists arrive with human-readable names, making them easy to use within NetSuite.
- This process allows you to archive the entire database, including all SQL tables, not just GP data. This is essentially like an insurance policy that enables you to transfer all third-party products and custom tables to the data lake, making the information accessible in the cloud.
Moving the data: Move your SmartLists and favorites to an Azure Data Lake
After you have connected to the data, how do you move it?
It’s important to note that Popdock is designed to run in your environment, not remotely or from the cloud. This means you can run the tool in your on-premise system and connect it to your systems without needing to set up another server. The gateway of the past is no longer necessary because you can simply hook it into your system and run it from your workstation.
With Popdock, you can extract data from Microsoft GP and move it to the Azure Data Lake as quickly as possible. While the amount of data you have will affect the speed of this process, it still runs incredibly fast. For instance, it will take longer to extract a terabyte of data than it would to extract 10 gigabytes. The tool runs SQL statements and dumps the data into CSV files.
Once the extraction is complete, the uploading process begins. The speed of this process depends on your internet connection. If you have a slow internet connection, this will take longer and vice versa.
Fixing errors in a list
In the tool we’re about to show you, you have the capability to fix any errors that may occur in a list, which is an incredible asset to this process.
As an example, let’s say that your IT team chose to do a backup in the middle of the night. While it was running through this process, you lost connection to your server and half of the tables weren’t able to be read. If that occurs, Popdock will allow you to pick up right where you left off. You can show up in the morning, go home, and if not all of the 1,000 tables or lists you were uploading made it, you can resubmit those tables or lists.
That’s a crucial piece of what Popdock allows you to do. It enables you to interact with and fix any problems that may occur during the uploading process.
How to use the Popdock Data Lake Upload Tool
Next, we’re going to show you how to use the Popdock Data Lake Upload Tool.
As we mentioned in the last article, this tool is a part of Popdock. It does not cost extra to use. This tool can be installed on your network and allows you to extract information.
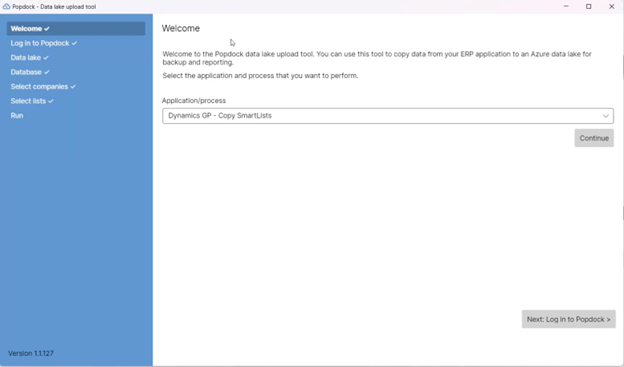
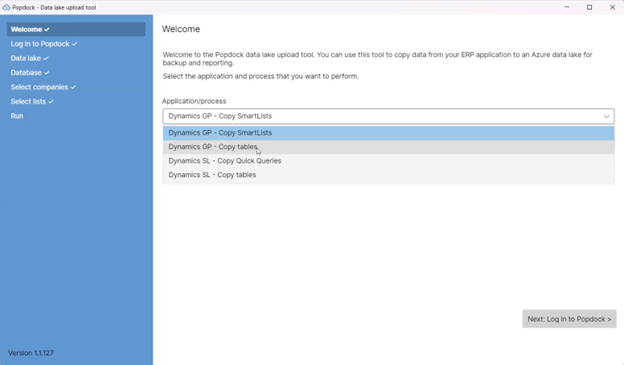
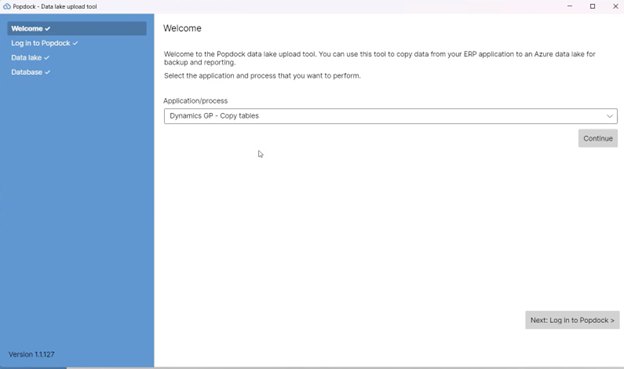
When you log in, it will ask if you want to work with SmartLists or tables.
For today’s example, let’s begin with SmartLists.
After making your selection, click on the “Continue” button at the bottom right-hand side of the window.
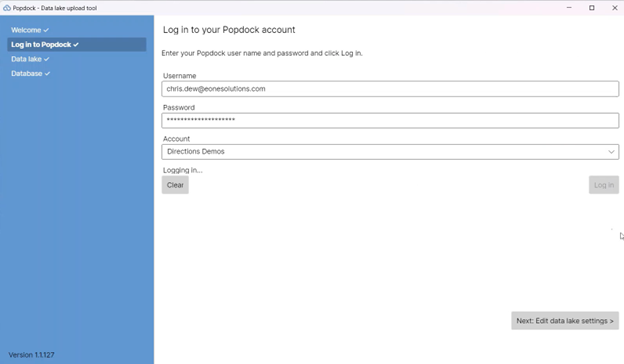
Next, enter your Popdock login credentials and then click on “Log in.” This will connect you to your Popdock account where some of the setup information is located.

Next, let’s proceed with logging in to your Azure Data Lake account. This step is crucial because we will be archiving this information into your data lake.
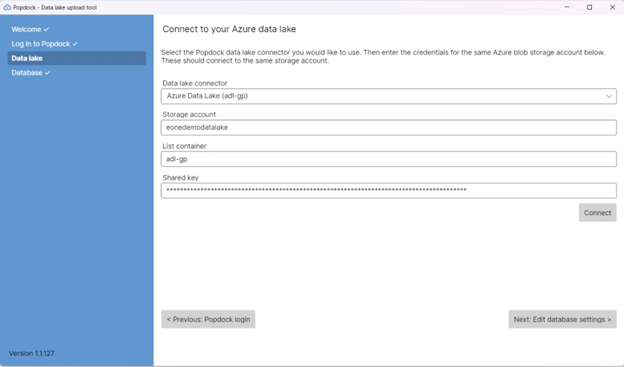
After selecting these specifications, click on “Connect.” This will initiate the connection process with the connector.
Now, let’s move on to the most important part. Since we are working on-premise, we need to hook into our GP server so we can really access the data effectively.
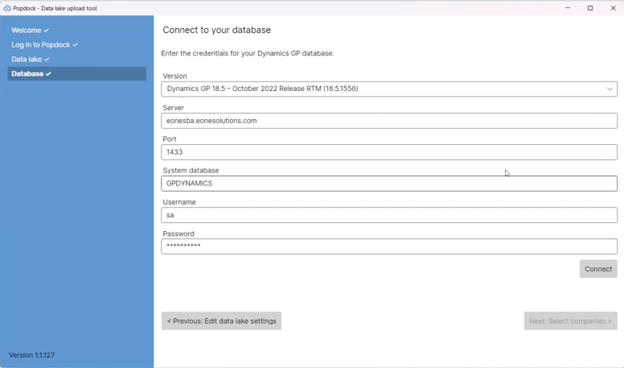
Popdock includes all the past versions of GP, so choose which version you need to connect to from the dropdown options.
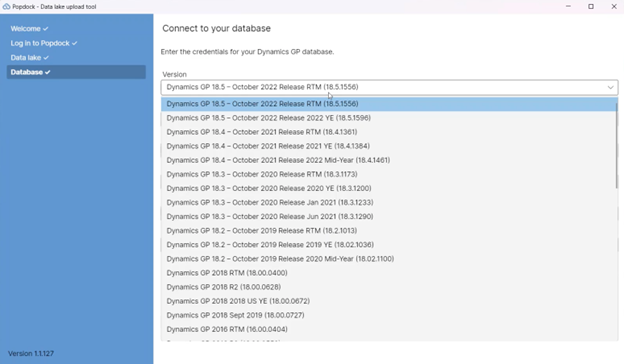
After choosing your version, click on “Connect” once more.

Now you can see all the companies that you have.
In our example, the setup is straightforward as we only have three companies listed. However, some of our customers have anywhere from 70 to well over 100 companies, and many users don’t want to move each one. There are a few companies that may have been test companies, are no longer in use, or were consolidated.

For example, in the case of our customer that had 70 companies, they had no need to archive 20 of those companies.
If you don’t want to archive a company, simply uncheck the ones you don’t want.
In this demonstration, we’ll uncheck “Three’s Company” because we don’t have any data in that company.
After selecting the companies you wish to archive, click on “Next: Select lists.”

On the next page, you’ll see all the lists. These are your SmartLists: All the standard SmartLists and the lists that were created with SmartList Builder.
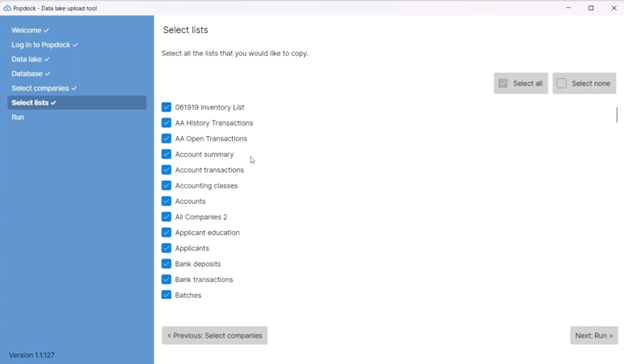
As you scroll down, you will notice that we have added SmartLists and that these aren’t only the default lists included. These include the eQA SmartLists which are lists that were created inside the system for testing purposes. All these SmartLists were built with SmartList Builder, and there’s even one in here that was built using SmartList Designer.
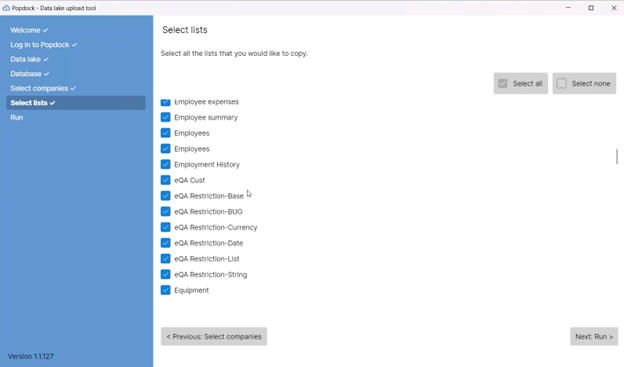
Next, you’ll select the lists you want to move. After you have selected your lists, click on “Next: Run.”
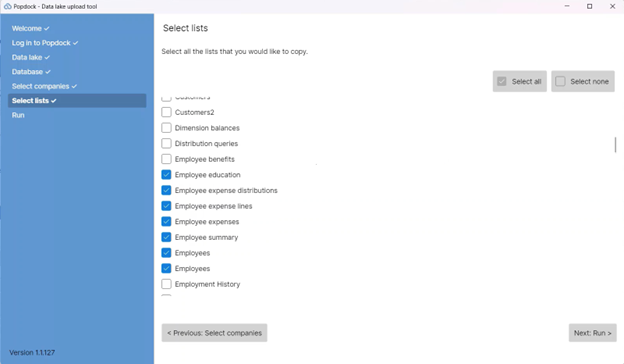
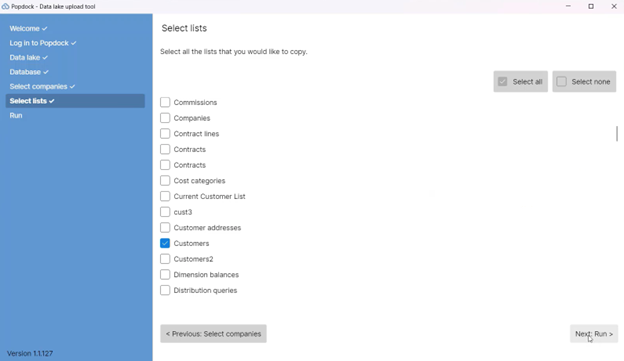
If you only need to access specific information such as payables or receivables, you have the flexibility to do so.
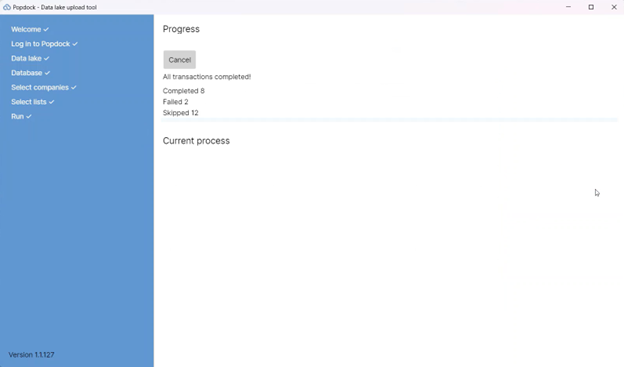
You can see it’s running 22 transactions, although we didn’t select that many lists. Why is it doing that? It’s running the 22 transactions for both companies that we selected: Fabrikam and Fore Iron Foundry. It is going through each one of them to retrieve the data.
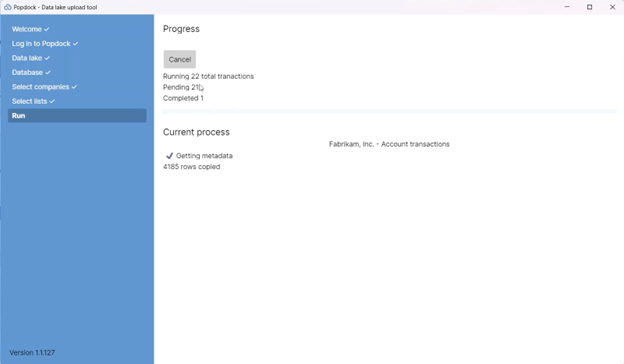
For the Fabrikam company alone, there are over 300,000 records to go through, which means it will require some additional time to process.
Once we have completed processing this list of 300,000 rows, the remaining records will be processed quickly.

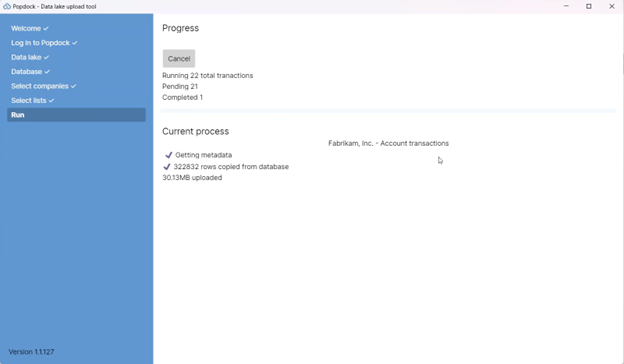
After the extraction is complete
Once all the rows have been extracted, the data goes through the uploading process.
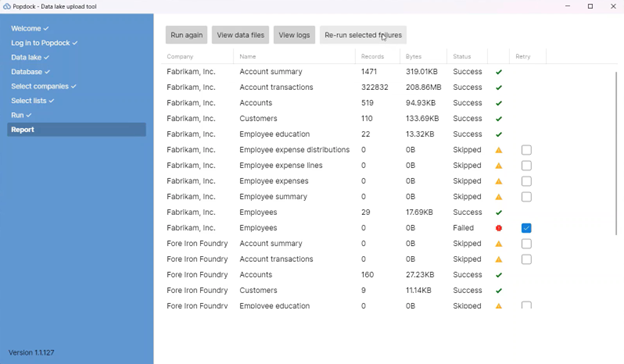
Most of these records succeeded for the Fabrikam company. However, a few of them didn’t have any records, so they were skipped during the process.

Further down, you can see that there was a failure to upload a particular record. By hovering over it, we can see that, there appears to be a problem with our calculation.
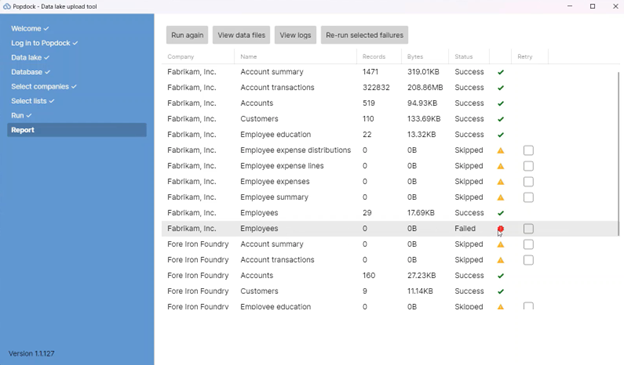
To go back and fix this record and then rerun it, you can select it and click on “Re-run selected failures.” Then it will rerun only that specific list.
If there is an issue with a record and you never fix it, it will continue to show up as a failure.
Choosing tables instead of SmartLists
The other option we want to show you is running tables instead of SmartLists.
On the welcome page of the Popdock Data Lake Upload Tool, select “Dynamics GP – Copy tables,” then click on “Continue” to log in to your Popdock account.
Then type in your data lake name into the “Table container” field and click on “Connect.”

Select your version of GP and click on “Continue.”

On the next page, you will notice a difference. When you select SmartLists, you have more options to choose from. However, with tables, you won’t have the same level of customization and selection.
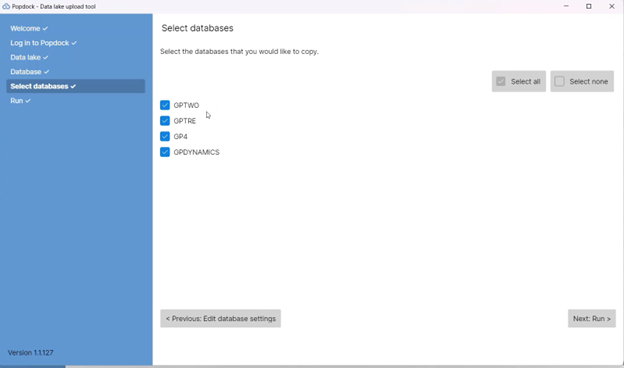
It allows you to specify which databases you want to archive. Whether there are 1,000 tables or 2,500 tables like in the case of the Fabrikam company, it will archive every database that you want. It pulls all the tables, whether they’re Microsoft or not.
After you select “Next: Run,” this process will proceed. If you have a large amount of data, it may run for a few hours.
We provide you with the list you’ll be using and ensure that everything is backed up and available for future reference – an insurance policy for your peace of mind.
Next up: Helpful Popdock features
Now, you can securely connect to your Dynamics GP data without having to poke holes in your firewall. You can quickly move to an Azure Data Lake and conveniently access and report on the data you need inside NetSuite.
With Popdock, you’re able to take on tasks that would normally only be limited to developers. We’ve made it easier than ever for consultants and end users to be able to connect, move, and report on data in whatever interface is needed. It’s simple to access, filter, and report on the data without leaving NetSuite (or any other system).
In our next how-to article, we’ll show you some extra Popdock features that will help you during your entire Dynamics GP data uploading process to NetSuite.
Are you ready to learn more about how Popdock can help your NetSuite experience? Contact one of our Popdock experts today at sales@eonesolutions.com or 888-319-3663 ext. 1. They are always eager to provide help and answers!