The REST connector will allow users to integrate to many rest web services. You will need to refer to the web service api to understand how SmartConnect and the web service you are using need to be setup as every web service is different.
SmartConnect currently comes with some default web services already setup. This includes Campaign Monitor, Concur, Hubspot, Timely and Zendesk. These are one click setups to get you going quickly that will setup parameters, return types, methods, and success definitions. To get started with any of these default web service providers you need to provide your authorization credentials. Each web service connects differently so you will need to check each web service’s documentation.
Setting up a custom REST Provider
- Open the REST Service Providers window located under the Maintenance Tab>>Service Providers.
- Click the Add button to setup a new REST Provider
- Enter a Provider Name and setup the following sections for your REST Provider
Parameters – You will need to refer to the API reference to know what parameters you will need.
- Click the (+) on the parameters section to setup a parameter.
- Enter a Parameter Name.
- Enter the Technical Name.
- Enter a default value if this parameter will usually have a set specific value. You will have the option to override this value in the map setup window if the parameter is not a header.
- If the parameter needs to be passed in the header mark the Is Header checkbox. You will not be able to override in the map setup window.
- Hash Parameter – Not currently used
HashSecret – Not currently used - Is Timestamp – Enable this option for parameters using dates
- Set By Method – Enable this option to query the value from a specific Method currently setup
- Choose the Method
- Enter the select string – For example, to select the id of a hubspot contact the string would be contact[0].vid.
- Choose the Method
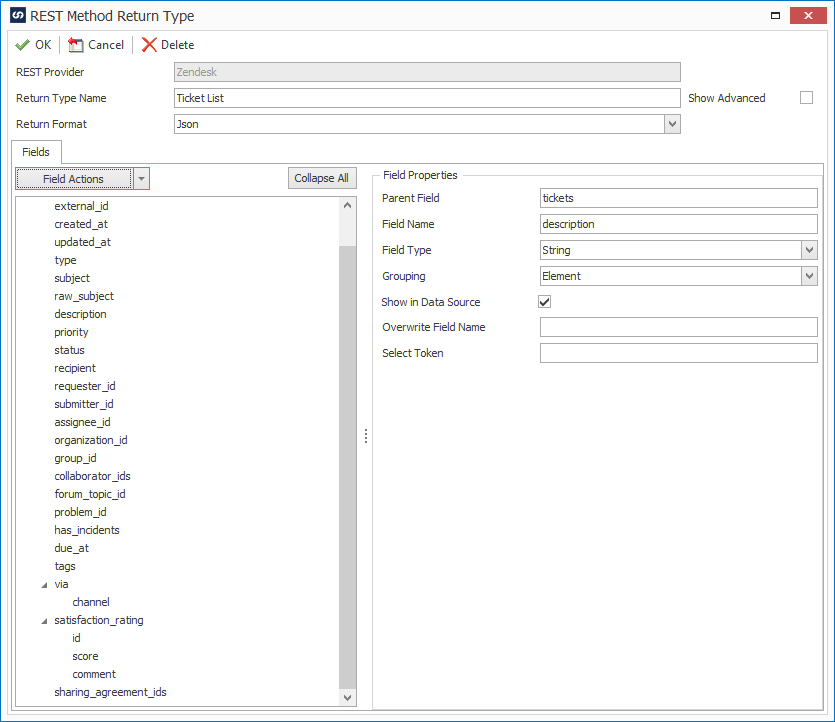
Return Types – Refer to you API to know what response format you will need.
- Enter a Return Type Name
- Select the Return Type Format according to the API
- Show Advanced will allow extra processing to be done to get the data from the method. For example, some providers add extra data to the return which will make the json invalid. You can use vb.net or C# to format the data correctly using the Initial Processing section. This code will run as soon as the method returns a result. This would be used when you need to run something against all data returned. Field Value Processing will run every time you try to get a value from the returned json. Some providers will return all data in an array and this code will allow you to select a single value from the array.
- Field Actions
- Add The fields that will be used in the response
To add a parent field, select the Field Actions drop down and select Add Parent Field- Enter the Field Name as found in the API reference
- Set the Field Type
- Set the Grouping
- Mark Show in Data Source if you want the field to show when using this Return Type on a Data Source
- If you would like to change the field name enter the value in Overwrite Field Name
- Select Token – Allows you to select a defined value from within an array of data.
- To add a child field, select a field that will be the parent field and then select the Field Actions drop down and select Add Child Field
- Enter the Field Name as found in the API reference
- Set the Field Type
- Set the Grouping
- Mark Show in Data Source if you want the field to show when using this Return Type on a Data Source
- If you would like to change the field name enter the value in Overwrite Field Name
- Select Token – Allows you to select a defined value from within an array of data.
- To remove a field, select the field to be removed and then select the Field Actions drop down and select Remove Field
- Load Fields From File – This option allows you to select a JSON or XML file and import the fields rather than adding manually. You will need to go mark the Show in Data Source box for the imported fields as they will not import to show by default.
- Select a JSON or XML file that is correctly formatted with the fields needed for the Return Type.
- Add The fields that will be used in the response
Groups – Groups are used to organize your methods.
- To create a group, click the (+) on the groups tab.
- A new blank line will be added to the Group Name column. Enter your desired group name.
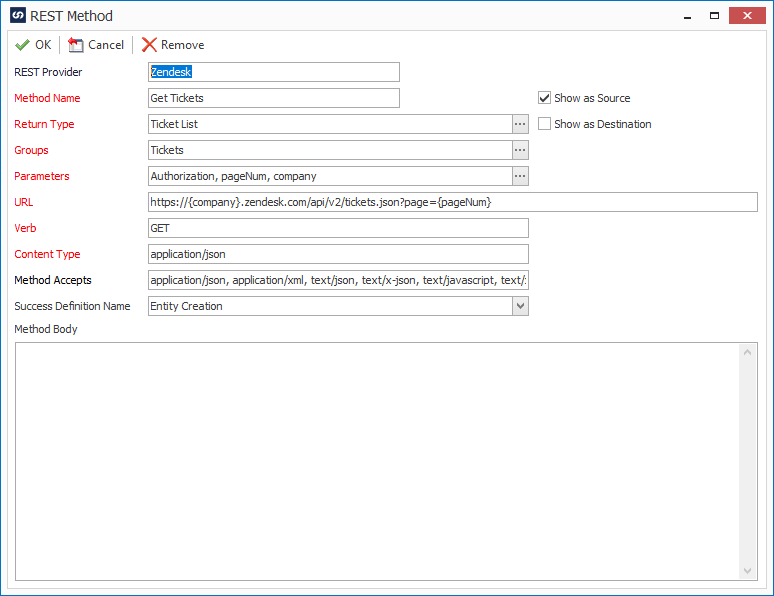
Methods – Setup methods available in the web service API being used.
- Click the (+) to start creating a new method.
- Enter a Method Name.
- Select the return type that will handle the response.
- Select the Group you would like this method to appear under in the Map Setup window.
- Select all the parameters needed for this method.
- Enter the URL for the method. You can pass parameters into the URL using curly braces. For Example, https://api.hubapi.com/contacts/v1/contact?hapikey={hapikey} will pass in the hapikey parameter value.
- Enter the appropriate verb for the method: GET, PUT, POST, PATCH or DELETE
- Enter the Content Type
- Enter the Method Accepts
- Select a Success Definition Name – Optional
- Mark Show as Source to use this method as a source or mark Show as Destination to use it as a Destination
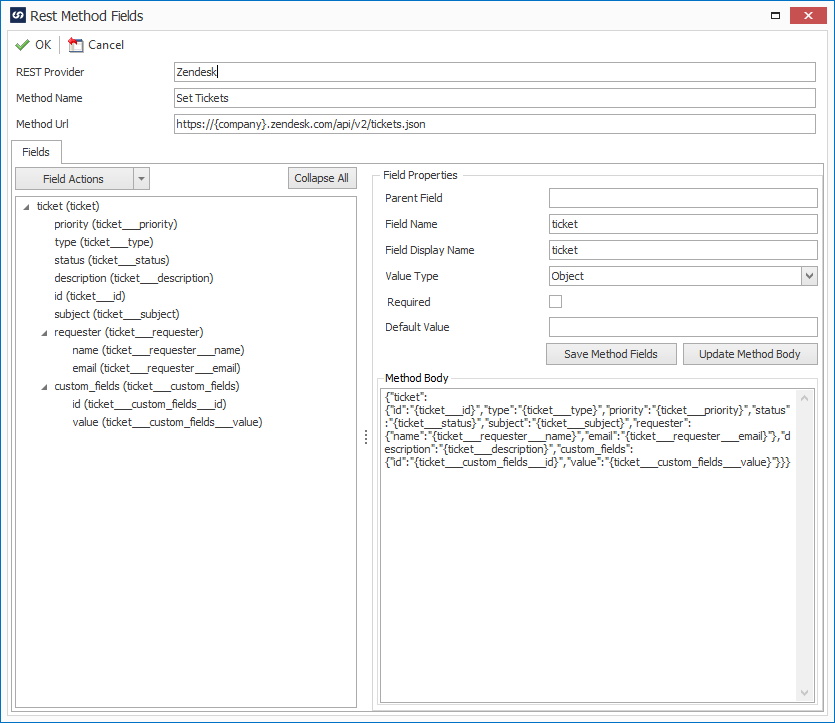
Method Fields- Add fields to the method that will be requested by the web service when creating data.
- Any methods you have created will be available on this tab. Select the method and click the Edit Fields button or double click the method name to edit the fields.
- Add fields to the method as defined in the API reference for the specific method.
- To add a parent field, select the Field Actions drop down and select Add Parent Field
- Enter the Field Name as found in the API reference
- Enter the Field Display Name
- Set the Value Type as found in the API reference
- Mark the required checkbox if the field must be submitted
- Enter a Default Value if needed otherwise the mapped value will be used
- To add a child field, select a field that will be the parent field and then select the Field Actions drop down and select Add Child Field
- Parent Field will auto populate accordingly
- Enter the Field Name as found in the API reference
- Enter the Field Display Name
- Set the Value Type as found in the API reference
- Mark the required checkbox if the field must be submitted
- Enter a Default Value if needed otherwise the mapped value will be used
- To remove a field, select the field to be removed and then select the Field Actions drop down and select Remove Field
- After adding a field click Save Method Fields then Update Method Body
- To add a parent field, select the Field Actions drop down and select Add Parent Field
- Load Fields from File – This option allows you to select a JSON file and import the fields rather than adding manually.
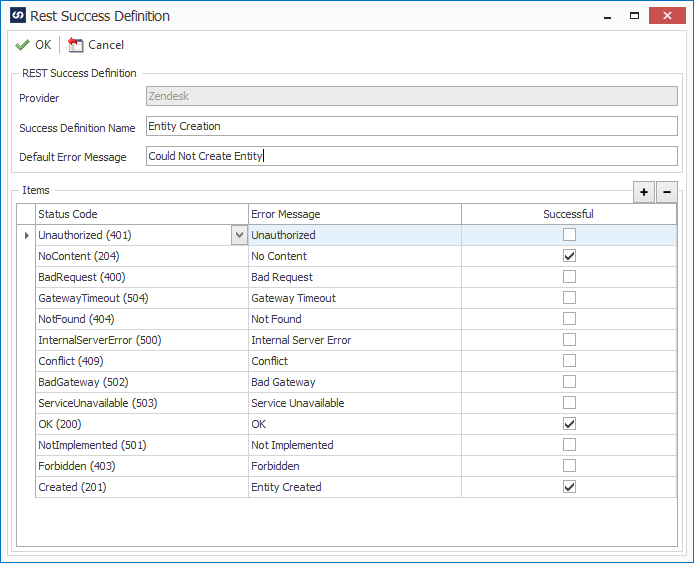
Success Definitions- Handles the response status codes for REST destinations such as OK(200), Forbidden(403), etc.
- To create a Success Definition, click the (+) on the Success Definitions tab.
- Enter a Success Definition Name – Used to select the definition for methods
- Enter a default error message. This is the error that will be displayed if an error is encountered that has not been defined.
- Click the (+) button to add status codes.
- Select a Status Code
- Enter the Error Message you would like to display when the status code is received.
- Mark the Successful box if you want the map to report success when the Status Code is received.