
NOTE: SuiteSignOn is no longer supported by Netsuite and is not an available authentication type in SmartConnect. Token Based Authentication will be the only option, so any existing connections will need to be changed to Token Based Authentication.
Setup for Token Based Authentication
- Enable Token Based Authentication
- In NetSuite, Navigate to Setup>>Company>>Enable Features. Click the Suite Cloud tab and go to the Manage Authentication Section.
- Select the TOKEN-BASED AUTHENTICATION Box and Save.
- Setup an integration
- In NetSuite, navigate to Setup>>Integrations>>Manage Integrations>>New
- Name the integration.
- Check the box for TOKEN-BASED AUTHENTICATION.
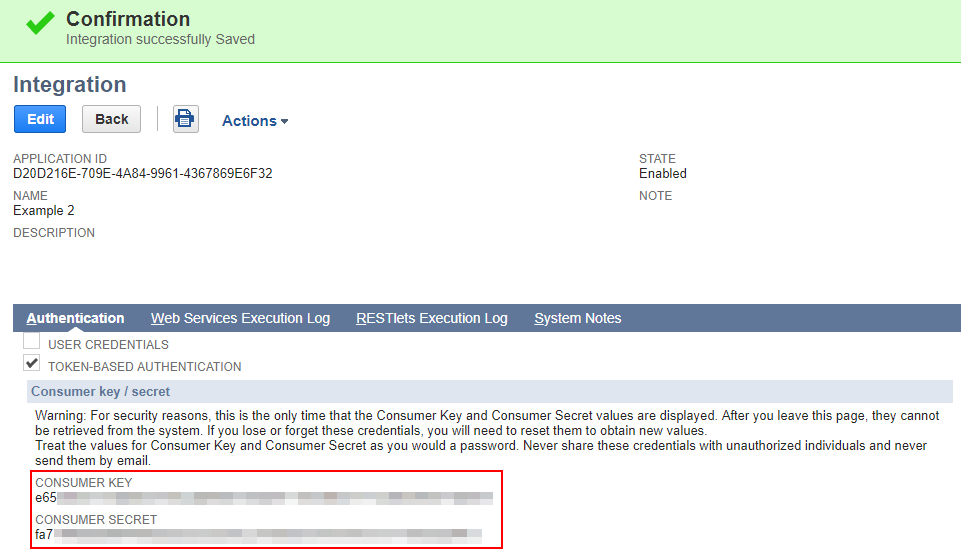
- Save the integration. This will create a CONSUMER KEY and CONSUMER SECRET that will only be displayed one time, so save them now. You will need both later in SmartConnect.
- Create an Access Token. To create an access token, we need to setup a role and assign the role to a user.
- To create a new role or update an existing role, navigate to Setup>>User/Roles>>Manage Roles.
- Click the New Role button or edit an existing role if you have one setup that you would like to add token-based authentication to.
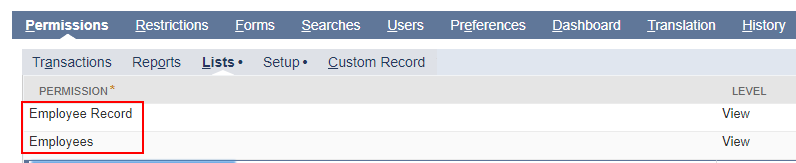
- You can setup the role as needed, but you need to make sure to add the Employee Record and Employees under Permissions>> Lists and the User Access Tokens, SOAP Web Services, and REST Web Services under Permissions>>Setup. These are the minimum permissions needed to be able to setup the connector. You will need additional permissions in place in order to query role categories/types depending on your specific needs.

-
-
- NOTE: If the SOAP and REST Web Services options are not showing, then they will need to be enabled. Go to Setup>>Company>>Enable Features. Then click on the SuiteCloud tab. Both options should be checked like below.
-

-
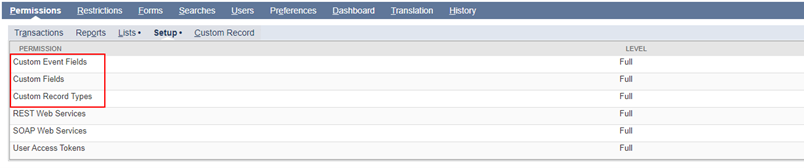
- If custom fields are to be used with SmartConnect, additional setup permissions will need to be added. Add Custom Even Fields, Custom Fields, and Custom Record Types to the Setup tab under Permissions.
-
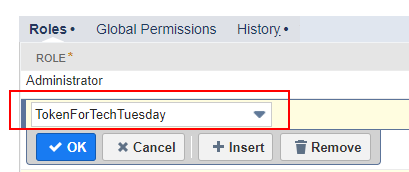
- Add this role to a user by navigating to List>>Employees>>Employees>Edit on desired user. Click on the Access tab, then the Roles sub tab.
-
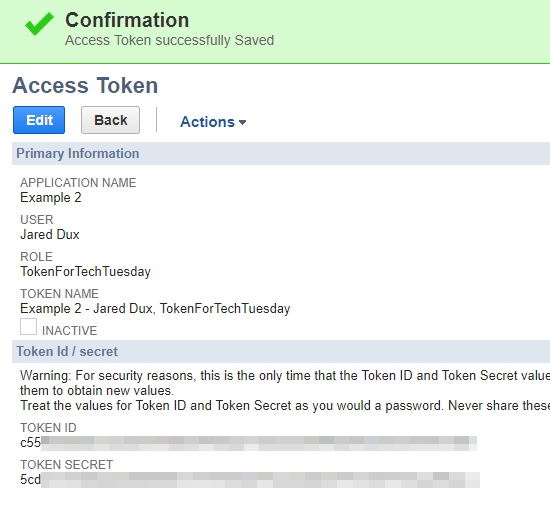
- Generate the Access token by navigating to Setup>>Users/Roles>>Access Tokens>>New. Choose the Application Name that was created in Step 2, select the user we assigned the role to, and choose the role.
- Click Save and a this will create a Token and Token Secret that will only be shown once, so save them now. You will need both later in SmartConnect.
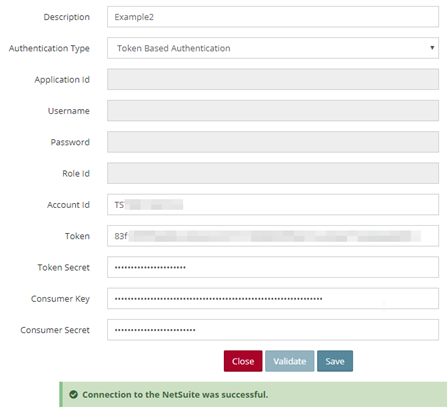
- Setup a NetSuite connector in SmartConnect.com using Token Based Authentication.
- In SmartConnect, navigate to Connections>>Create Connection>>NetSuite
- Name the connection and choose Token Based Authentication.
- Enter the information we gathered in the previous steps and click Validate. Note: Your Account Id can be found in NetSuite by navigating to Setup>>Company>>Company Information.
This connector can now be used for sources and destinations in SmartConnect.com. With this authentication type you will be able to make five connections to NetSuite at a time. If the user access tokens are active, this connection will work, even if the user needs to change their password due to a password policy.
Have questions? Feel free to reach out to us at sales@eonesolutions.com