Within the SmartConnect executable folder, there is a wonderful tool called eOne.SmartConnect.Config.exe. This tool allows for corrections to the SmartConnect configuration file. By default, the SmartConnect configuration file is encrypted so we cannot manually modify it and this utility gives us that option.
Typical Situations
Here is a list of typical items the Configuration Utility will help resolve
- Incorrect SmartConnect SQL User password
- If the wrong password was used during installation
- If the SmartConnect SQL password has been changed
- Using a test and production instance on the same machine. This has already been documented in this blog article, Setup SmartConnect to use a Production and Test database.
- Incorrect SmartConnect SQL Server or changed SQL Server typically after an upgrade or server move
Usage
To use the SmartConnect Configuration Utility, browse out to the SmartConnect program folder which is defaulted to C:Program Files (x86)eOne SolutionsSmartConnect.
Right Click on the eOne.SmartConnect.Config.exe and select ‘Run as Administrator’. If you do not run as administrator, you will not be able to save changes to the configuration.
The Configuration window will open as empty as shown below.
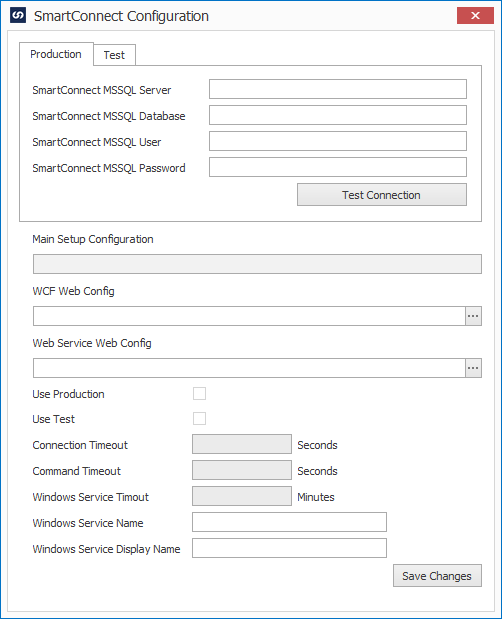
We will now need to fill in the information into the top part of the window and click Test Connection to validate the SmartConnect instance.
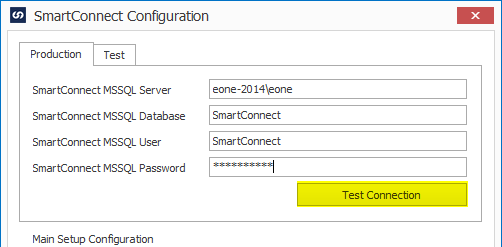
- SmartConnect MSSQL Server – The Microsoft SQL Server where the SmartConnect database lives
- SmartConnect MSSQL Database – The name of the SmartConnect database created during installation
- SmartConnect MSSQL User – The name of the SmartConnect SQL User created during installation.
- SmartConnect MSSQL Password – The name of the SmartConnect SQL User Password created during installation
If any of this information is incorrect, we will receive the error: ‘Failed to connect to the SmartConnect database, please check the entered credentials and try again.’

To verify the right information is being entered, use the same credentials in SQL Server Management Studio.
SmartConnect SQL User
The SmartConnect SQL user is not a Windows Domain user but is always a SQL user. Users would have been entered during SmartConnect install the first time SmartConnect is installed.
The SmartConnect SQL user is the db_owner of the SmartConnect database.
If this user is not known, open SQL Management Studio and navigate to the SmartConnect database. Expand the nodes to the Users and determine which user is the db_owner.
NOTE: Passwords with a semi-colon will not be able to log into this window.
SmartConnect User Password Is Unknown
There are some instances where the SmartConnect SQL user password is not known.
The only method to resolve this issue, is to open SQL Management Studio and change the SmartConnect User password and then enter on this window.
Then follow the steps below under Additional ServerWorkstation Installations to update other SmartConnect installs with the new password.
Settings
Once we have entered the right connection information, the current settings from the Configuration file will be displayed.
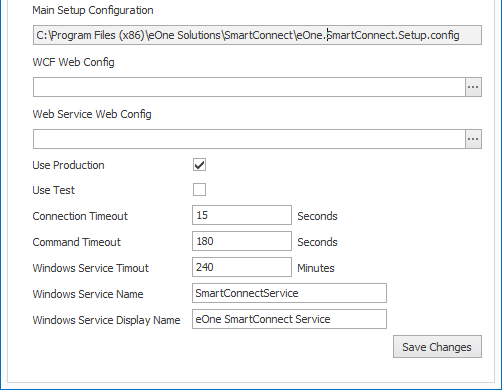
- Main Setup Configuration – The file being changed when clicking the Save Changes Button
- WCF Web Config (if installed on this machine) – The WCF Config file to be updated when clicking the Save Changes Button
- Web Service Web Config (if installed on this machine) – The Web Service Config file to be updated when clicking the Save Changes Button
- Use Production – When the SmartConnect Windows Service is being used on this machine, use the production settings
- Use Test – When the SmartConnect Windows Service is being used on this machine, use the production settings
- Connection Timeout – Time allowed for SmartConnect to connect to the SmartConnect Database or Dynamics GP Database, if applicable.
- Command Timeout – Time allowed for SmartConnect to execute a SQL process, whether read or write.
- Windows Service Timeout – Time allowed for long running maps to be processed by the windows service schedule.
- Windows Service Name – Name of the SmartConnect Windows Service (Scheduler)
- Windows Service Display Name – Display Name of the SmartConnect Windows Service (Scheduler)
WCF Web Config
If the SmartConnect WCF Web Service has been installed on this machine and any of the connection information needs to be updated, you can update the web.config by selecting it in the WCF Web Config path.
![]()
The typical install location will be C:Program Files (x86)eOne SolutionsWcf
Select the web.config
Clicking the Save Changes Button will update this file as well.
Web Service Web Config
If the SmartConnect WCF Web Service has been installed on this machine and any of the connection information needs to be updated, you can update the web.config by selecting it in the Web Service Web Config path.
![]()
The typical install location will be C:Program Files (x86)eOne Solutionswww
Select the web.config
Clicking the Save Changes Button will update this file as well.
Additional Workstation/Server Installations
If SmartConnect is installed on additional servers or user workstations, you can either repeat the same steps on those installs or you may simply grab the eOne.SmartConnect.Setup.config and copy it to the SmartConnect folder. Copying the file will most likely require administrative privileges.
Copying setup.config file will not update the web.config files where the web services may be located. Use the SmartConnect Configuration Utility Interface to update the Web Service files as discussed above.
If you have any more questions, feel free to reach out to us at sales@eonesolutions.com