
In a previous column, I had discussed how we could change the column names of the text output file that SmartConnect had created.
The main reason that we would want to do this is if the output file required specific column names and SmartConnect was changing them due to source column naming conventions that SmartConnect uses.
Because SmartConnect does not explicitly let us set the column names, the workaround to the previous issue was to use a map “post” task to read the destination file, change the column names, and then re-write the output file. That worked well and I know that I’ve referred SmartConnect users to this blog article more than a few times.
This last week, I had another user with the same issue. But this time the output file was an Excel file which isn’t as easily manipulated. To start off this example, we will use the same Customers.xlsx file that was used previously. We can see that we still have the same source column name as previously.
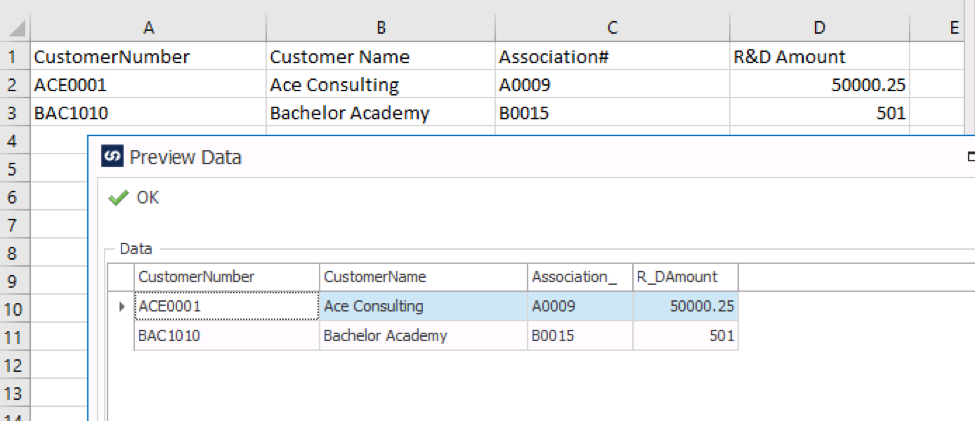
Figure 1: Input source columns are renamed
The space, pound sign, and ampersand are all replaced or removed.
Like before, the goal is to have our output file columns named exactly this.
Now I do realize in this example I am going to take an Excel file and then export it to another Excel file which isn’t something you typically would do. I just wanted to use the same source file for continuity but the source could be anything that SmartConnect would support as a data source.
I thought that this time we would make it a bit more interesting and have SmartConnect append the Current Date & Time to the file name. Also, we won’t hard code our file name, we’ll let our customization get that for us and use it as part of the column renaming.
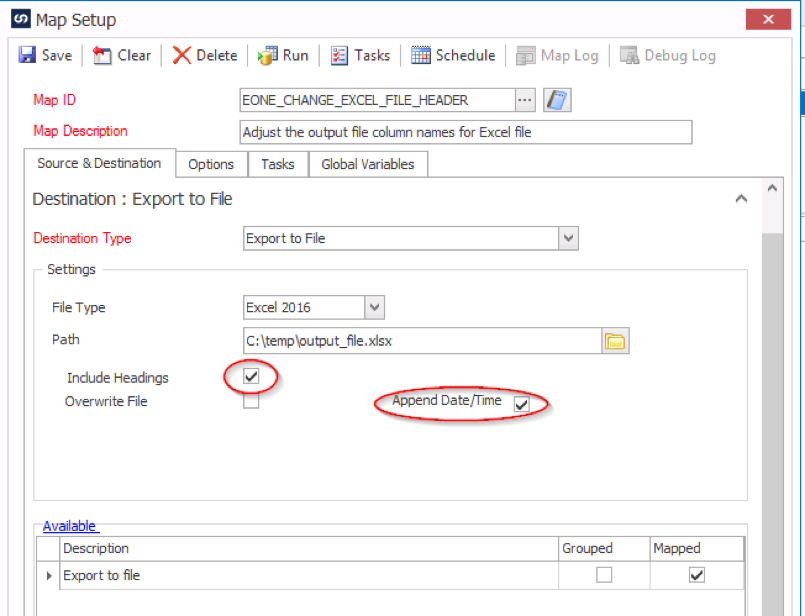
Figure 2: Have SC append the date and time
The first step is that we’ll need to know our output file “base” name.
The easiest way to do this is to use a SQL Task on the map “After Map Success” task. We could do this in a VB script but it is a bit more work to make the connection and pull the data, much simpler to let SmartConnect do the work for us.
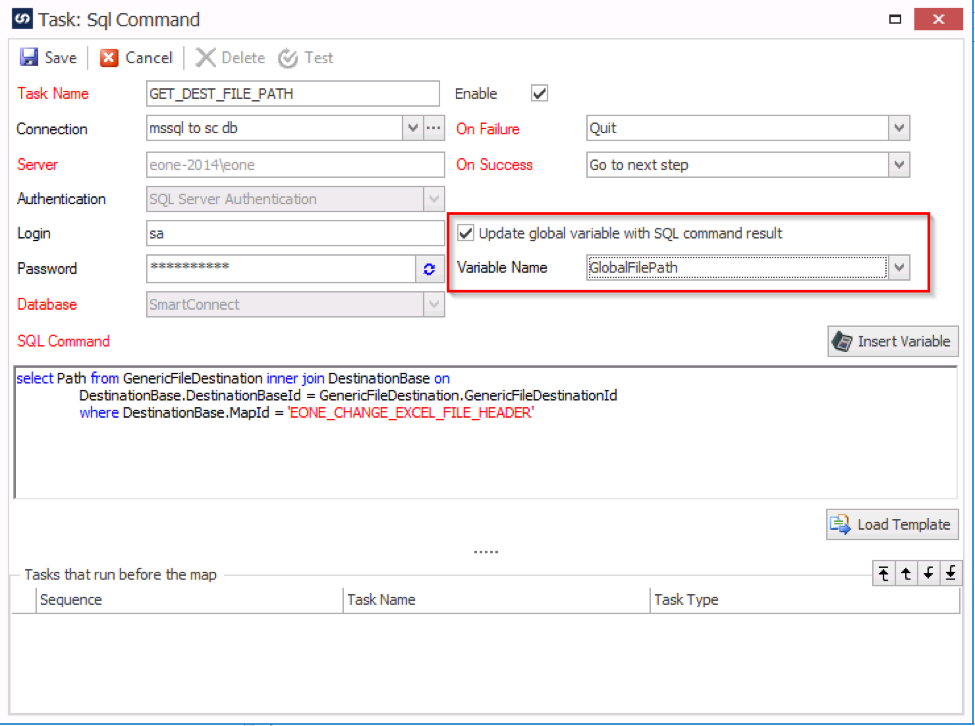
Figure 3: Find the select output file name
The script is:
Select Path from GenericFileDestination inner join DestinationBase on
DestinationBase.DestinationBaseId = GenericFileDestination.GenericFileDestinationId
where DestinationBase.MapId = ‘EONE_CHANGE_EXCEL_FILE_HEADER’
Also, notice that I marked SmartConnect to put the file name in a global variable for us – GlobalFilePath.
Once we run the map, we now know the “base” name and path that the output file will be. But we’ll also need to know the date & time stamp that SmartConnect uses to read that output file.
The “trick” for this is knowing that the datetime stamp on the file output name is the End Time of the map as shown in the Progress window (or the logs).
Figure 4: VB task to fix output columns
This task will run after our SQL Command task since we rely on the other task to populate the GlobalFileName so that we can parse it in this script.
The complete text of the method with comments is:
dim filenameOnly as string
dim extension as string
dim destpath as string
dim NewOutputFileName as string
dim endDateTime as date
Dim xlApp As Object
Dim xlWorkBook As Object
Dim xlWorkSheet As Object
‘get the base path, file name, and extension from the global that SQL Task populated
filenameonly= Path.GetFileNameWithoutExtension(GlobalFileName)
extension = Path.GetExtension(GlobalFileName)
destpath = Path.GetDirectoryName(GlobalFileName)
‘let VB implicitly convert the End Date from the system into a date field
endDateTime = GlobalRunEnded
‘Get the output file name that SmartConnect exported to using
‘new file output name with timestamp added
NewOutputFileName = destpath + “” +
filenameonly + “_” +
endDateTime.tostring(“yyyy-MM-dd_hh-mm-ss”) +
extension
‘messagebox.show(NewOutputFileName)
‘use COM automation from VB to open the file and sheet.
‘then rename columns 1 to 4. Wouldn’t have to for first cell
‘since name is OK but just did it for consistency
xlApp = Microsoft.VisualBasic.CreateObject(“Excel.Application”)
‘xlApp.Visible = True
xlWorkBook = xlApp.Workbooks.Open(NewOutputFileName)
xlWorkSheet = xlWorkBook.Worksheets(“sheet1”)
xlWorkSheet.Cells(1, 1) = “CustomerNumber”
xlWorkSheet.Cells(1, 2) = “Customer Name”
xlWorkSheet.Cells(1, 3) = “Association#”
xlWorkSheet.Cells(1, 4) = “R&D Amount”
‘finally close the workbook
xlWorkBook.Save()
xlWorkBook.Close()
xlApp.Quit()
return true
Running the map and then examining the output, we see:
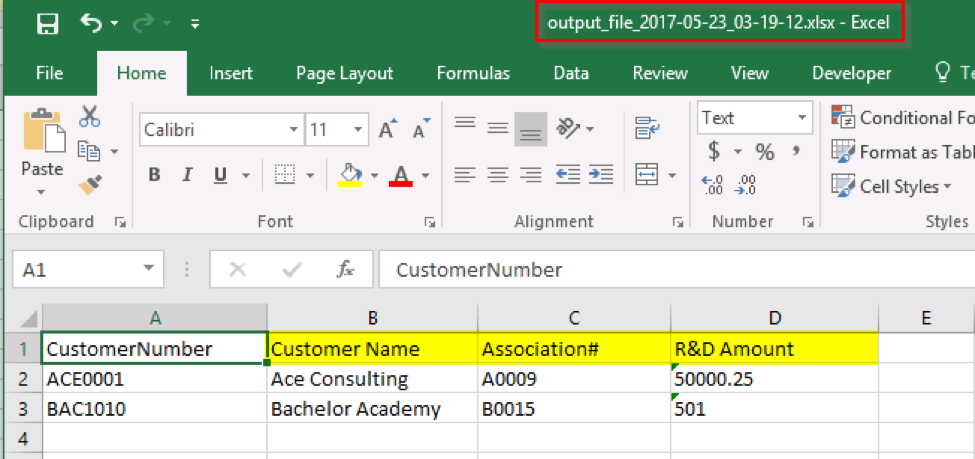
Figure 5: Fixed output file
Because we started with an Excel file with these headers, the reader might question whether this worked or not. However, we can see that the name of the file did get set by SmartConnect that this is truly the output file created by SmartConnect and that our code worked as expected.
To recap, a couple of things we learned in this blog article.
- It is possible to adjust/fix the column names in an Excel Output File
- We discovered how the SmartConnect gets the date and time of anywhere in SmartConnect where it automatically appends the datetime to something.
You can download a zip file with the files used for this map HERE.
Best Regards,
Patrick Roth
eOne