
One feature that has been asked for by customers is the ability to specify column names when using the Export to File feature.
By default, as of the latest SmartConnect 20.16.0.31, when exporting to a file is that the source file column names will be used as the output column names. This issue is potentially compounded by the fact that SmartConnect will replace “odd” characters in the source file column names with underscores.
So for example, if we use an Excel source file formatted this way:
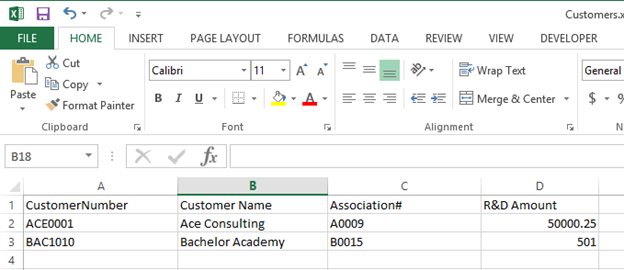
Figure 1: Header row naming issues for SC
Notice spaces in Column B, the pound symbol in C, and the ampersand in D.
When we preview the data in SmartConnect, we can see that SmartConnect replaces those characters.
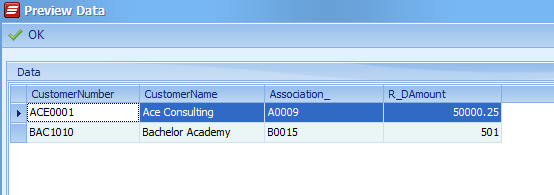
Figure 2:Spaces removed and characters replaced with underscores
And as anticipated, if we use Export To File, the names we see in the Preview Data window are used as the output column header names.
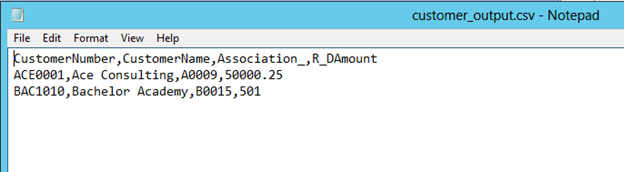
Figure 3: Output file with “wrong” headers
While that usually isn’t an issue, if this file has to be brought into an external system as-is, now the columns aren’t named what we need them to be in the output file.
Because we cannot directly configure the column names, the easiest way to make this work is to use a “Tasks that runs if the map succeeds” task script.
In the below screenshot, we see the code window that has the code to do make this happen.
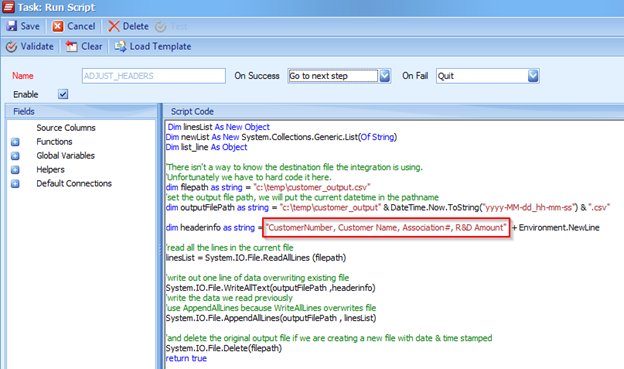
Figure 4: Map success script
Looking at the code it:
- Sets the input file path and the output file path. There aren’t variables in SmartConnect to let us know the output file pathname so we have to hard code it in the map.
In this example, I have chosen to timestamp the file with the current datetime. - Next, we define the column names that we want to use. Note that the names are the same ones from the original Excel source file.
- Then it reads all the lines from the original source file. Doing it this way might take up a big chunk of memory if your original output file is very large – but it is a very easy line of code to write to do this.
- From there, we write the Header line to the file that we want to be the new output file. If we use the filepath variable we would overwrite the existing source file (which is fine if you want it named that way).
- Next once we have that header piece written, then write all of the data lines into that same file.
- Lastly, we delete the original source file so we just have the new output file.
At this point, the new output file with the correct column headers will exist and the original file will have been removed.

Figure 5: New output file with the correct headers
I would encourage my readers to vote for the suggestion to let us set the column names in SmartConnect. But until then, this method does work nicely and is pretty easy to do – especially since I did the hard work already.
Now you might notice that I didn’t address the situation if the Export To File option is set to “Excel 20XX”. That also comes up from time to time and is an interesting problem since we can’t just “read/write” like we can with the flat text file as this example uses.
You can download a zip file with the files used for this map HERE.
But that will have to be a topic for another day!
Patrick
eOne