
While SmartConnect has several default connectors for Microsoft Dynamics GP, Microsoft Dynamics CRM and Salesforce.com there are many more connections that can be created using an ODBC Data Source. Within the SmartConnect User Interface several ODBC connections have been listed by default as examples that can be used in SmartConnect.
We are going to look at creating a data source to a MySQL database using the ODBC Connection type in SmartConnect but the same process will be applicable to connecting to Oracle or DB2 or Sybase or any other software application that uses an ODBC driver.
Setup ODBC DSN
We are going to assume that your MySQL system is set up and running properly before making a connection from SmartConnect.
The main component needed for connecting to this type of Data Source in SmartConnect is the ODBC Driver for the source application on each machine where the SmartConnect integration will be running. The MySQL ODBC Driver is included as part of the MySQL install application but you need to make sure it is selected or check the MySQL website to determine if there is a separate install for just the ODBC Driver. Be sure to download and install the 32-bit version of the ODBC driver as SmartConnect is a 32-bit application and will only use the 32-bit driver.
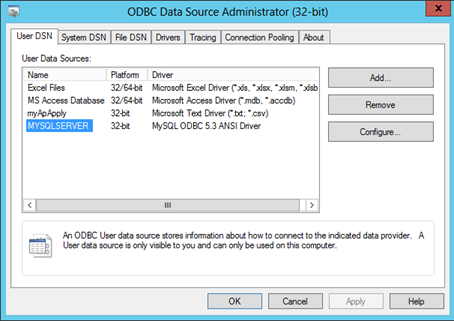
Once installed on a machine, we need to setup the ODBC Source as a User DSN. Follow this link MySQL ODBC Setup to connect to your MySQL Database. These steps will need to be followed on each SmartConnect machine including the Scheduling Server and Web Server, if applicable. I have named mine MYSQLSERVER.
Map Setup
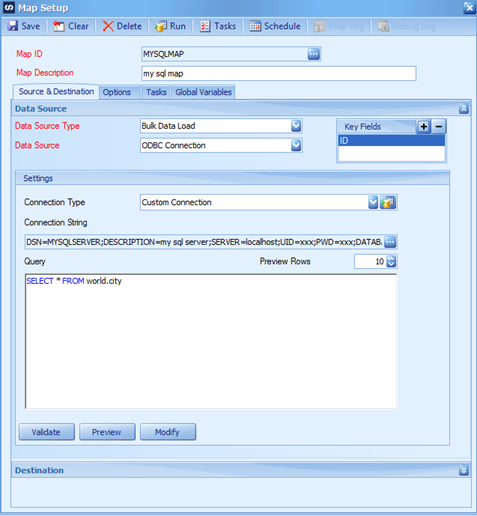
Now we can go into SmartConnect and create our data source. The Data Source Type will always be Bulk Data Load and the Data Source will be ODBC Connection.
We’ll start by choosing a connection type of Custom Connection, however, you can define a default ODBC Connection by going to Maintenance->ODBC Data Source->Add and setting up a connection that everyone would use.
Click on the Connection String lookup button. Scroll down to the “Select a DSN” option and double-click to select it.

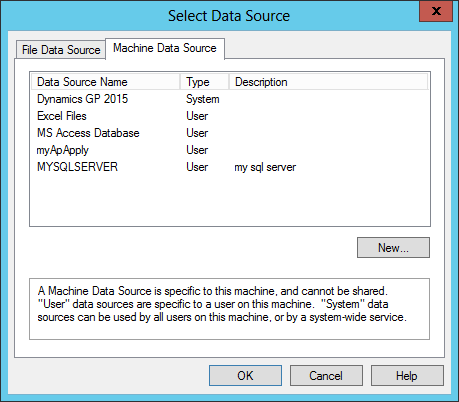
This will open the Select Data Source window. Click on the Machine Data Source tab to view the available ODBC Data Sources, one of which should be our MySQL DSN. Highlight the correct DSN and click OK. This will open the MySQL Connector Configuration window allowing you to make sure the connection information is correct. Click OK to use the current settings.
Data Source Query
Now that we have our connection, we need to write the Query to retrieve the data. While there are a set of standard SQL statements for ODBC sources, some applications have their own syntax so you will want to review the applications documentation. Here is a link to the MySQL documentation, MySQL SQL Statement Syntax.
I have a simple select statement to grab all data from the city table which is in the world schema.
You can click on the Modify button to open the graphical interface for generating the SQL statement, however it will only show tables from the default schema. If the table you need is not available the SQL statement will have to be written manually.
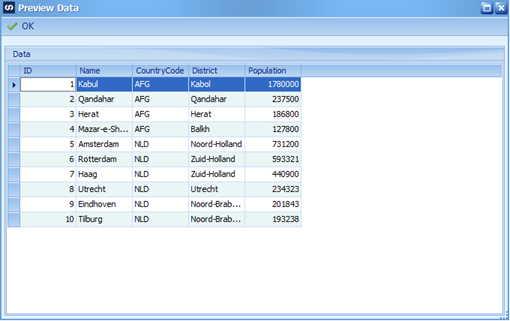
Click on the Preview button to make sure your SQL statement pulls back the desired data.
Finishing the integration is the same as any other map that has been created. Set your Key Fields, choose your destination and map the source columns to the destination columns.
Destination
Suppose you want to update the data in your MySQL database or other non-Microsoft SQL Server database. This requires a little more technical work as SmartConnect does not have a destination type of ODBC, however that does not mean we can’t update an ODBC enabled database. It does require the ODBC driver being used to have the capability to write data using .NET.
Create your map by defining your datasource and destination as usual. What is different from a typical SmartConnect integration is that since my final destination is really a table in MySQL, I am going to export the SmartConnect data to a CSV file that will be overwritten each time the map executes. I could technically pick any destination but the export option is quick and easy to create.
Then, I will then create a Run Script Task on Document Success to update MySQL.
Obviously this will require knowledge of .NET coding to be able to write the necessary logic for updating an ODBC connection.
I created a table called customers in the world schema that I am going to update as each document is successfully sent to the destination. Note, this will only work if there is one record per Key Field in the data source, as in my example, I only have one source record per customer.
Here is the actual code that I used as an example to update my fields in the MySQL database from the Dynamics GP Customer (RM00101) table.
I am using a default ODBC connection that I created called mysqlConnection_Default. This connection is available for any script by expanding the Default Connections->Generic Connections->ODBC Connections.
Here is the VB.NET version of the code.
Dim connectionstr as string = _GODBC_mysqlConnection_Default
Dim sqlconn as new System.Data.Odbc.OdbcConnection(connectionstr)
Dim sqlCommand as new System.Data.Odbc.OdbcCommand()
Dim sqlCode as string
sqlCode = “insert into world.customers (idcustomers, customer_number, customer_name, customer_class) ”
sqlCode = sqlCode & “VALUES (‘0’, ”
sqlCode = sqlCode & “‘” & _CUSTNMBR.Trim() & “‘, ”
sqlCode = sqlCode & “‘” & _CUSTNAME.Trim() & “‘, ”
sqlCode = sqlCode & “‘” & _CUSTCLAS.Trim() & “‘); ”
try
sqlconn.Open()
sqlCommand.Connection = sqlconn
sqlCommand.CommandText = sqlCode
sqlCommand.ExecuteNonQuery()
catch ex as Exception
MessageBox.show(ex.ToString())
return false
end try
return true
Here is the C# version
string connectionstr = _GODBC_mysqlConnection_Default;
System.Data.Odbc.OdbcConnection sqlconn = new System.Data.Odbc.OdbcConnection(connectionstr);
System.Data.Odbc.OdbcCommand sqlCommand = new System.Data.Odbc.OdbcCommand();
string sqlCode = null;
sqlCode = “insert into world.customers (idcustomers, customer_number, customer_name, customer_class) “;
sqlCode = sqlCode + “VALUES (‘0’, “;
sqlCode = sqlCode + “‘” + _CUSTNMBR.Trim() + “‘, “;
sqlCode = sqlCode + “‘” + _CUSTNAME.Trim() + “‘, “;
sqlCode = sqlCode + “‘” + _CUSTCLAS.Trim() + “‘); “;
try {
sqlconn.Open();
sqlCommand.Connection = sqlconn;
sqlCommand.CommandText = sqlCode;
sqlCommand.ExecuteNonQuery();
} catch (Exception ex) {
MessageBox.show(ex.ToString());
return false;
}
return true;
The MessageBox.Show command is optional as you may not want to display an error for every single record in the data source especially if the integration is running on a schedule.
When the map executes, it creates a CSV file with my data and inserts each record into the MySQL customers table.
This method can be used for any ODBC Database to read and write data apart from the basic connectors provided in SmartConnect.
Default ODBC Data Source
As a last note, I mentioned earlier that you can create a default ODBC Data Source connection that would be available to any mapping or scripting you need.
One advantage of creating the default connector is that if there is ever a change needed to that connection, it only needs to be done in one location and not on each individual map. The other advantage is that it allows for security by ensuring only the user who should have the connection password sets up the connection one time.
You can create as many ODBC Data Sources that are needed by going to the Maintenance menu and clicking ODBC Data Source and then Add.
Provide a name for the connection, click on the Connection String lookup. On the Connections window, scroll down and choose “Select a DSN” to open the Data Source window to pick your predefined ODBC Data Source.
Once created, this Source will be available when selecting the ODBC Data Source Connection, Calculated fields as a connection and Script Tasks as a default connection.
EDIT: 10/19/20 PTR Updated a few link URLs
