Troubleshooting a Salesforce Realtime Trigger can be difficult because we can’t manually run the integration. This article will serve as a guide of steps that can be followed to troubleshoot a Salesforce Realtime data source integration that doesn’t run when expected.
1. Setup SmartConnect Error Logs
We will start be enabling and checking the SmartConnect error logs.
- Check that Errors are being saved by the integration
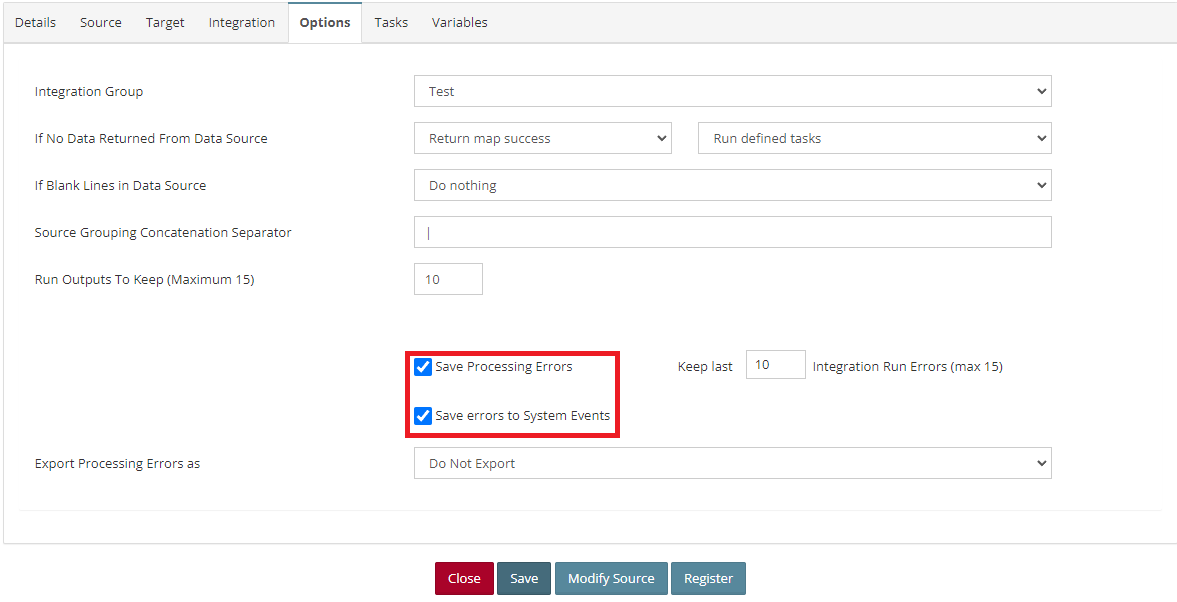
- Open Processes > Integration Processes
- Click Modify on the Realtime integration
- Navigate to the Options tab
- Make sure both Save Processing Errors and Save errors to System Events are checked
- Click Save
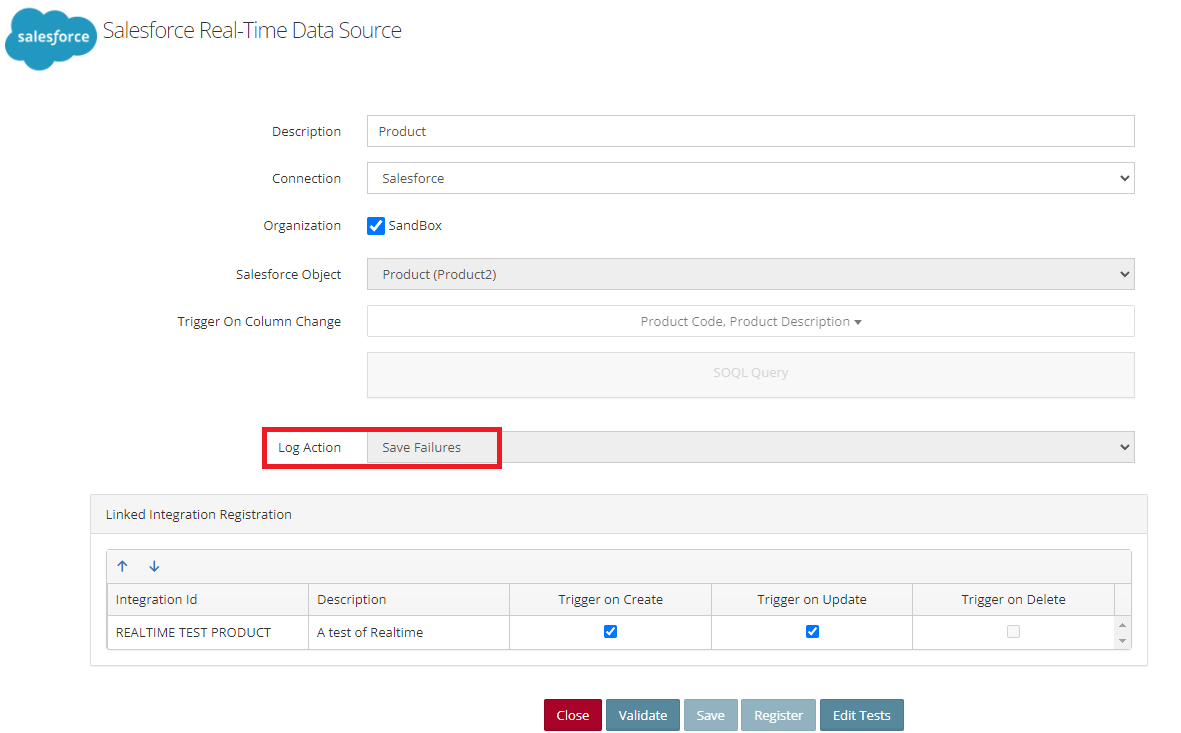
- Check the Log Action is set on the Realtime data source
- Navigate to Data Sources > Realtime Triggers
- Edit the Realtime data source
- Set the Log Action to Save Failures
- Click Validate
- Click Save
- Click Register
2. Run a Test
Now that we have verified all the logging settings are configured, we’ll run a test change and check the logs.
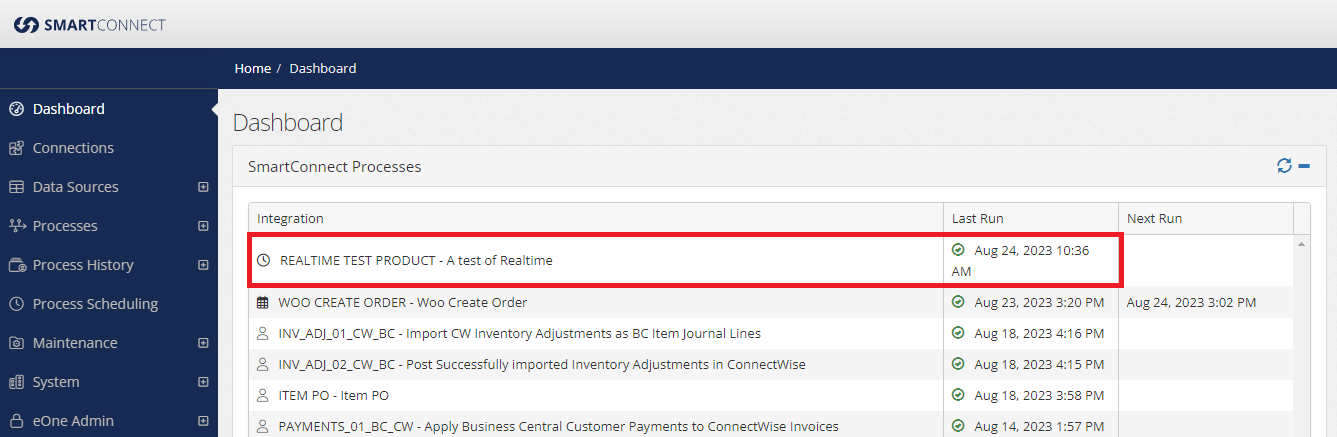
- Log into Salesforce and make a change that should trigger the Realtime integration.
- Next, switch to SmartConnect and open the Dashboard and monitor for the integration run. (it should show in the list within 1 minute)
- If the run doesn’t show on the dashboard proceeded to step 3. Remote Site Settings.
- If the integration completes successfully, but no data is sent to the integration target, check the following.
- Open Processes > Integration Processes
- Click Modify on the Realtime integration
- Navigate to the Target tab
- Make sure the target tenant selected is the correct one
- Navigate to the Integration > Restriction tab
- Check for a restriction that is preventing this record from being sent to the target

- If the integration fails check the following.
- Open Processes > Error Processing
- Locate the Realtime integration in the list and expand the run errors
- Click Edit on the top error
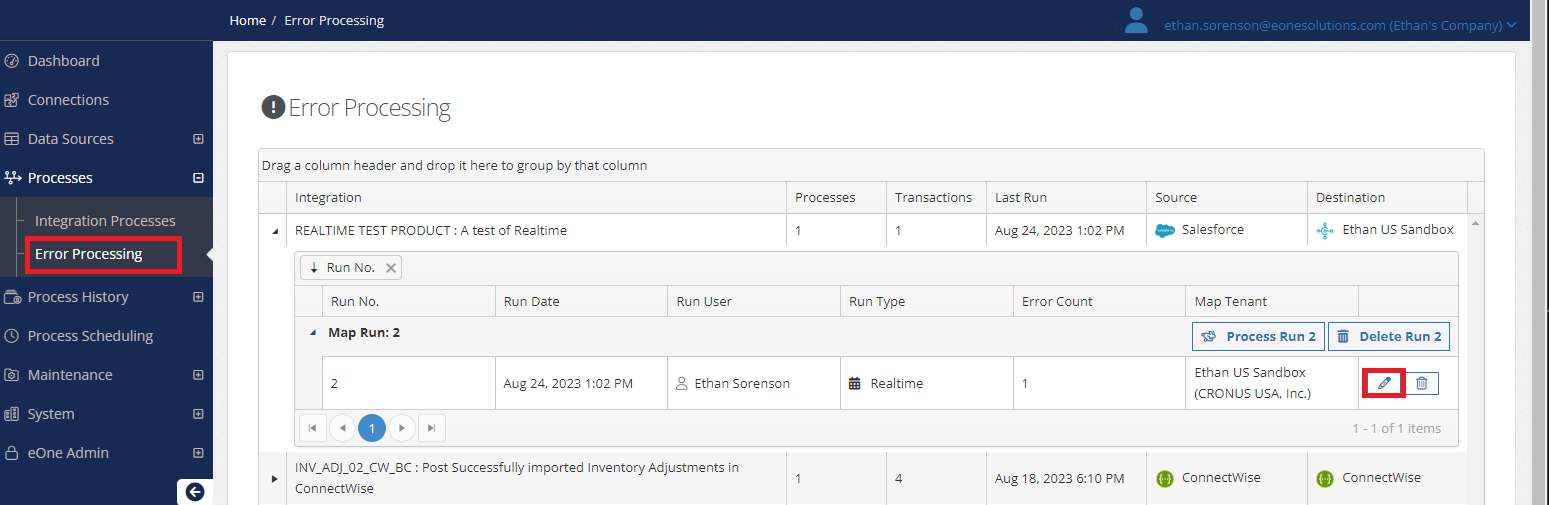
- In the Process Errors window, click on the Red (!) button to view the error message
- If possible, resolve this error and run another test

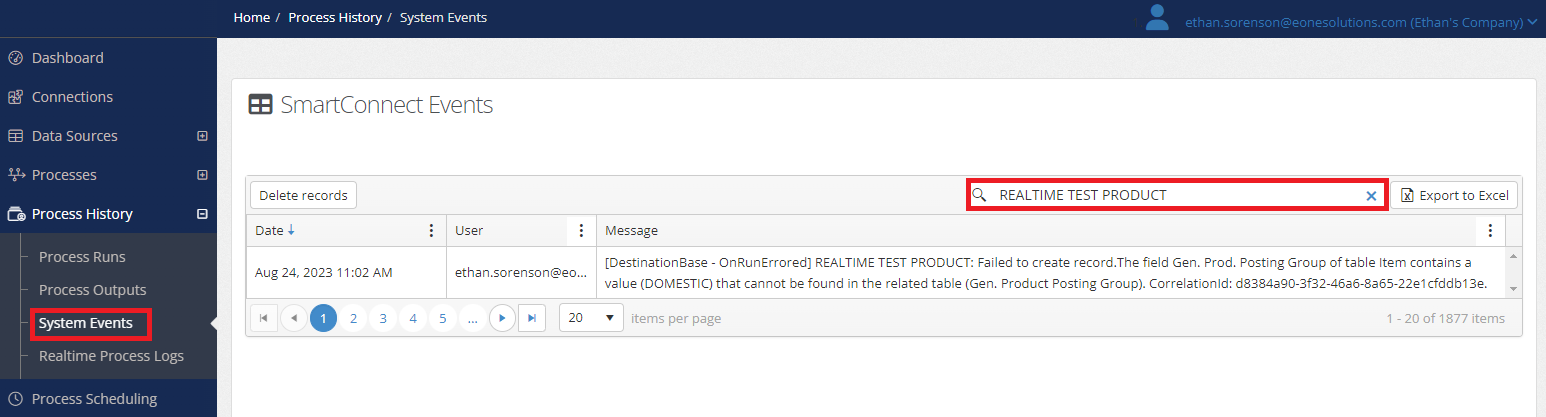
- Another place to check is Process History > System Events
- Search for the Integration Process Id
- This will show all errors related to the process, including scripting errors
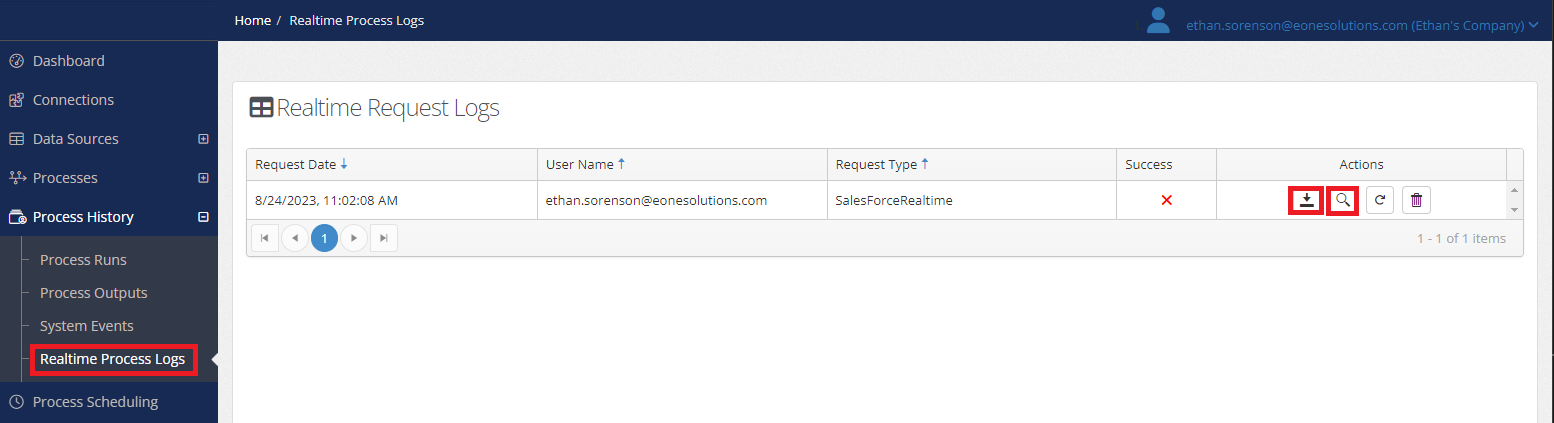
- Finally, we can check Process History > Realtime Request Logs
- Click on the Magnifying glass icon for the record that failed
- This will show the formatted data set received from Salesforce
- Click the Download icon for the record that failed
- This will download the raw data received from Salesforce
3. Check Salesforce Remote Site Settings
Check the Remote site settings in Salesforce as shown in this Help Article.
4. Check Salesforce Triggers
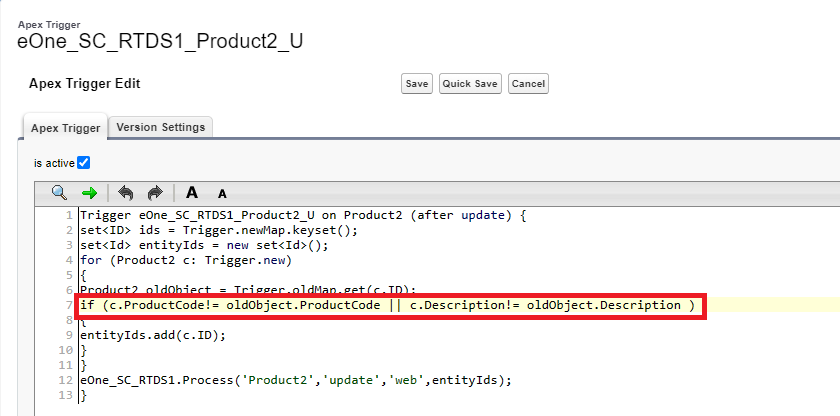
Next, we will check in Salesforce to make sure the Apex trigger exists and it is tracking the correct fields.
- Log into Salesforce > Setup
- Search for Apex Triggers
- Locate the Apex Trigger for your object and click Edit
- All eOne triggers start with the prefix eOne_SC_RTDS1_
- The trigger suffix of either I or U for Insert and Update respectfully

- If your trigger does not exist, proceed to step 5. Reregister Realtime Triggers.
- In the Trigger check Line 7 this should contain the field you are modifying. If your field is not on this line, proceed to step 5. Reregister Realtime Triggers. If your field is on line 7, proceed to 6. Check SOQL Query
5. Reregister Realtime Triggers
We may need to register our trigger again if the trigger does not exist in Salesforce or is out of sync with the setup in SmartConnect.
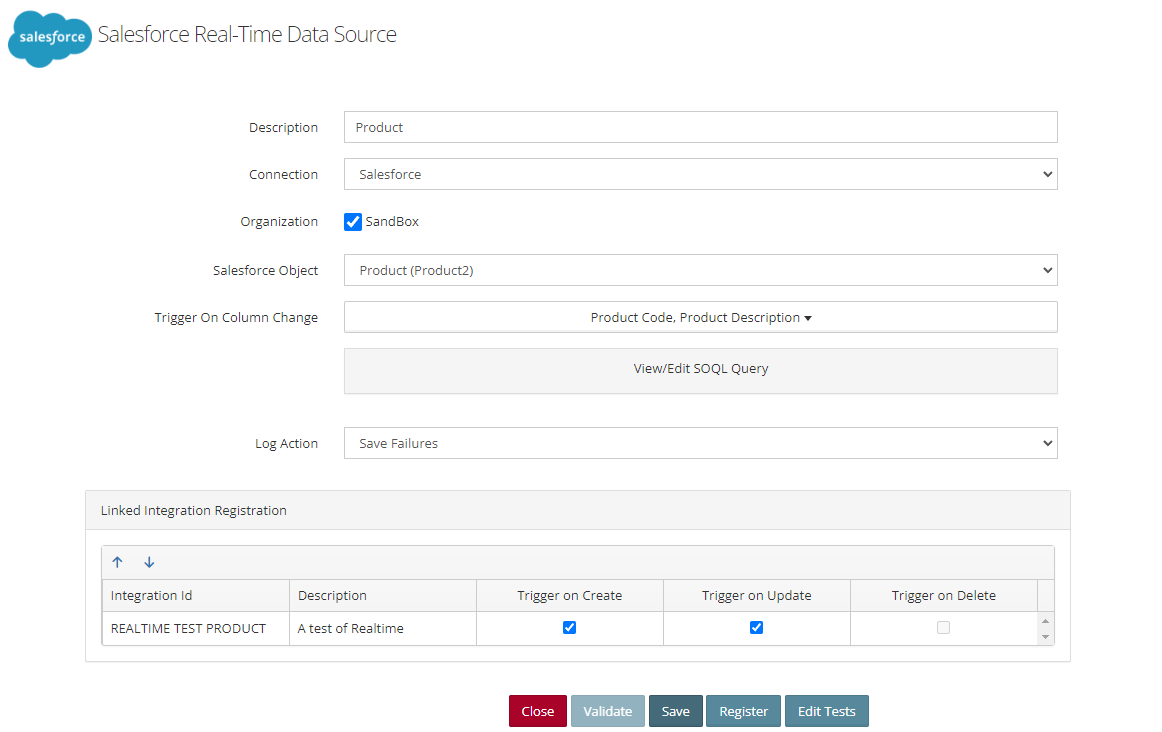
- Navigate to Data Sources > Realtime Triggers
- Edit the Realtime data source
- Uncheck the Trigger on Create and Trigger on Update check boxes
- Click Validate
- Click Save
- Click Register
- Recheck the Trigger on Create and Trigger on Update check boxes
- Click Register
- Run another test from step 2. Run a Test
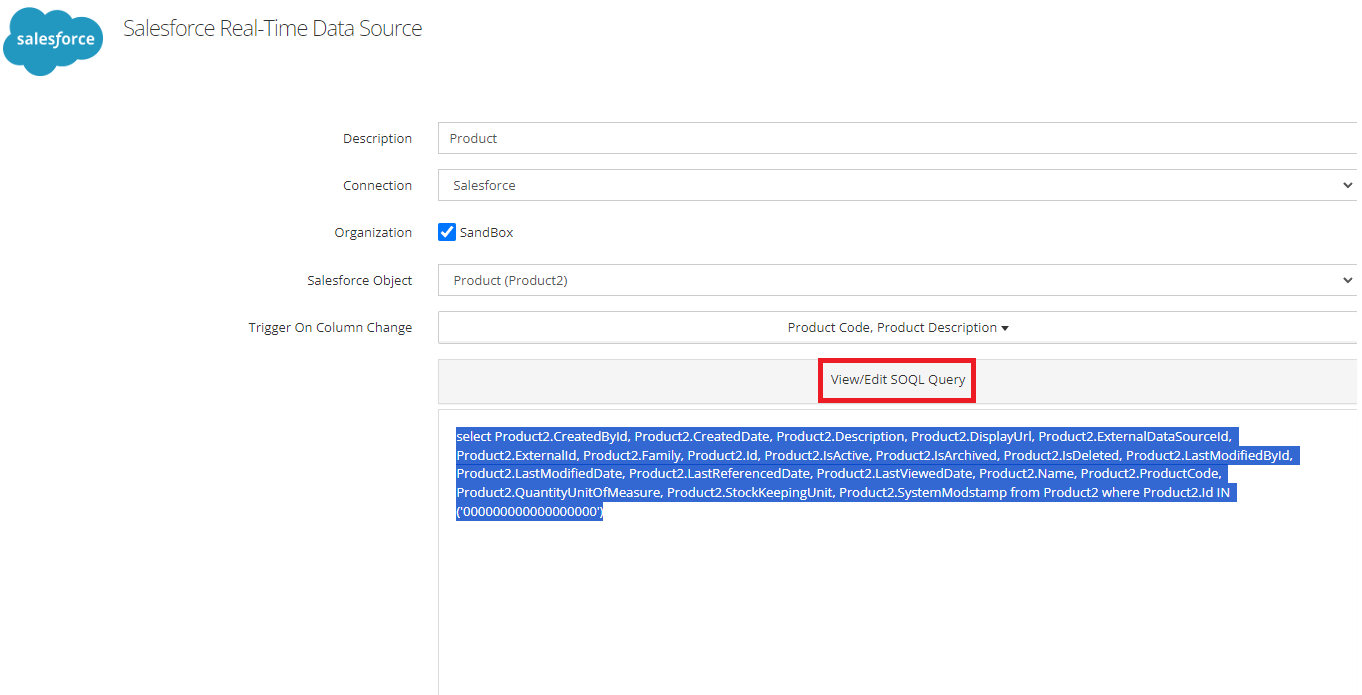
6. Check SOQL Query
It is possible the Salesforce trigger is running, but all records are being filtered out by the SOQL query. We can check this by manually running the SOQL query in the Salesforce Developer Console.
- In SmartConnect, Navigate to Data Sources > Realtime Triggers
- Edit the Realtime data source
- Click Validate
- Click View/Edit SOQL Query
- Copy the full SOQL query
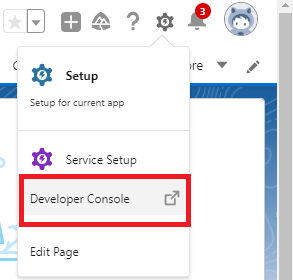
- Log into Salesforce
- Click on the Setup Gear icon
- Select Developer Console
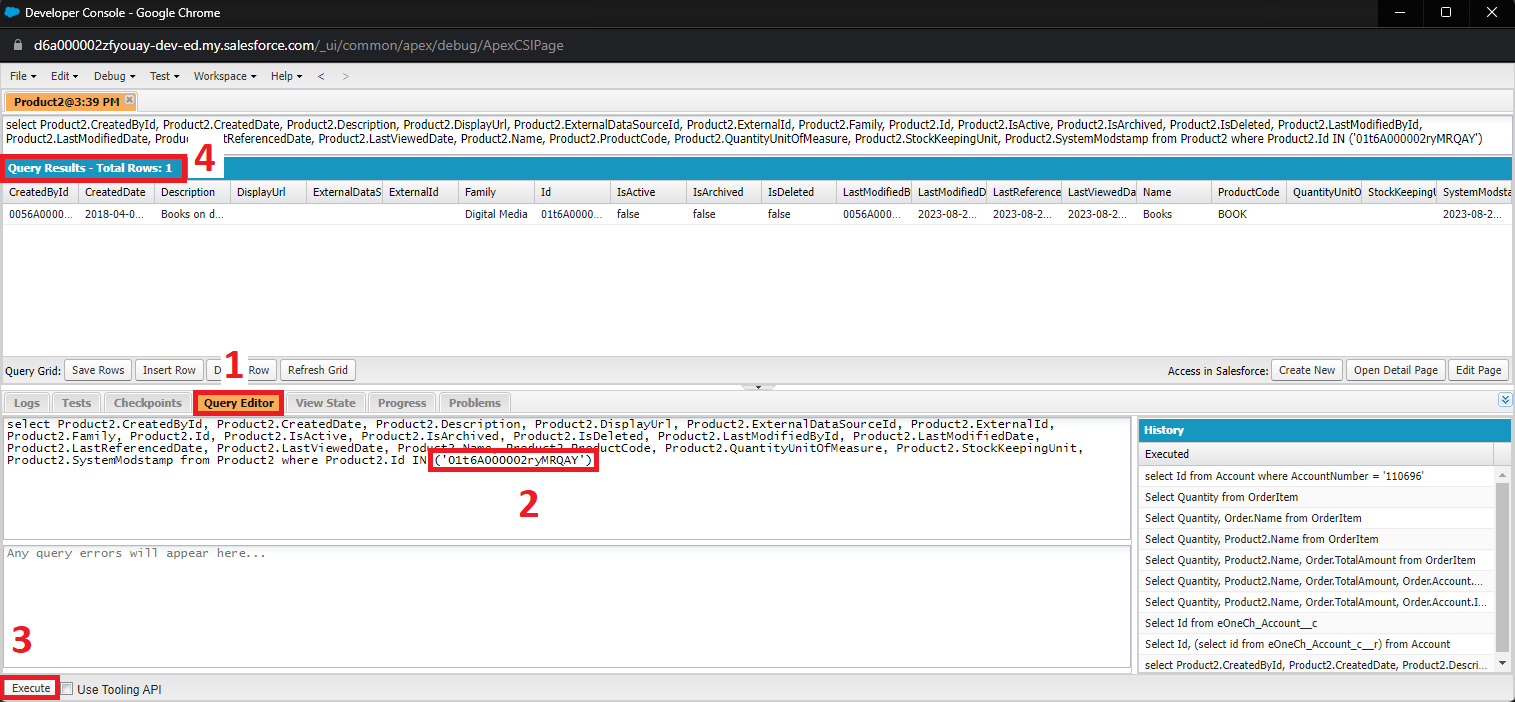
- In the Developer Console paste the SOQL query into the Query Editor (at the bottom of the window)
- In another browser tab, open the Salesforce record you have been modifying for testing
- From the URL, copy the record’s Salesforce Id

- replace (‘000000000000000000’) in the query with the record Id.
- Click Execute
- The Query Results – Total Rows should be greater than 0. If the count is 0, then you will want to modify the filters on your SOQL query
- Click on Query Editor Subtab
- Replace record Id in the Query Editor window
- Click Execute
- Review the Query Results
7. Run Salesforce Debug Log
If all the other setup steps look correct, our last troubleshooting step is to run a Debug Log from the Salesforce Developer Console.
- Log into Salesforce
- Click on the Setup Gear icon
- Select Developer Console
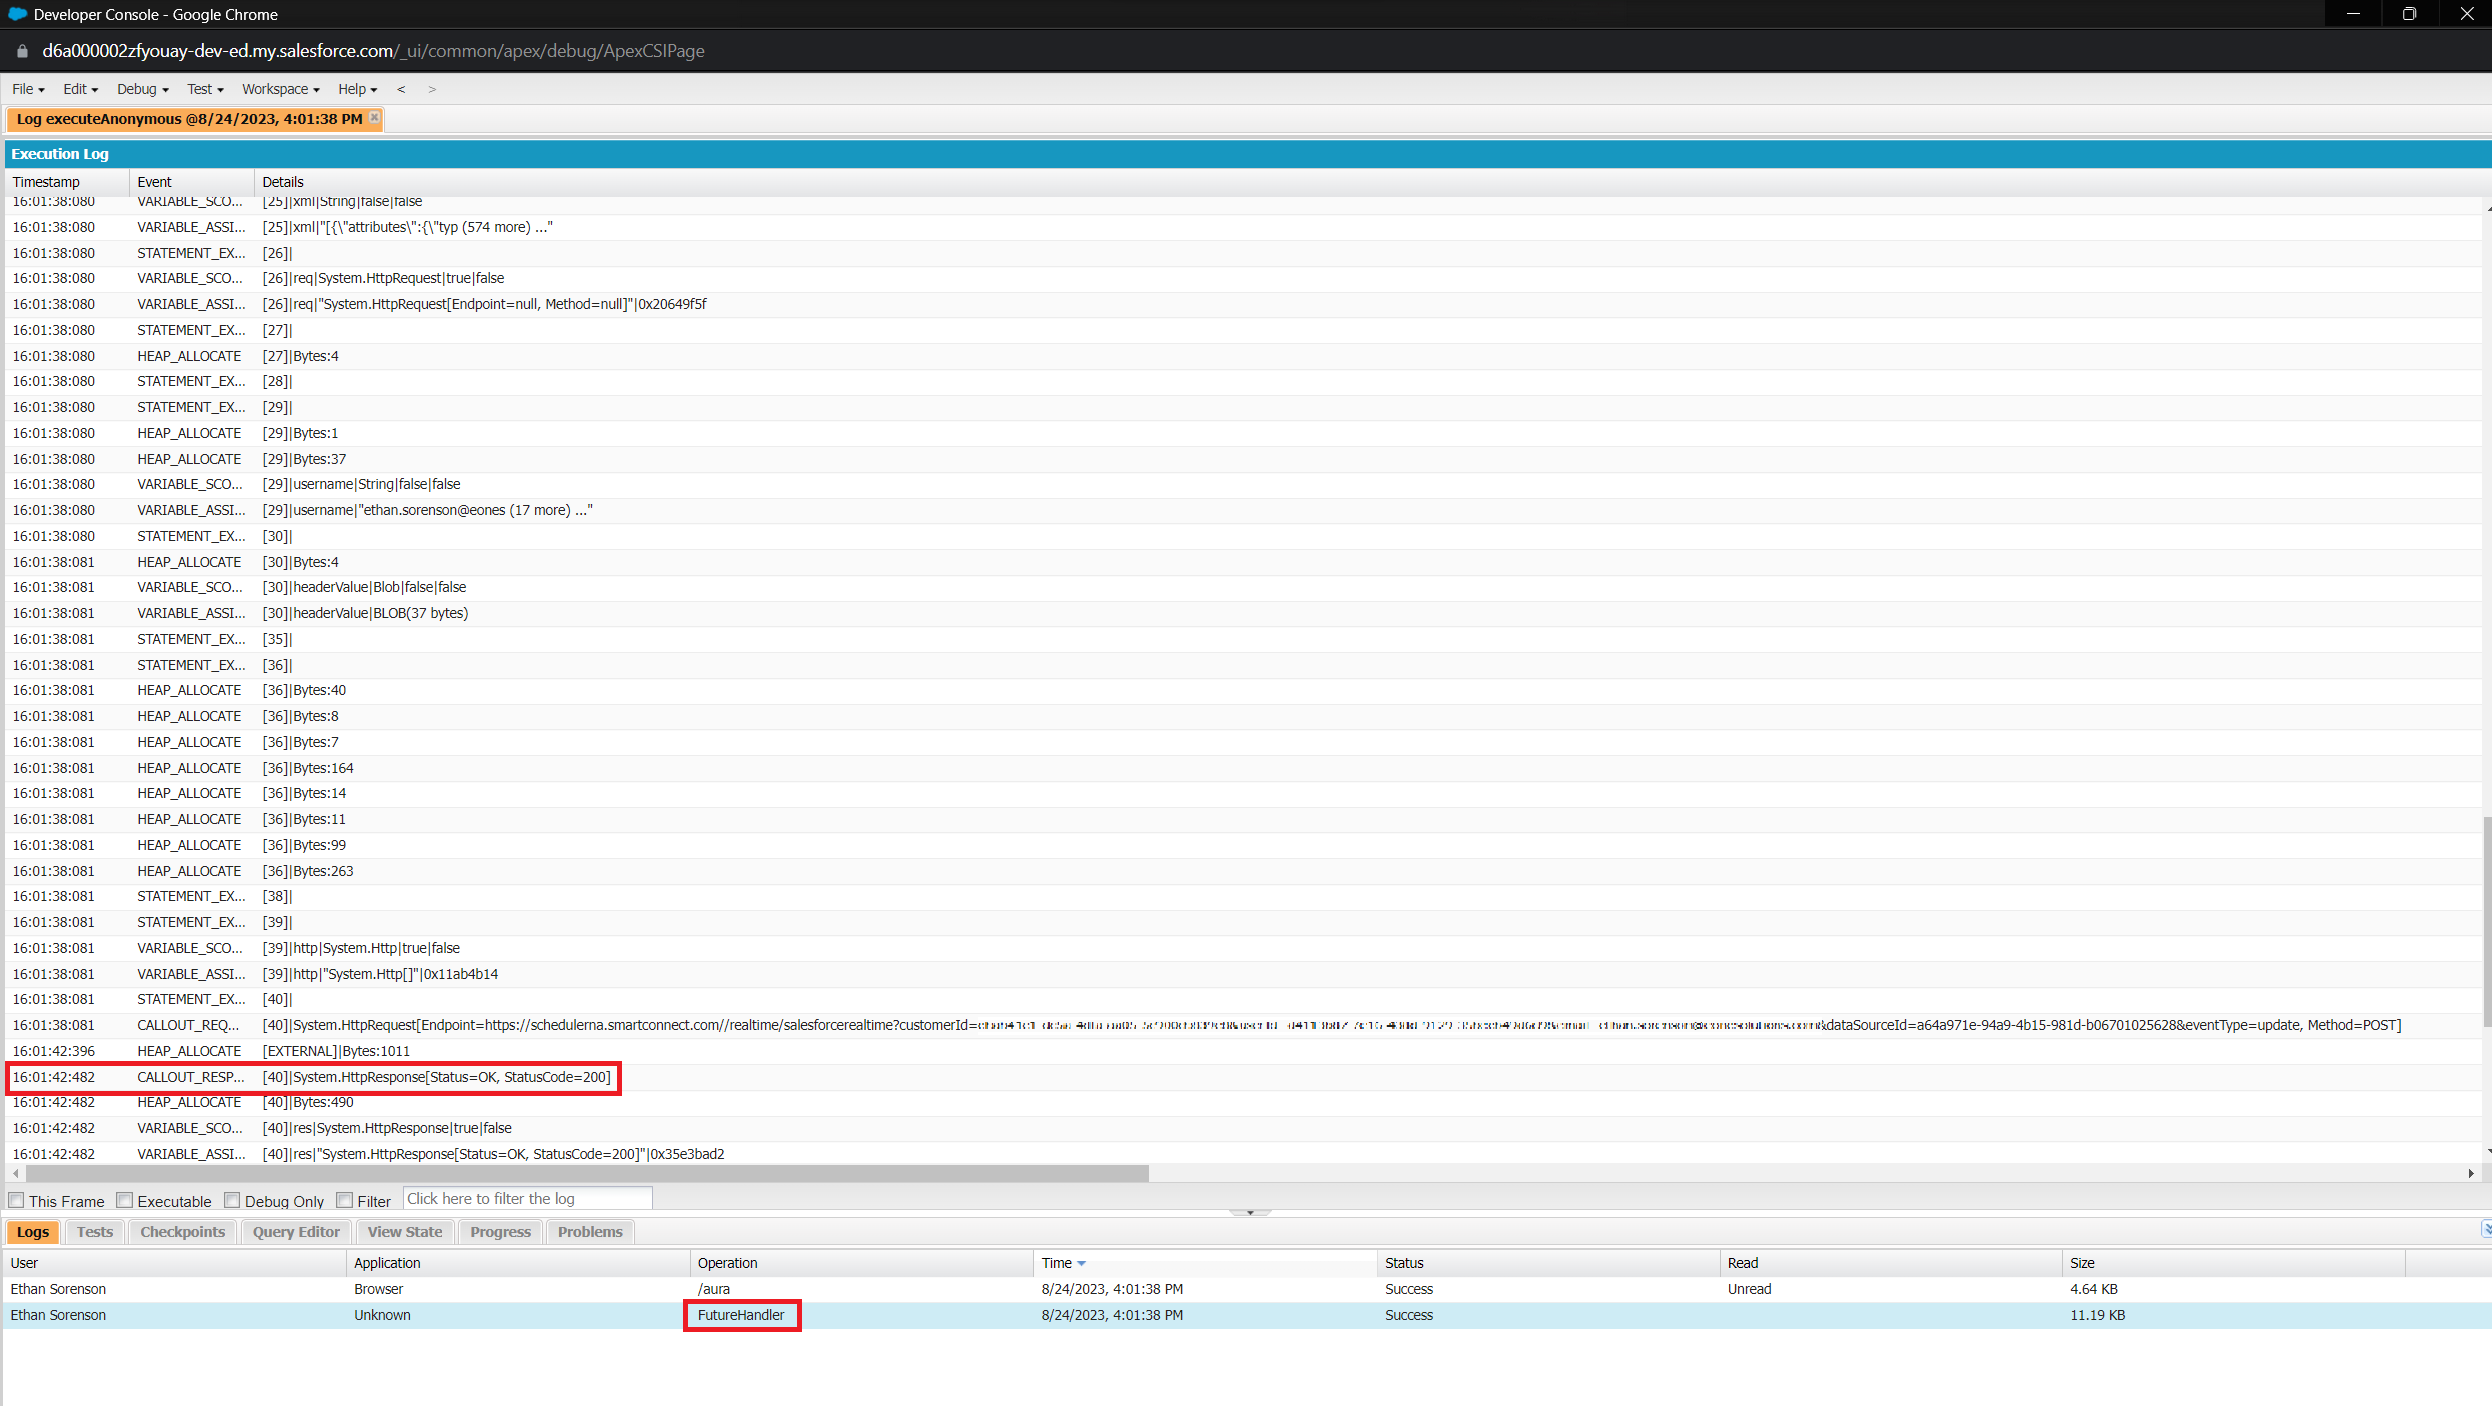
- Click on the Logs tab
- In another browser tab open the Salesforce record you have been modifying for testing and make a change that should trigger the integration
- Switch back to the Developer Console window
- Look for an event with an Operation type of FutureHandler
- This is the log for the Realtime trigger event
- Double-click the log to open the detail
- Check through the log detail for any errors
- At the bottom, the CALLOUT_RESPONSE should return an HTTP 200. If it doesn’t, the request failed to send to SmartConnect
Conclusion
If none of these steps revealed/solved the issue with your Realtime data source, please reach out to our support team at support@eonesolutions.com .