This article will discuss how to upload and download files to an SFTP with SmartConnect 20.16 or newer using the WinSCP API.
This example is like the one where we put files onto an FTP site, however, users are needing to work with files from a more secure FTP Server. If you only need to connect to an FTP site, here is that article. http://www.eonesolutions.com/blog-post/tech-tuesday-creating-a-task-in-smartconnect-to-get-a-file-from-an-ftp-site/. SmartConnect uses .NET, either C# or VB.NET, for scripting to the .NET FTP library by default but there is not a Microsoft default .NET library for an SFTP site. When connecting to a SFTP site, an application that specializes in that connection type is required.
For this article, I will be using WinSCP as my connecting application and library. I found it quite easy to use for connecting to my SFTP site, which is just a test site called Wing FTP http://www.wftpserver.com/onlinedemo.htm. One nice feature of using an application such as WinSCP is the possibility of using different protocols instead of just SFTP, so I could technically use this same code library for my standard FTP site as well.
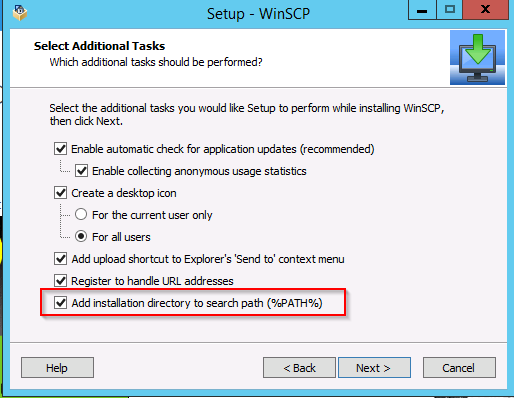
On the WinSCP install, I would consider marking the “Add installation directory to search path” checkbox. The reason for this is that this should ensure that the .NET compiler can always find the WinSCPnet.dll on script compilation.
The first step would be to download the application of choice for connecting to the site. Make sure you can connect to your site using this application before trying to set up your task inside of SmartConnect. Try uploading and downloading files as well to ensure the user and password we will use in our script has the necessary authorization to complete the task as I found with some test sites the user only has read access. Please read the application’s documentation on connecting to the SFTP site based on your site’s authentication method since it may require different methods than provided here. These two web sites provide the basics on what SFTP authentication methods may be used. https://www.eldos.com/security/articles/1962.php?page=all; https://www.2brightsparks.com/resources/articles/sftp-authentication.html.
SmartConnect
Secure Global Variables
In the SmartConnect Script Task we don’t want to enter the User Name and Password in plain text, so we want to create some secure global variables to enter that information to encrypt it from users who should not have that information. The other advantage to using Global Variables is changing the value once will update any maps using that value without having to go to each map and update.
Go to Maintenance->Secure Global Variables
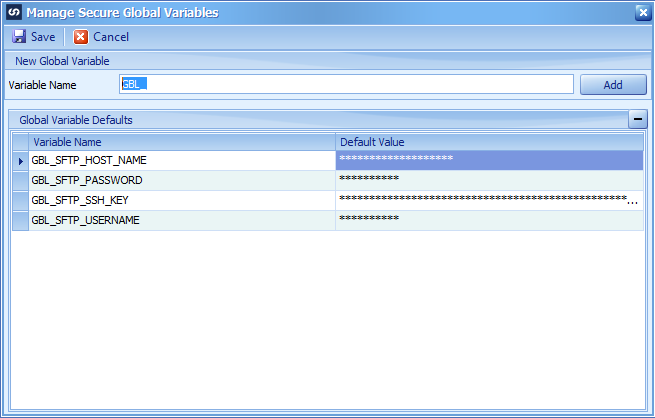
In the Variable Name, enter the name of the Global Variable you would like to create. I have created three new variables per the screenshot below and as you will note, the values are hidden so they cannot be viewed within SmartConnect.
Please note, the SSH Key is obtained from the server administrator or may be obtained from WinSCP by going to Session->Server and protocol information. It may not be required for every scenario.
Script Name Space
To be able to use the WinSCP library within SmartConnect, we need to add the DLL to the SmartConnect NameSpace table and copy the DLL to a few locations as well.
SmartConnect 21+
Item 2 will only be needed if the maps will be executed from the SmartConnect web services.
- C:Program FileseOne SolutionsSmartConnect folder (include any location where SmartConnect has been installed)
- C:Program FileseOne SolutionsSmartConnect APIbin folder (wherever the SmartConnect WCF Web Service is installed)
- C:WindowsSysWOW64 folder (on machine where the SmartConnect eOne Windows Service has been installed)
- C:WindowsMicrosoft.NETFramework64v4.0.30319 folder
Once the DLL file is in the SmartConnect folder, go to File – > Maintenance -> Script Name Spaces.
SmartConnect 2018 and older
Items 2 and 3 will only be needed if the maps will be executed from the SmartConnect web services.
- C:Program Files (x86)eOne SolutionsSmartConnect folder (include any location where SmartConnect has been installed)
- C:Program Files (x86)eOne Solutionswcfbin folder (wherever the SmartConnect WCF Web Service is installed)
- C:Program Files (x86)eOne Solutionswwwbin folder (wherever the SmartConnect Web Service is installed)
- C:WindowsSysWOW64 folder (on machine where the SmartConnect eOne Windows Service has been installed)
- C:WindowsMicrosoft.NETFrameworkv4.0.30319 folder
Once the DLL file is in the SmartConnect folder, go to Maintenance -> Script Name Spaces.
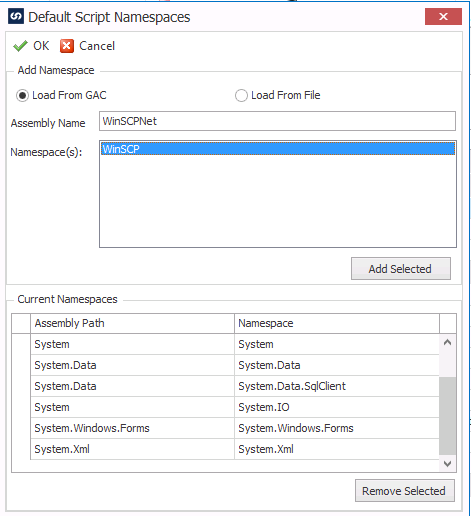
Change the Add Namespace option to Load From GAC.
For the Assembly Name field, manually enter in WinSCPNet as shown below and tab off of the field. The Namespaces(s) should then populate.
Make sure to select the WinSCP namespace as below and click the “Add Selected” button to add the WinSCP namespace.
To ensure the DLL Namespace is properly loaded, exit Smartconnect and log back in.
NOTE: Once this namespace has been added to SmartConnect, you will have to install WinSCP to EVERY MACHINE running SmartConnect!
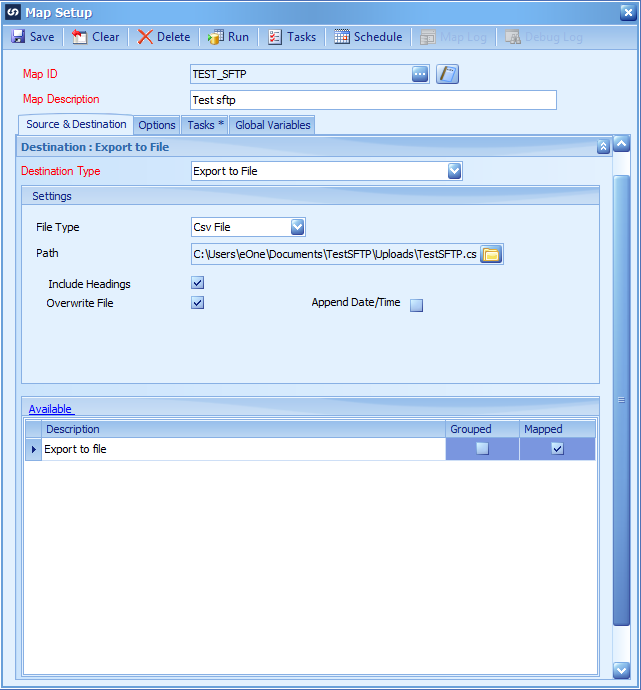
Destination
We are simply going to export the source data to a CSV file and use this file in our Task below.
Task
If you want to or need to take advantage of other features of the WinSCP API that are not specified in this example, you can view their documentation here. https://winscp.net/eng/docs/library
Upload
In a typical upload situation, we need to grab a file or two after the map is completed, but certainly it could be written as a task after each document or on any task within the SmartConnect map.
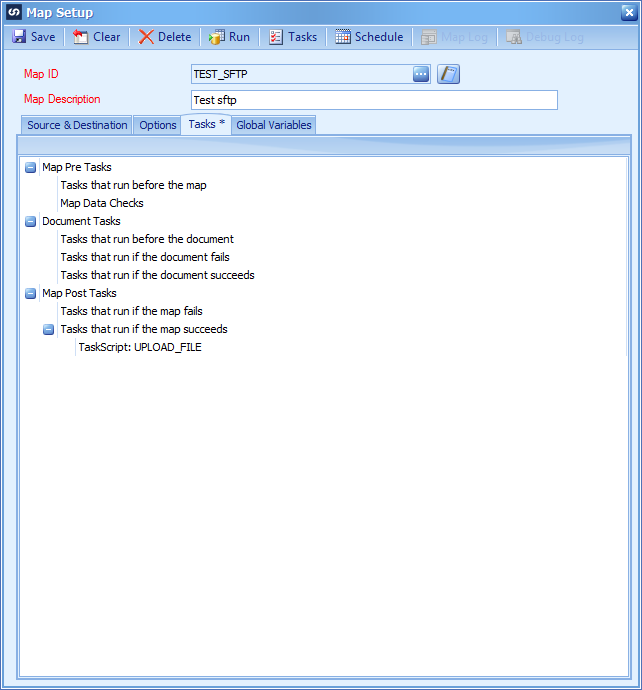
With our Tasks that run if the map succeeds, we will right-click and choose New Task -> Run Script.
VB.NET
Dim fileName as string
Dim uploadFolder as string
filename = “C:UserseOneDocumentsTestSFTPuploads*” ‘ files to be loaded from this folder. wilcards can be used
uploadFolder = “/upload/” ‘ Default folder where files will be loaded
Try
Dim sessionOptions as new WinSCP.SessionOptions
with sessionOptions
.Protocol = WinSCP.Protocol.Sftp
.HostName = GBL_SFTP_HOST_NAME
.UserName = GBL_SFTP_USERNAME
.Password = GBL_SFTP_PASSWORD
.PortNumber = 2222
.SshHostKeyFingerprint = GBL_SFTP_SSH_KEY
end with
using session as new WinSCP.Session
session.Open(sessionOptions)
Dim transferOptions as new WinSCP.TransferOptions
transferOptions.TransferMode = WinSCP.TransferMode.Binary
Dim transferResult as WinSCP.TransferOperationResult
transferResult = session.PutFiles(Filename, uploadFolder, false, transferOptions)
transferResult.Check() ‘THrows the first error if not successful
For Each transfer as WinSCP.TransferEventArgs in transferResult.Transfers
‘Write results to Event Viewer or SQL table or Log Table
‘This will display a message box with the results
MessageBox.Show(“Upload of file “ & transfer.FileName & ” successful.”)
Next
end using
Catch ex as System.Exception
MessageBox.Show(ex.ToString()) ‘Display any Exceptions
Finally
End Try
return true
C#
string fileName = null;
string uploadFolder = null;
fileName = “C:\Users\eOne\Documents\TestSFTP\uploads\*”;
// files to be loaded from this folder. wilcards can be used
uploadFolder = “/upload/”;
// Default folder where files will be loaded
try {
WinSCP.SessionOptions sessionOptions = new WinSCP.SessionOptions();
var _with1 = sessionOptions;
_with1.Protocol = WinSCP.Protocol.Sftp;
_with1.HostName = GBL_SFTP_HOST_NAME;
_with1.UserName = GBL_SFTP_USERNAME;
_with1.Password = GBL_SFTP_PASSWORD;
_with1.PortNumber = 2222;
_with1.SshHostKeyFingerprint = GBL_SFTP_SSH_KEY;
using (WinSCP.Session session = new WinSCP.Session[]) {
session.Open(sessionOptions);
WinSCP.TransferOptions transferOptions = new WinSCP.TransferOptions();
transferOptions.TransferMode = WinSCP.TransferMode.Binary;
WinSCP.TransferOperationResult transferResult = default(WinSCP.TransferOperationResult);
transferResult = session.PutFiles(fileName, uploadFolder, false, transferOptions);
transferResult.Check();
//THrows the first error if not successful
foreach (WinSCP.TransferEventArgs transfer in transferResult.Transfers) {
//Write results to Event Viewer or SQL table or Log Table
//This will display a message box with the results
MessageBox.Show(“Upload of file “ + transfer.FileName + ” successful.”);
}
}
}
catch (System.Exception ex) {
MessageBox.Show(ex.ToString());
//Display any Exceptions
}
finally
{
}
return true;
Download
In the download scenario, we want to pull file(s) from the SFTP site and put them into a folder data source using a pre-map task.
Set the Folder Data Source properties where the files will need to be placed.
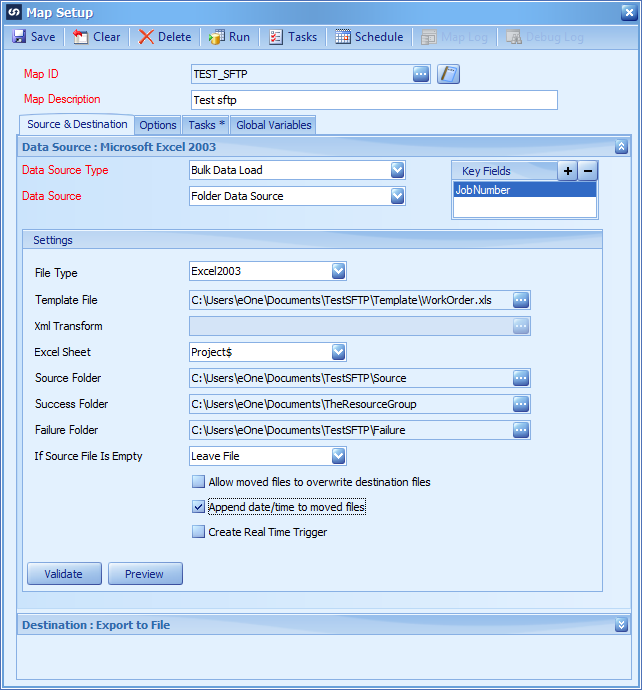
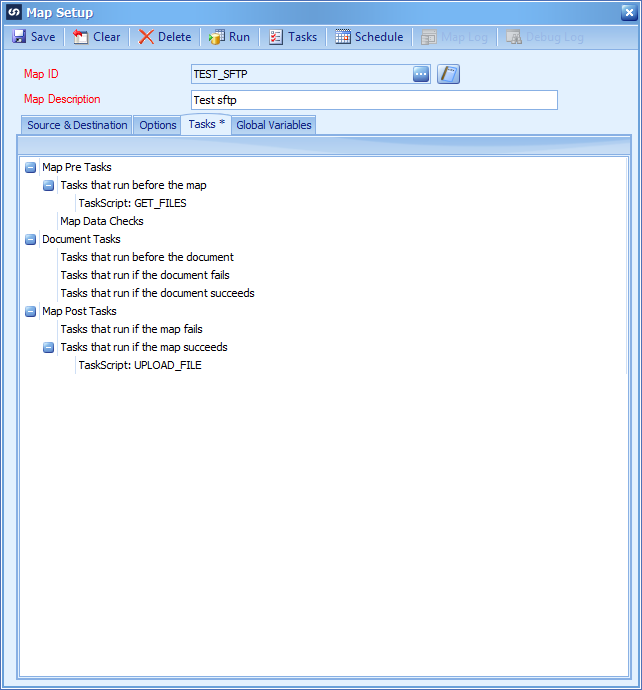
Create the Get Files Run Script Task on the Tasks that run before the map to place them into the Source folder defined in the data source section of the map.
VB.NET
Dim downloadFolder as string
Dim ftpFolder as string
downloadFolder = “C:\Users\eOne\Documents\TestSFTP\source\” ‘ files to be loaded from this folder. wilcards can be used
ftpFolder = “/upload/” ‘ Default folder where files will be loaded
Try
Dim sessionOptions as new WinSCP.SessionOptions
with sessionOptions
.Protocol = WinSCP.Protocol.Sftp
.HostName = GBL_SFTP_HOST_NAME
.UserName = GBL_SFTP_USERNAME
.Password = GBL_SFTP_PASSWORD
.PortNumber = 2222
.SshHostKeyFingerprint = GBL_SFTP_SSH_KEY
end with
using session as new WinSCP.Session
session.Open(sessionOptions)
Dim transferOptions as new WinSCP.TransferOptions
transferOptions.TransferMode = WinSCP.TransferMode.Binary
Dim transferResult as WinSCP.TransferOperationResult
transferResult = session.GetFiles(ftpFolder, downloadFolder, false, transferOptions)
transferResult.Check() ‘THrows the first error if not successful
For Each transfer as WinSCP.TransferEventArgs in transferResult.Transfers
‘Write results to Event Viewer or SQL table or Log Table
‘This will display a message box with the results
MessageBox.Show(“Download of file “ & transfer.FileName & ” successful.”)
Next
end using
Catch ex as System.Exception
MessageBox.Show(ex.ToString()) ‘Display any Exceptions
Finally
End Try
return true
C#
string downloadFolder = null;
string ftpFolder = null;
downloadFolder = “C:\\Users\\eOne\\Documents\\TestSFTP\\source\\”; // files to be loaded from this folder. wilcards can be used
ftpFolder = “/download/”; // Default folder where files will be retrieved from
try {
WinSCP.SessionOptions sessionOptions = new WinSCP.SessionOptions();
var _with1 = sessionOptions;
_with1.Protocol = WinSCP.Protocol.Sftp;
_with1.HostName = GBL_SFTP_HOST_NAME;
_with1.UserName = GBL_SFTP_USERNAME;
_with1.Password = GBL_SFTP_PASSWORD;
_with1.PortNumber = 2222;
_with1.SshHostKeyFingerprint = GBL_SFTP_SSH_KEY;
using (WinSCP.Session session = new WinSCP.Session[]) {
session.Open(sessionOptions);
WinSCP.TransferOptions transferOptions = new WinSCP.TransferOptions();
transferOptions.TransferMode = WinSCP.TransferMode.Binary;
WinSCP.TransferOperationResult transferResult = default(WinSCP.TransferOperationResult);
transferResult = session.GetFiles(ftpFolder, downloadFolder, false, transferOptions);
transferResult.Check();
//THrows the first error if not successful
foreach (WinSCP.TransferEventArgs transfer in transferResult.Transfers)
{
//Write results to Event Viewer or SQL table or Log Table
//This will display a message box with the results
MessageBox.Show(“Download of file ” + transfer.FileName + ” successful.”);
}
}
}
catch (System.Exception ex)
{
MessageBox.Show(ex.ToString());
//Display any Exceptions
}
finally
{
}
return true;
Note: In the code samples above, the port number has been set to 2222. Change this to your correct port for your application.
Conclusion
This is just one example of an application that can be used with SmartConnect for sending and retrieving files from an SFTP site.