The Run SQL Validation task allows SQL validations to be run against map data-source data before map processing commences or before document processing commences.
To create a run SQL validation task:
| 1. | Select the tasks tab on the map setup window. |
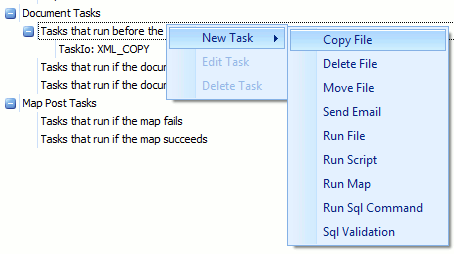
| 2. | Select the task stage in the task tree to determine that stage at which this task will run. |
| 3. | Right click on the tasks stage, select new task, the select the SQL validation task. |
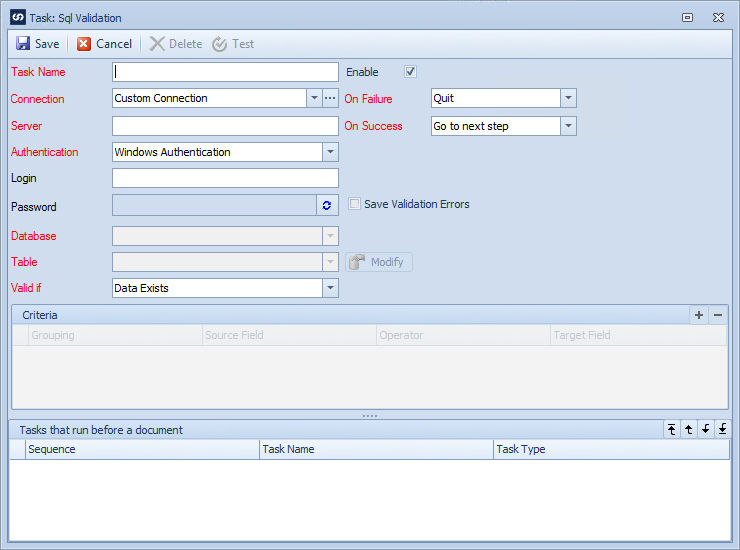
| 4. | Enter the name of the task. Task names must be unique within each map. |
| 5. | Check the enable checkbox to enable the task. |
| 6. | Enter the required action if the run file task fails. Selecting Quit will halt map processing if the copy fails. Go to next step will record the failure but allow processing to continue. Cancel processing will stop map processing but will not return an error to the user. |
| 7. | Enter the required action if the run file task succeeds. Selecting Quit will halt map processing if the copy fails. Go to next step will continue to the next step in map processing. Cancel processing will stop map processing but will not return an error to the user. |
| 8. | Select a Connection from the drop down list. If Custom Connection is selected the server, authentication details and database selection will be required. If a default connection is selected the server, authentication details and database selections will be grayed out and defaulted from the selected connection. If a new default connection should be set select the manage default connections button  and enter the new details. and enter the new details. |
| 9. | Enter the name of the MSSQL Server / Instance to be used for this task. This may be defaulted by the connection selected in step 8. |
| 10. | Select the required authentication type. Windows authentication will use the details for the current windows user to try to connect to the MSSQL server. Selecting SQL Server Authentication will required the entry of a MSSQL login and password. This setting may be defaulted by the connection selected in step 8. |
| 11. | If required enter the MSSQL login. This may be defaulted by the connection selected in step 8. |
| 12. | If required enter the MSSQL password. This may be defaulted by the connection selected in step 8. |
| 13. | Select the Connect button to use the entered details to connect to the MSSQL server. If the connection is successful available databases will be displayed in the database drop-down list. |
| 14. | If required select the MSSQL database from the drop-down list. This selection may be defaulted by the connection selected in step 8. |
| 15. | Select the MSSQL table to be used to validate the map data. If the validation data is contained in more than one MSSQL table use the Modify button to create a MSSQL query to use for the validation. |
| 16. | Use the Valid if drop-down to determine if validation is successful if the required data is contained in the MSSQL query or successful if the data does not exist in the MSSQL query. E.g. when importing sales transactions the transaction is only valid if the customer already exists in the customer table. When importing customers the customer is invalid if it already exists in the customers table. |
| 17. | Select  on the criteria grid to create matching criteria between the map data and the MSSQL validation query. on the criteria grid to create matching criteria between the map data and the MSSQL validation query. |
| • | Source - the column in the map source data. |
| • | Operator - equal to or not equal to. |
| • | Target - the column in the MSSQL validation query. |
| 18. | Select Save to save the task. |
To edit a SQL validation task:
| 1. | Select the tasks tab on the map setup window. |
| 2. | Either double click on the task to be edited, or select the task, right click then select edit. |
To delete a SQL validation task:
| 1. | Select the tasks tab on the map setup window. |
| 2. | Either select the task, right click then select delete, or edit the task and select delete on the window toolbar. |