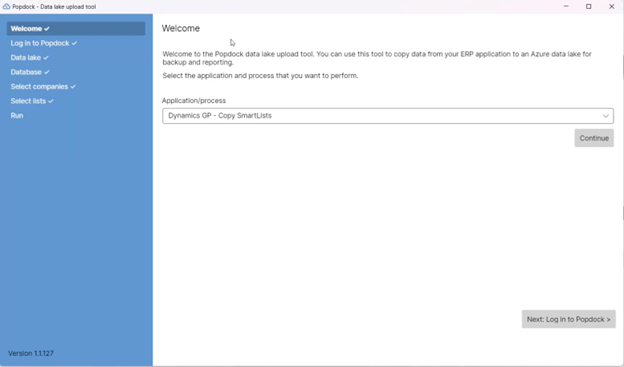
When working with Popdock widgets, the most common use is creating a widget and embedding it to show your favorite list, multiple lists, or a chart. The following will be a more advanced example of what an integrated Popdock widget can be, and in the next few steps we will show you how to add a parameter to your widget which then allows us to pass through data from Microsoft Dynamics CRM, for example, to the widget so that when you open an account you can see their invoices from Dynamics GP. These steps will go deep into customizing a form in Dynamics CRM, and we will include the neccessary steps, along with custom javascript needed.
For this example, we will be using Dynamics CRM and sales being tracked in Dynamics GP. We will also be using the Account Number in CRM which matches to the Dynamics GP Customer Number. We will start off by assuming you already have a Popdock account with these connectors already added to your account and that you are matching your CRM Account Number to your Dynamics GP Customer Number.
Preparing Your List and Saving It As A Favorite
Step 1
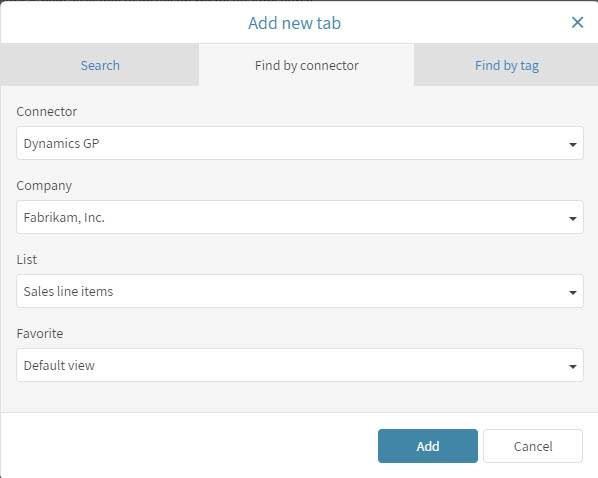
First we will start in Popdock. Once you are logged in, start off by adding a new tab and selecting the list you want to work with. Here I am using the Dynamics GP Sales line items list default view which I will customize and save as a favorite.
Step 2
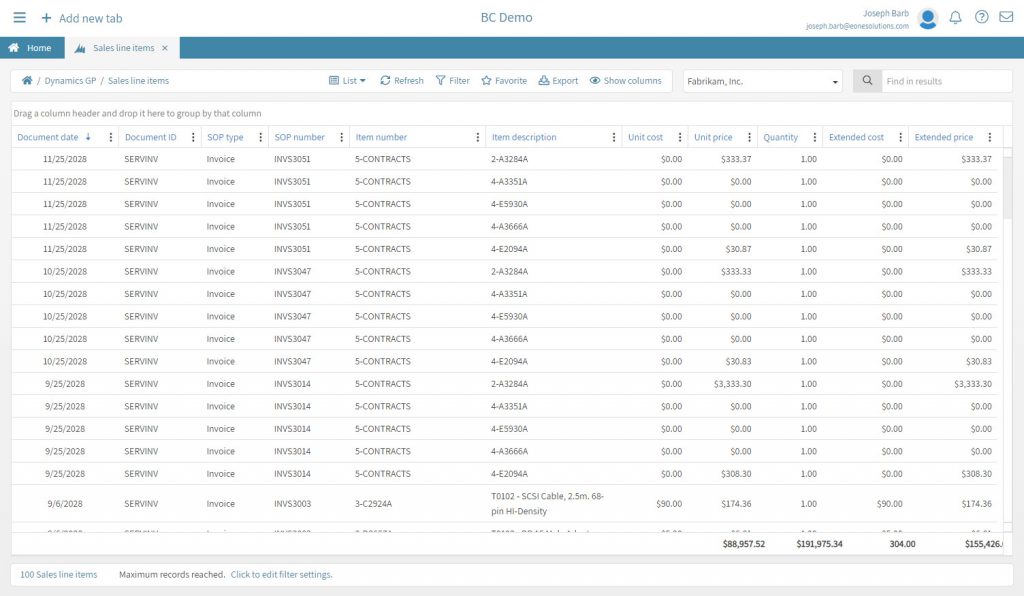
Prepare your list to show how you would like to see it inside of CRM. Here, I have edited the columns by adding/removing what I to see. Customer Number is not required because we will be using it as a parameter and we will only see the sales line items for an individual customer. I have also sorted my Document date column in descending order so I see the latest items first.
Step 3
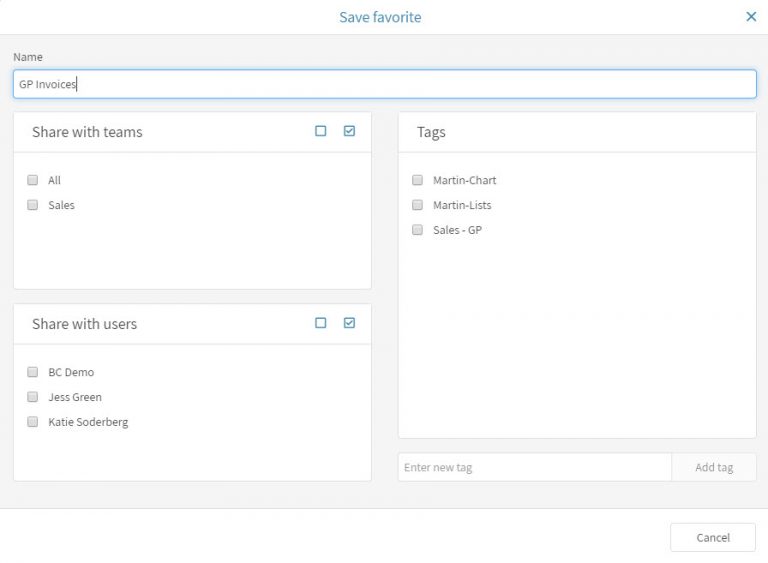
Now that you have the list setup like you would like to see it, you will want to save it as a favorite and give your favorite a name. Click the favorite button and save your favorite.
Creating A Popdock Widget And Adding A Parameter
Step 1
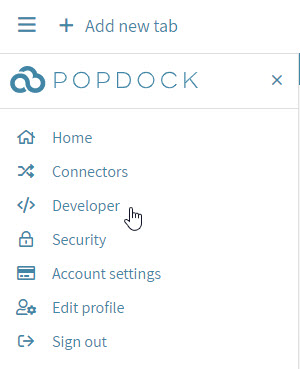
Click on the left drop down menu in your Popdock and go to Developer. If you do not have the Developer option in your menu, please make sure you have been given permissions to this feature or that your subscription is the Standard or higher plan.
Step 2
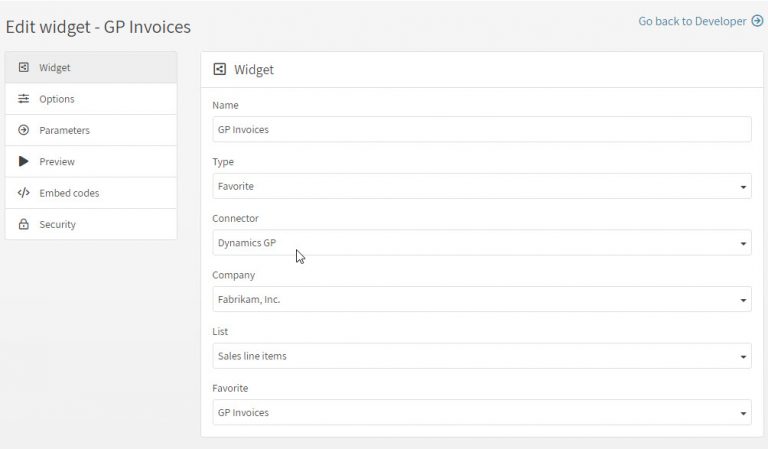
Click the +Add widget button to start setting up your widget. Then give your widget a name to see the complete form that needs to be configured with the favorite you just created.
Step 3
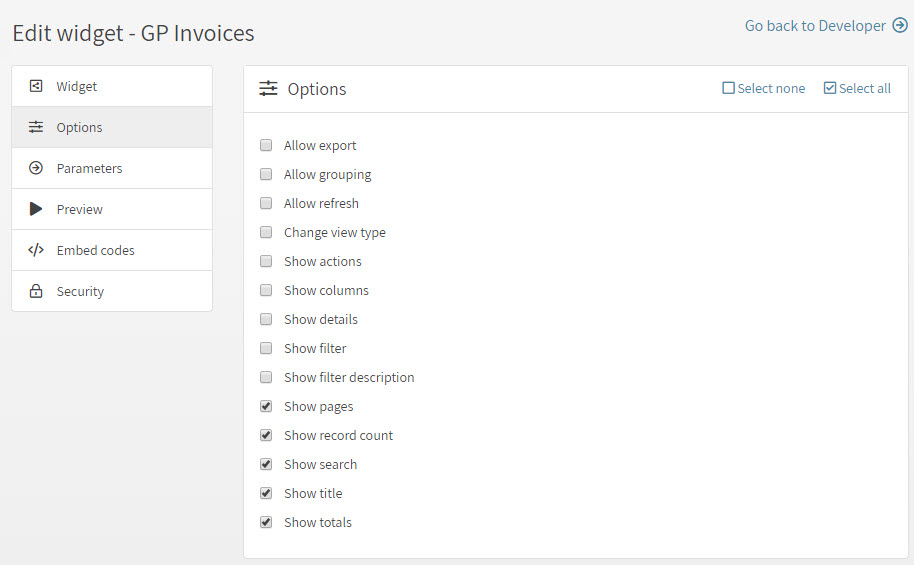
Click on Options in the left navigation menu, then select the options you would like available on the widget. Here I have selected just a few:
Step 4
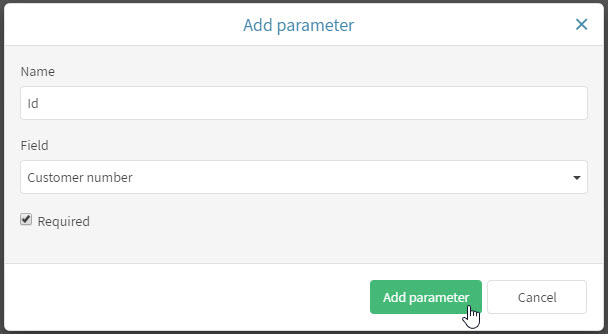
Click on Parameters in the left navigation menu, then for the Name we will use just a simple “Id”. The field drop down are the fields in the list you are using for this widget and we want to link it to the Customer number field. I have also selected that it is required so that when one is not submitted to the widget it does not display any other data, but show an error that “Required parameters are missing”.
Step 5
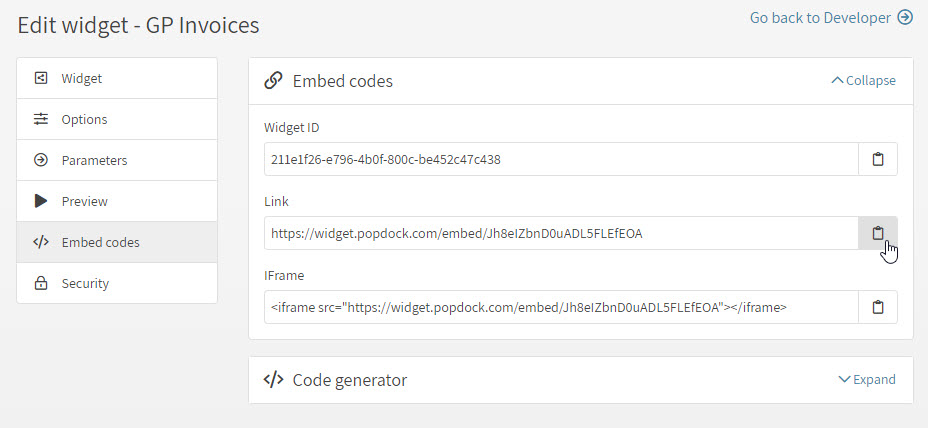
Now that you have completed adding the parameter, the widget is ready and we can move to setting it up in Dynamics CRM. Before leaving the widget settings, go to Embed Codes in the left navigation and copy and paste the Widget link to a notepad or leave this open to copy it at a later time when needed in the CRM steps.
Adding A Widget Inside Dynamics CRM
For setting up an IFrame in CRM we will need to work in the classic view, currently the new Unified Interface does not support any IFrame configuration. In a later blog post, I will show how to manage your widgets in tabs in the new Unified Interface.
Step 1
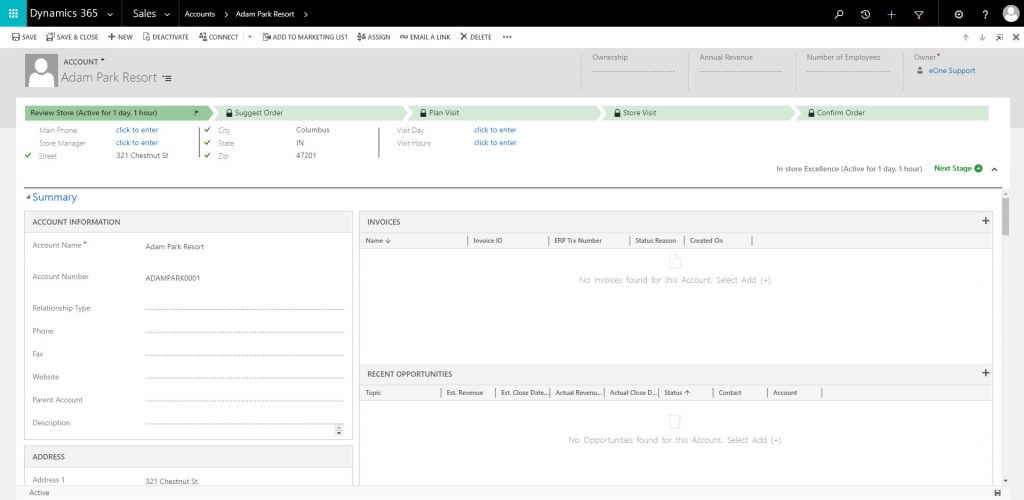
First we will go to Sales then Accounts and open one of your accounts. Here is a simple one I have for Adam Park Resort:
Step 2
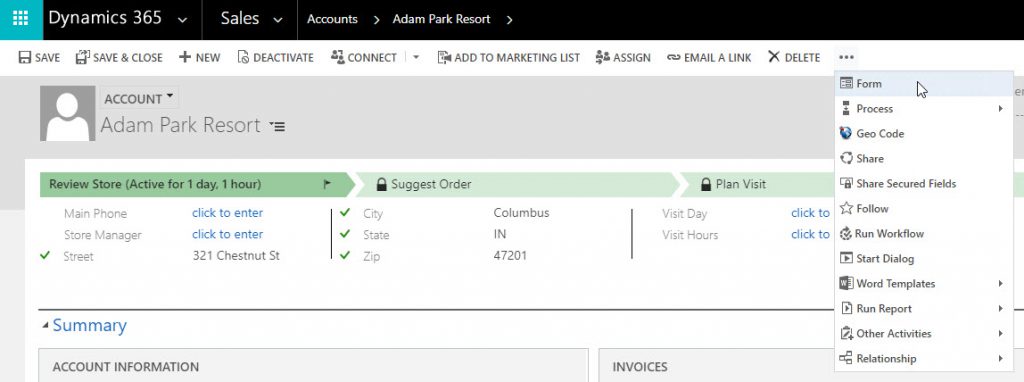
Next we want to edit this form so click on the 3 dots for the More Commands menu and choose Form.
Step 3
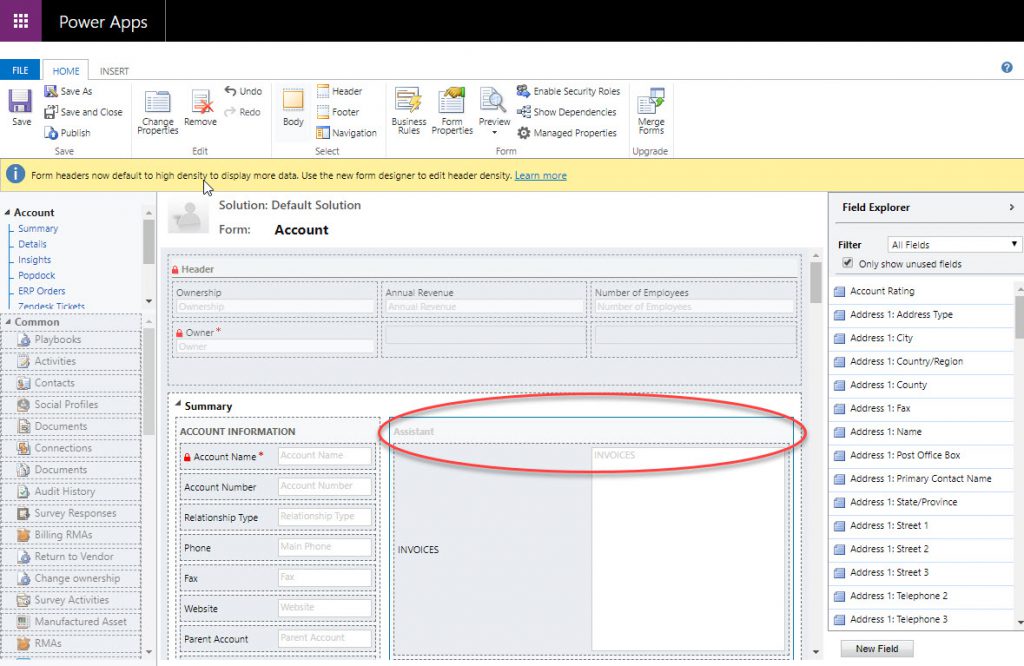
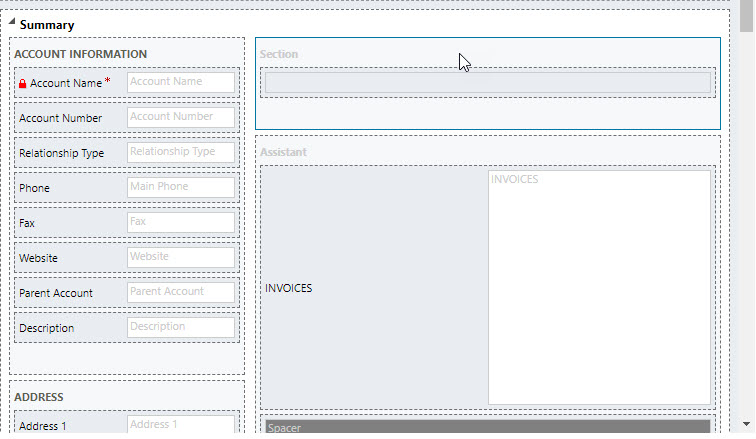
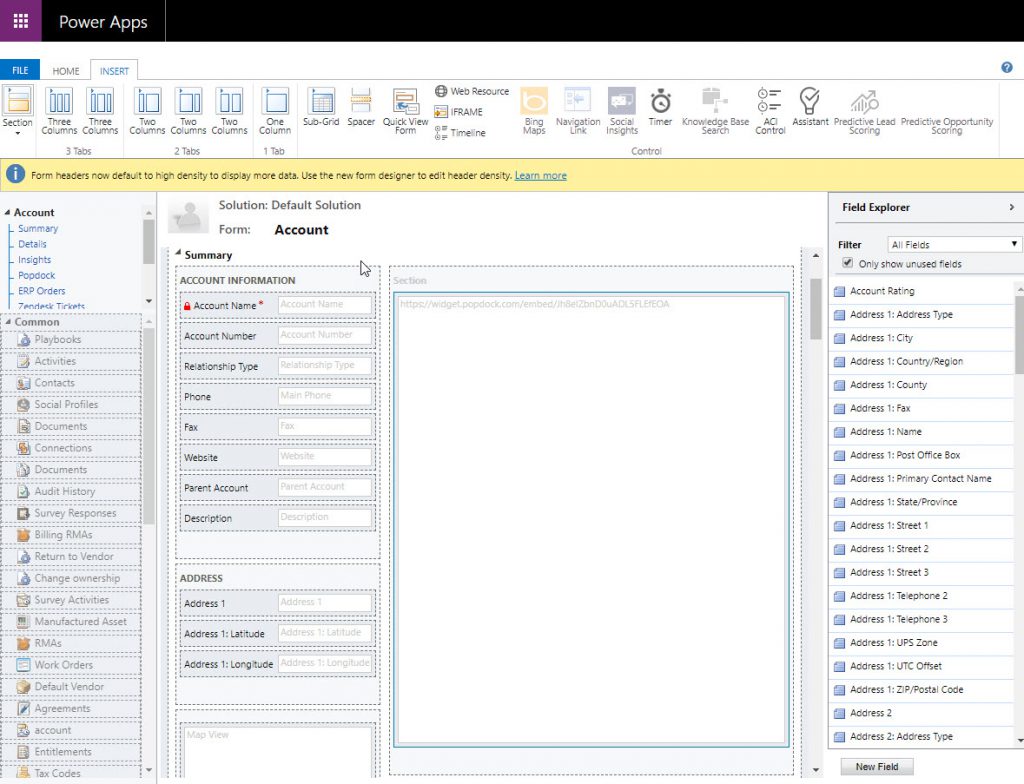
You should now have a PowerApps window that opens separately from your current browser window. This shows the layout of the form for that account page. We will be inserting a section just above the Invoices section for the Popdock Widget.
Step 4
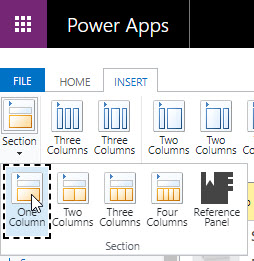
From the top tabs, you will want to click the Insert tab. Then at the top bar of icons, we want to choose Section, this will then show a drop down with a few different options. Choose One Column.
Step 5
You should see a new section added to the form, it may not be in the exact place above Invoices, but you can easily click and hold down your mouse button to drag the section to your desired location.
Step 6
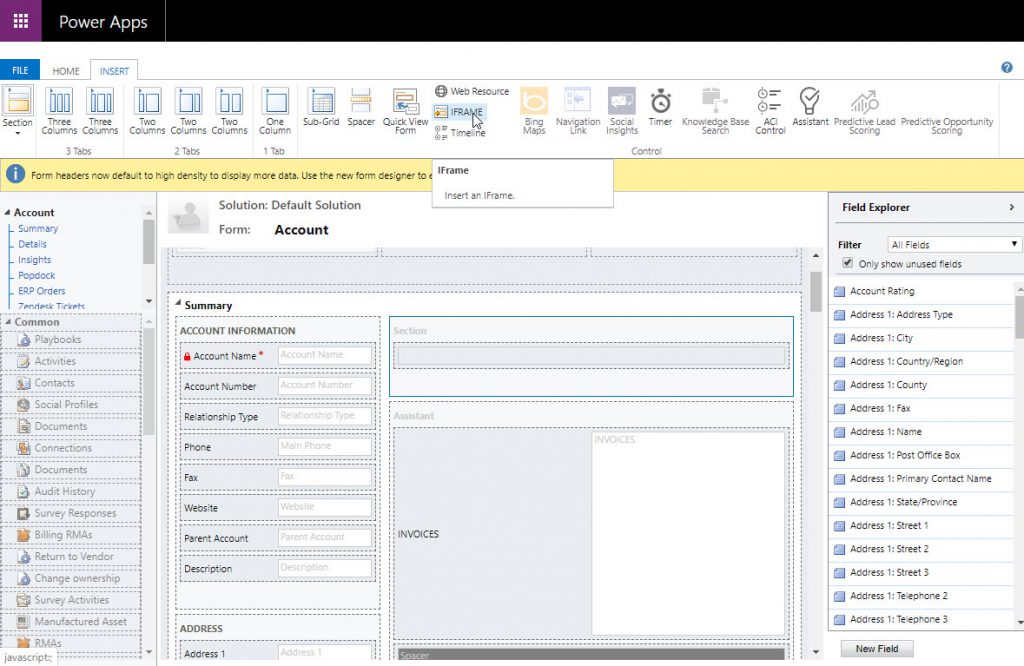
Now that we have an empty section, we will need to insert an IFrame now. With the section clicked on and highlighted in blue, you should still be on the Insert tab so click on IFrame.
Step 7
This will open the “Add an IFRAME” window. Here you will want to give the IFrame a name, it’s best to use a name with no spaces for easy use when writing the javascript code where it requires the name of the IFrame. Here I have given it the name “GPInvoices”. Now if you have the widget link saved or still open where you can access the link, copy and paste your link to the URL field. Last, in the Security section of this window, uncheck the box for “Restrict cross-frame scripting, where supported.”
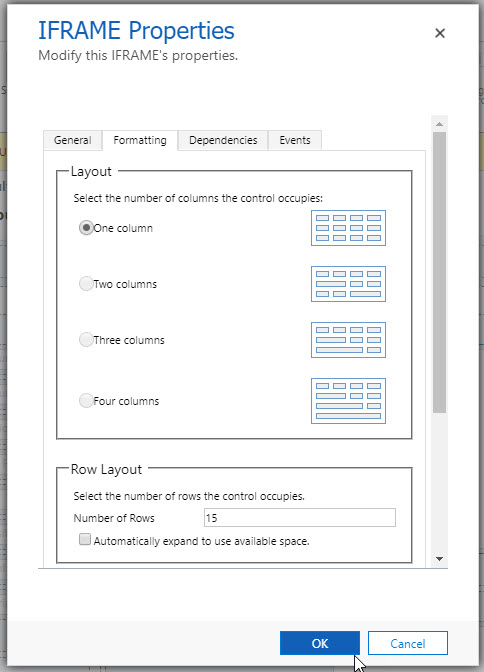
Next click the Formatting tab and in the Row Layout section we want to increase the default number of rows to 15. You can return to this an adjust it as needed. Then click OK.

Now you will see that the IFrame is inserted and showing a blank area with only the URL displayed:
Step 8
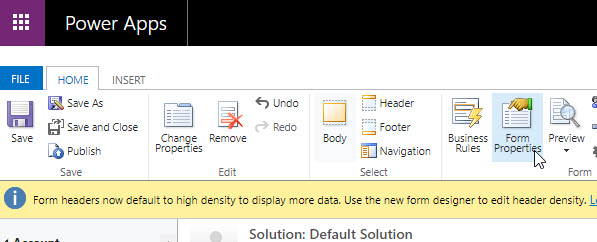
If we saved and published this now, it would not work and all you will see is an error message in the widget that said “Required parameters are missing”. This is because we still need to add the javascript that sends the parameter from the page to the widget. To do this we need to go to the Home tab at the top and click on Form Properties.
Step 9
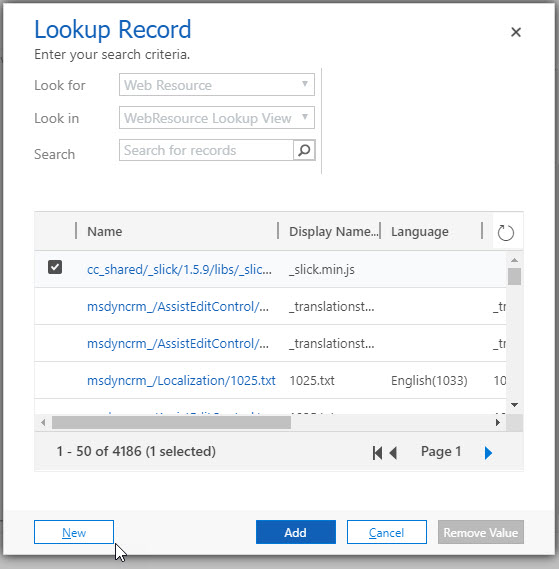
This opens the Form Properties window. On the Events tab, click on the Add button at the top of the tab.

Step 10
This opens the Lookup Record window and since we have not created this new record for the widget, we will click on the New button at the bottom left:
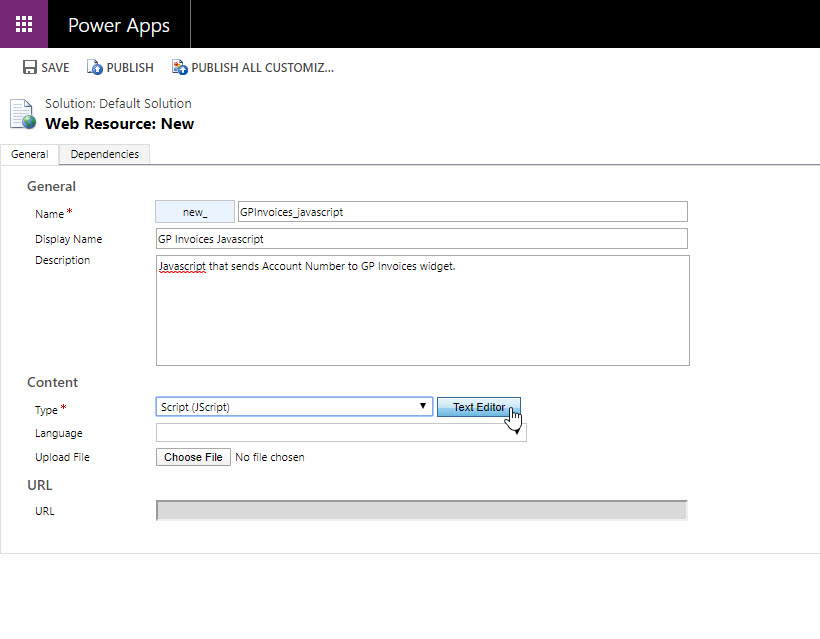
Step 11
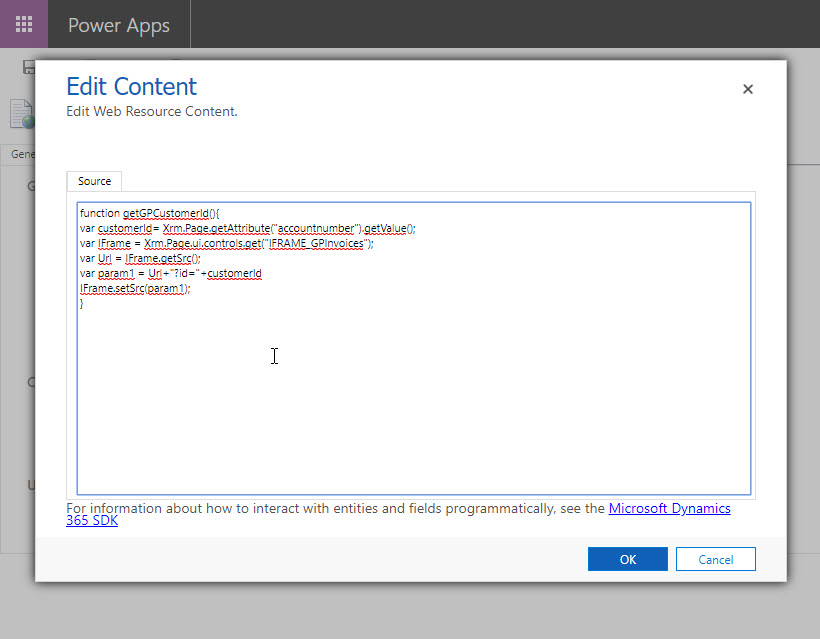
This opens a new window with the settings for a new web resource. Here I will be giving it the name of “GPInvoices_javascript”, the Display Name that I want to see when finding it is “GP Invoices Javascript”. The description is optional, I added a brief one here just to show you. Then Type it is important that you choose “Script (JScript)”. Now we want to click on the Text Editor button to add the javascript needed for the widget to work properly.
Step 12
The following Javascript is what is needed based on the configurations that I have made from the widget URL and parameter to the CRM widget IFrame and CRM Account Number field we are sending to the widget. The function name is an important piece of data as well and will be needed in a following step. Copy this function in its entirety to the Edit Content window that appears after clicking on the Text Editor button. Then click OK.
function getGPCustomerId(){
var customerId= Xrm.Page.getAttribute(“accountnumber“).getValue();
var IFrame = Xrm.Page.ui.controls.get(“IFRAME_GPInvoices“);
var Url = IFrame.getSrc();
var param1 = Url+”?id=”+customerId
IFrame.setSrc(param1);
}
Step 13
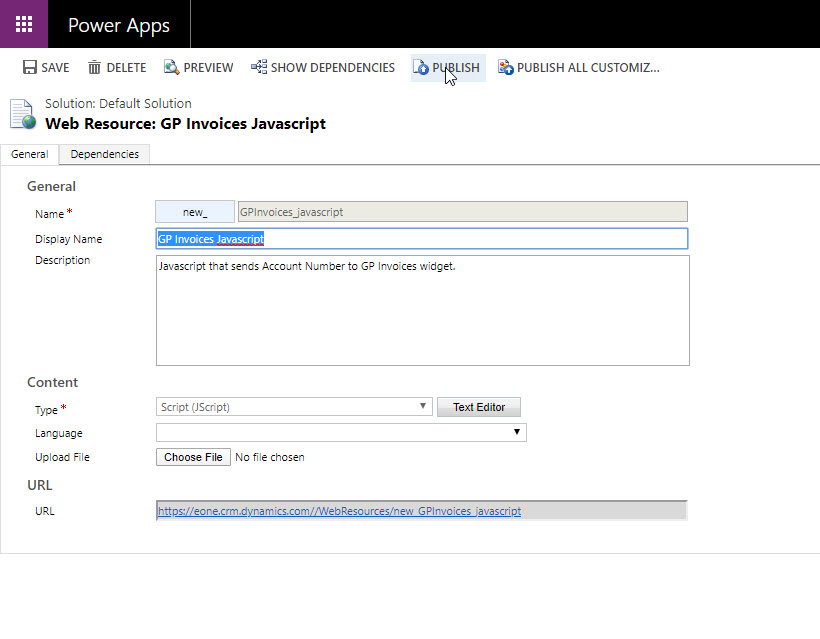
It should now return you to the Web Resource window and you can now publish it by clicking Publish. Once the Publishing Customization message appears and then goes away, you can then click the X on the window to close the Web Resource window. This will return you to the Lookup Record window.
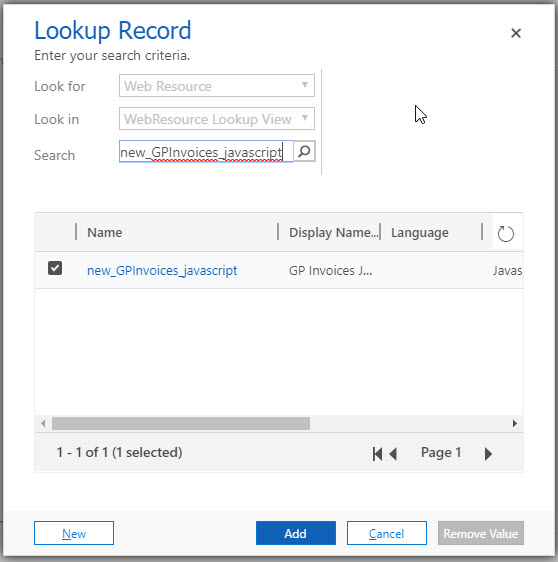
Step 14
Now you should see the new web resource you just created and it will automatically be selected for you to add. Now you just need to click the Add button. This will then return you to the Form Properties window and you will see the new web resource is added in the Form Libraries.
Step 15
We are almost done! We have everything we need configured and setup, but the last piece which is for the javascript to run when the account page loads. So in the Form Properties window below the Form Libraries is the Event Handlers section. Here you will need to click the Add button.
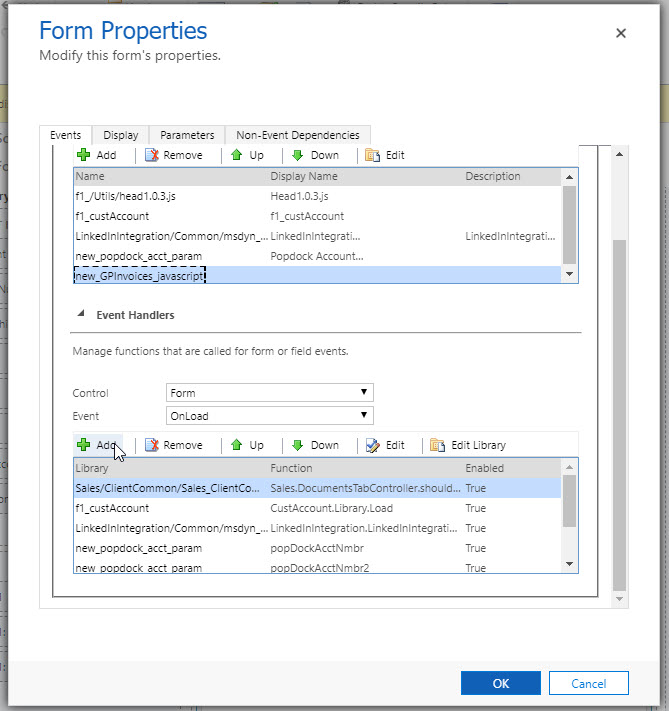
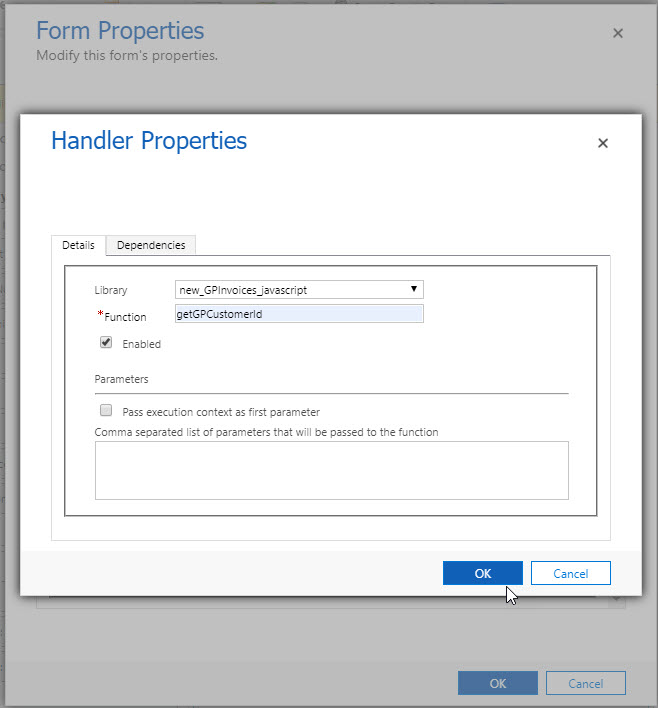
Step 16
This is the piece where you need the function name that we used in the javascript. If you remember we called it “getGPCustomerId”. Select the web resource we created from the Library drop down options. Then in the function field enter “getGPCustomerId” as we called it in the javascript. Then click OK and then on the Form Properties window click OK again.
Step 17
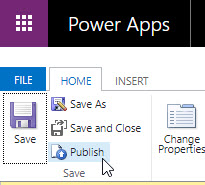
We are now back to the PowerApps Account Form and we can now click save and finally click publish to publish all customizations. Once it has completed publishing, click the X to exit the forms window.
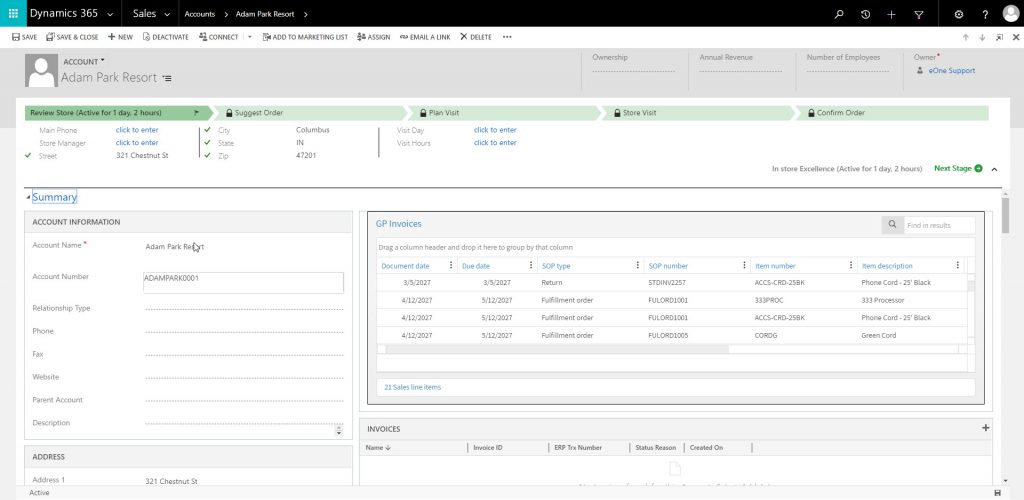
This completes everything needed for the widget now to work inside of CRM. Go ahead and refresh your accounts page if you still have it open and it should look like this with the working widget.
If you have any errors, the most common issue is the javascript and confirming all names used on both the Popdock widget steps and the CRM form properties steps.
If you would like some assistance with this setup or have any questions please reach out to our Popdock Support Team at support@popdock.com.