The following configuration settings may be amended through the use of the SmartConnect configuration tool.
| • | The SmartConnect user password - a password change on the client is required when the SmartConnect user password has been changed on the MSSQL server containing the SmartConnect database. |
| • | The MSSQL connection timeout - the default connection timeout may be changed on the client to allow a longer connection time when connecting to either the SmartConnect MSSQL database, or Dynamics GP databases. The standard default for the connection string is 15 seconds. |
| • | The windows service timeout - the default timeout for a windows service map run may be changed to allow long running maps to be processed by the windows service scheduler. The standard default for this timeout is 240 minutes. |
| • | The SmartConnect server list - every time a SmartConnect client connects to a SmartConnect database on a different MSSQL server, the server name is recorded in a list that is recalled when the client next tries to log in. This list may be amended to remove old or no longer needed MSSQL servers. Note: this setting is only applicable for machines running the SmartConnect windows service. |
Note: configuration changes made via this tool are only applied to the current machine where the configuration change is run.
To amend SmartConnect configuration settings:
| 1. | Navigate to the SmartConnect directory in windows explorer. Usually C:\Program Files (x86)\eOne Solutions\SmartConnect. |
| 2. | Select and run the eOne.SmartConnect.Config.exe file. |
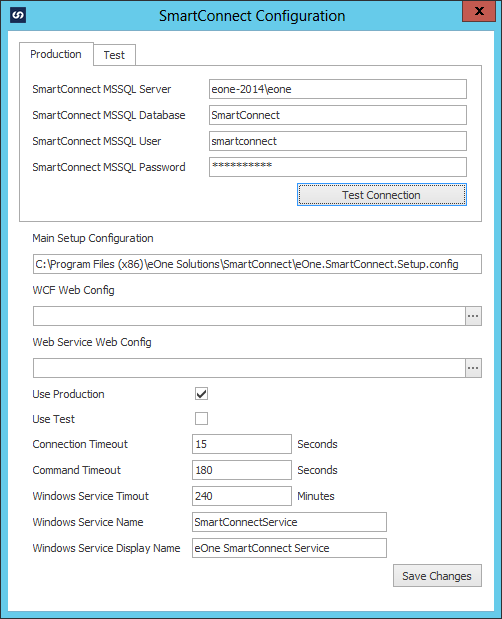
| 3. | Enter the name of the SmartConnect MSSQL server. |
| 4. | Enter the name of the SmartConnect SQL database. |
| 5. | Enter the SmartConnect MSSQL user and password. |
| 6. | Select the test connection button. The form with then attempt to connect to the SmartConnect database on the MSSQL server using the password provided. If connection is successful, and configuration details can be read, configuration fields are enabled at the bottom of the form. |
| 7. | Amend the timeout and other settings as needed. |
| 8. | Select the Save Changes button to record your configuration changes. |