The Microsoft Dynamics CRM Connector Setup screen within SmartConnect defines the method of connecting to CRM, as well as the default CRM company.
To set up the Microsoft Dynamics CRM connector:
| 1. | Open the SmartConnect setup screen, select Setup on the Setup ribbon. |
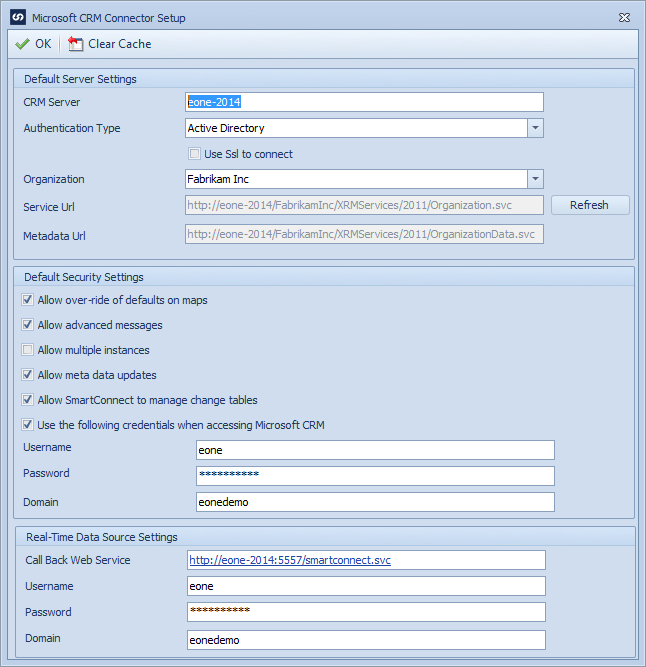
| 2. | Double click on the SmartConnect Dynamics CRM Connector, or select SmartConnect Dynamics CRM Connector and select the Connector Setup button at the bottom of the screen. This will open the Microsoft Dynamics CRM Connector Setup window. |
| 3. | Enter the default CRM server and port. Do not enter the http/https prefix. |
| a. | For Active Directory installations the server name is required. If the CRM server is not running on port 80 the port number should also be entered. |
| b. | For CRM Online installations just the CRM server name should be entered (e.g. crm5.dynamics.com). The organization name and port number are not needed. |
| c. | For Internet Facing Deployments, the server name should be prefaced with the discovery service alias (usually dev) |
| 4. | Select the required authentication type. |
| b. | Internet Facing Deployment |
| c. | Microsoft Online (Live Id) |
| d. | Microsoft Online Federation (provisioned via Microsoft Office 365) |
| 5. | Select connect using SSL if https is required to connect to the CRM server. Both CRM Online and Internet Facing Deployments will automatically assume that SSL is to be used. |
| 6. | If users are allowed to over-ride the default CRM server for CRM destinations, select the Allow over-ride of defaults checkbox. This will allow users to send data to CRM servers other than the default CRM server selected. |
| 7. | If users are allowed to use the advanced messaging for CRM within SmartConnect, select the Allow advanced messages checkbox. |
| 8. | If users are allowed to update meta data information within CRM, select the Allow meta data updates checkbox. |
| 9. | If SmartConnect is to manage the creation of CRM change tables and change transactions, check the Allow SmartConnect to manage change tables checkbox. |
| 10. | If a single user is to be used to connect SmartConnect and CRM check the User the following credentials when using CRM checkbox. (Note: CRM Online and Internet Facing Deployment installations require definition of a single user to connect to CRM) |
| a. | Enter the username to be used to connect to CRM. (Note: if non standard ports have been used for an IFD installation, the full username may be required to connect to CRM e.g. administrator@dev.eonesolutions.com) |
| b. | Enter the password to be used to connect to CRM. |
| c. | Enter the AD domain of the user to be used to connect to CRM. (Not required for CRM Online, or CRM Online Federation) |
| 11. | Select the Refresh button to retrieve the list of CRM organizations. |
| 12. | Select the default organization to be used for CRM. |
| 13. | If real time data sources are to be triggered from CRM, enter the call back web service url for the SmartConnect web service. |
| • | If the Web Service tab has been setup in the SmartConnect Setup window, this will automatically populate. |
| • | Enter the username, password and domain to be passed back to the SmartConnect web service. |
| 14. | Select OK to save the setup changes. |
Notes:
| • | If the default security area of the setup screen is not filled out the credentials of the logged in user will be used. (AD installations only) |