All requests received by a SmartConnect WCF REST service that fail SmartConnect validation are automatically written to the SmartConnect service security log.
The following information is logged against each invalid request:
| • | Date - the date and time of the invalid request. |
| • | Client IP address - the client endpoint address. |
| • | Server IP address - address of the server that received the request. |
| • | Rejection reason - the reason the request was rejected. |
| • | Username - the username passed from the client. |
| • | Serialized request - the request serialized to string. |
To view the SmartConnect web service security log:
| 1. | Log into the SmartConnect client as an administrator. |
| 2. | Select the Security Logs button from the Logs tab. |
| 3. | Enter date range if required, then select the Refresh Query Button. |
| 4. | Hover over a row to view the serialized request string. |

To manage entries in the web service security log:
Manually
| 1. | Log into the SmartConnect client as an administrator. |
| 2. | Select the Security Logs button from the Logs tab. |
| 3. | Select criteria if required then select the Refresh Query button. |
| 4. | Select the row(s) to be removed, then select the Delete Selected button. |
Automatically
| 1. | Log into the SmartConnect client as an administrator. |
| 2. | Select the Web Security button on the Setup tab. |
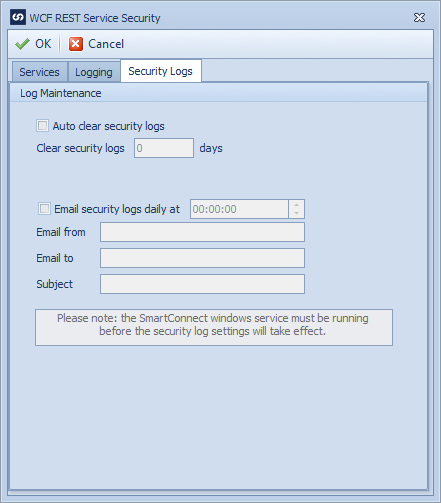
| 3. | Select the Security Logs tab. |
| 4. | If security logs should be automatically deleted after a specified time frame check the Auto clear security logs checkbox. |
| 5. | Enter the number of days to keep security logs. Logs older than this will be removed. |
| 6. | Select OK to save changes. |
Note : the SmartConnect windows service must be running before automatic removal will occur.
Security log emails:
Administrators may receive a daily email of all requests that have failed SmartConnect validation.
To set up a daily security log email:
| 1. | Log into the SmartConnect client as an administrator. |
| 2. | Select the Web Security button on the Setup tab. |
| 3. | Select the Security Logs tab. |
| 4. | Check the Email security logs daily at checkbox then select the time at which the emails should be sent. |
| 5. | Enter a from email address for the security log email. |
| 6. | Enter a to address for the security log email. If the email is to be sent to more than one email address, separate email addresses with ; |
| 7. | Enter a subject for the security log email. |
| 8. | Select OK to save changes. |
Note : the SmartConnect windows service must be running before automatic removal will occur.
Note : the SmartConnect security log email does not contain the serialized request string.