In this post, we will review how to use Global Variables and scripting in SmartConnect.com to create document level after integration tasks.
In my case, for each record I was processing I needed to update a field in the source system when the record was successfully integrated into the destination. If this was a SmartConnect on premise integration, I would have used a Run Integration task after document success. However, this is not an option in SmartConnect.com.
To work around the lack of an after document run integration task, I created a global variable to store document numbers of the records that had errors. Then, I used an after integration Run Integration task to update the source records. If the document number of the source record appears in the global variable, then we do not update that document in the source system.
Step 1: Create a global variable
- On the SmartConnect menu, select Maintenance – Global Variables.
- Click Create Global Variable
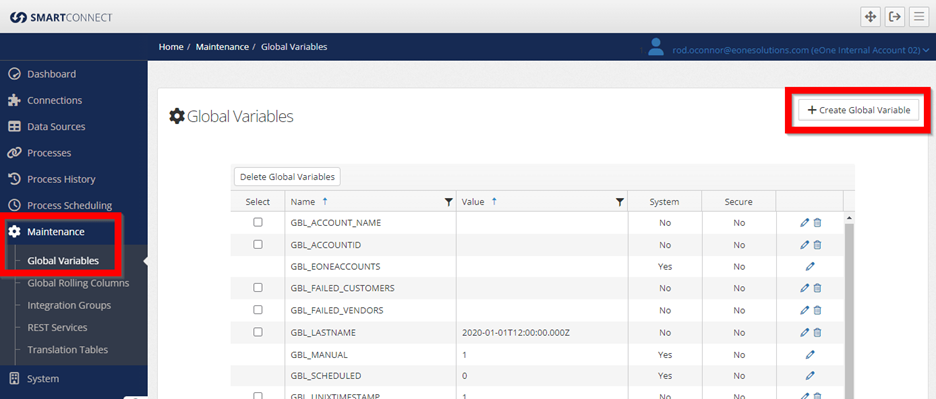
- Give the global variable a name. In my example, I am calling mine GBL_FAILED_CUSTOMERS because the process I am using it in is creating customer records in the target solution. The actual name you use doesn’t matter, but you will need to adjust the scripts later in the post to use whatever name you use here.

- You do not need to enter a value in the Value field or Secure checkbox.
- Click Save
Step 2: Catch the documents with errors
Back on the original process, we need to add a task that will update our global variable with the ID of any records that fail. In my case, this is the Customer Number. Because we are using one variable to potentially capture multiple broken records, we need a delimiter between each ID. I have chosen a pipe delimiter (|) as I know that will not appear in my data. You can choose a different delimiter if you like, but just make sure that whatever you use won’t appear in your data naturally.
Note that I am actually creating 2 tasks here. The first will ensure that the global variable from above is set to an empty string. Technically this step is not required as we saved the variable as an empty string, but I like to do this step just in case.
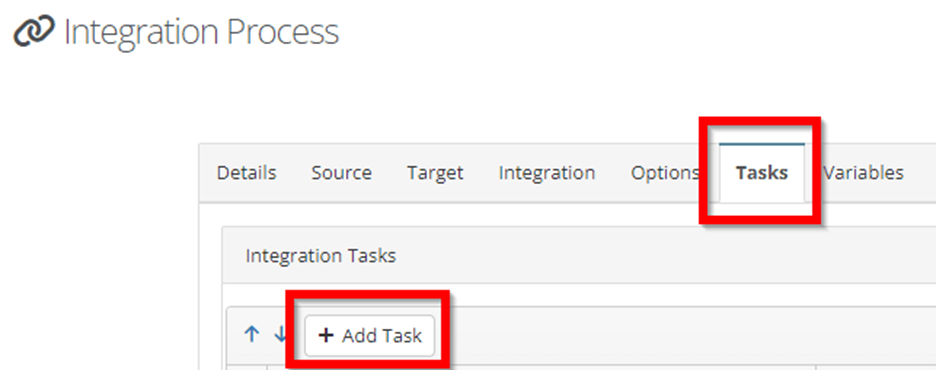
- Open your integration process.
- Click the tasks tab.
- Click on Add Task.
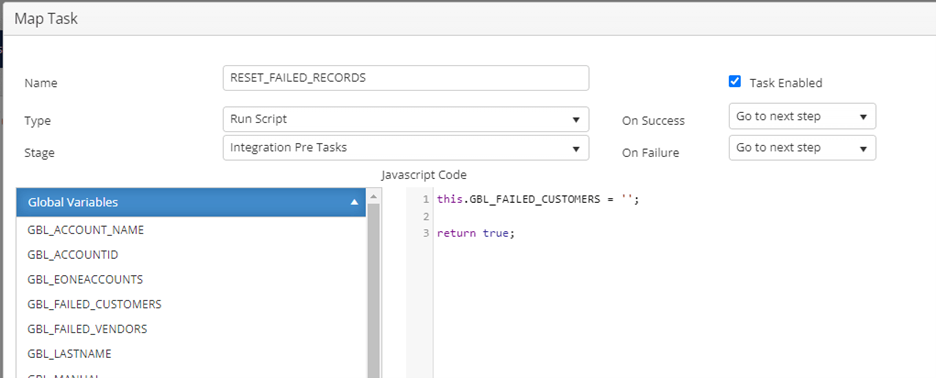
- Give your task a name. In my example, I called it RESET_FAILED_RECORDS.
- Select Run Script as the Type.
- Select Integration Pre Tasks as the Stage.
- Enter the following code in the JavaScript Code box:
this.GBL_FAILED_CUSTOMERS = ”;
return true;
Note: if you used a different name for your global variable above, you will need to replace “this.GBL_FAILED_CUSTOMERS” with your global variable. Hint: You can find your global variable in the Global Variables list on the left. Simply drag your variable from the list into your code to save on typing.
- Click Save.
- Click Add Task.
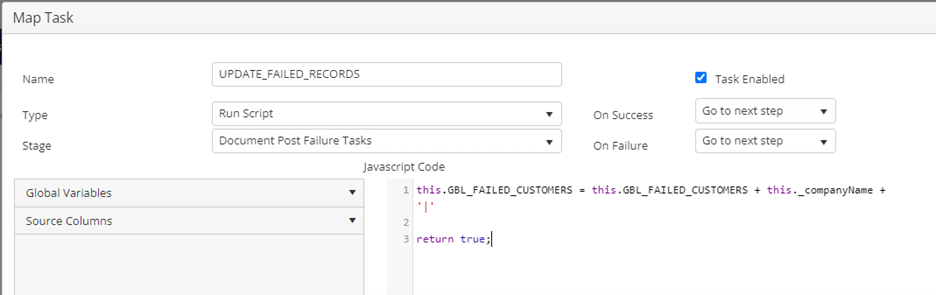
- Give your task a name. In the example, I called mine UPDATE_FAILED_RECORDS.
- Select Run Script as the Type.
- Select Document Post Failure Tasks as the Stage.
- Enter the following script in the Javascript Code box.
this.GBL_FAILED_CUSTOMERS = this.GBL_FAILED_CUSTOMERS + this._companyName + ‘|’
return true;
- Note that if you used a different name for your global variable above, you will need to replace “this.GBL_FAILED_CUSTOMERS” with your global variable.
- Click Save.
- Click Save on the integration process to save your changes.
At this point, any time that a record fails, we will record its ID into a pipe delimited list in a global variable. Next, we need to use that information to update the source records.
Step 3: Create a SmartConnect Process to update the source
In my example, I was updating a checkbox on the customer record in my source system to reflect that the integration had succeeded. This meant that I was able to create a process that used the exact same data source as my original integration, and then used the customer entity from that same system as the destination. This is important for the last step of the post.
In your case, if you need to use a different data source to make your update, you need to ensure that the same ID you used in your first integration is the source grouping for this second integration.
Whichever is appropriate for you, create the integration that will make the update you require.
Step 4: Add logic to restrict error records
For the process you created in step 3, we need to stop it from processing records that had an error. To do this, we are going to be using the Restrictions feature.
- Within your process, select the Integration Tab.
- Select the Restriction subtab.
- Enter the following script in the Javascript Code box:
var checkstr = this.GBL_FAILED_CUSTOMERS //This is passed in from the parent process
var currentrec = this._companyName
var timetoquit = 0
if (checkstr.length == 0)
{return true;}
checkstr = checkstr.substring(0, checkstr.length – 1) // trim the last | off the string. This way, if there is only 1 the index of | is 0
//If there is more than 1 document that failed, the document values are delimited with a |
var idx = checkstr.indexOf(‘|’) // Check if there are any | in the string supplied
if (idx === -1)
{if (checkstr == (currentrec))
{return false;}
else
{return true;}}
//If we got this far, there is more than 1 string to test
var retval = checkstr.substring(0, idx) // Get the first record number
var err = false
do{
if(retval == (currentrec)) // If the string matches the current id
{
err=true;
timetoquit = 1;
}
if (checkstr == (‘|’)) // if there are no more strings
{timetoquit = 1;}
checkstr = checkstr.substring(idx + 1, checkstr.length); // Get rid of the part of the string we already used
idx = checkstr.indexOf(‘|’); // Get the length to the next |
if (idx > 0)
{
retval = checkstr.substring(0, idx);
}
else
{
retval = checkstr;
checkstr = ‘|’;
}
} while(timetoquit === 0)
if (err === true)
{return false;}
else
{return true;}
Note: if you used a different name for your global variable above, you will need to replace “this.GBL_FAILED_CUSTOMERS” with your global variable.
- In my example, the ID I was searching my string for was this._companyname. You will need to replace this with whichever source field represents your ID.
- If you used a delimiter other than |, you will need to replace those in the script as well.
Note: This script will check the global variable to see if the record currently being processed exists in the list. If it does, the script returns false, which means SmartConnect will not process this record. In other words, the destination will not be updated for this particular record.
- Click Save on the integration to save your changes.
Step 5: Call the second process from the first
The last thing we need to do is call the process we just added from the original process. Because we want the update to run whether there is a problem or not, we need to add the run integration task for both success and failure.
- In the original process, select the Tasks tab.
- Click Add Task.
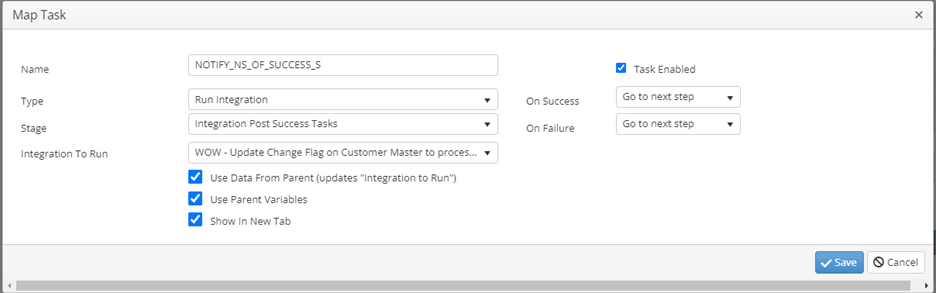
- Give the task a name. In my example, I used NOTIFY_NS_OF_SUCCESS_S.
- Select Run Integration as the Type.
- Select Integration Post Success Tasks as the Stage.
- In the Integration to Run field, select the process that you created in step 3.
- IF your second process uses the same data source as the original process, click the “Use data from parent” checkbox. Do not check this if you used a different data source in your second process.
- Check the “Use Parent Variables” box. This will ensure that your list of error records is passed to the second process.
- Click Save.
- Click Add Task.
- Repeat the above steps, except:
-
- Use a different name for this task. I used _F instead of _S at the end of mine.
- Select “Integration Post Failure Tasks” in the Stage field.
- Click Save.
- Click save on the integration to save your changes.
Summary
In order to use a run integration task at the document level in SmartConnect.com we:
- Created a global variable to store the documents we did NOT want to run the second integration for.
- Updated the global variable using an after document task. In our case, we needed after document failure.
- Created the second integration we wanted to run.
- Added a restriction to the second integration that reads the global variable and stops records where the ID exists in the global variable from processing.
- Called the second map from the first as both an integration success and integration failure task.