Tokens are a feature within Popdock that can enforce security on widgets, named API endpoints, and calling the Popdock API. There are three ways to create a token inside of Popdock and all three will be covered in this article.
Method 1: Inside the User Settings
The first method of creating tokens in Popdock is within a user’s individual profile. This is a better method for a developer within your environment who will be testing various API Endpoints and list data endpoints.
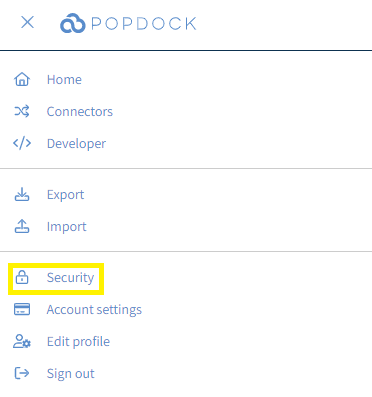
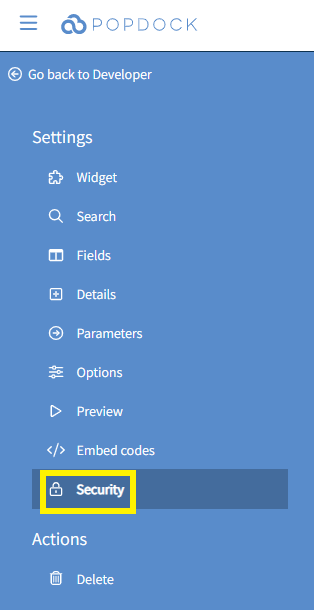
1. To create a token for a user in Popdock, click on the triple bar menu in the upper left corner of the Popdock homepage and click on Security within the dropdown menu.
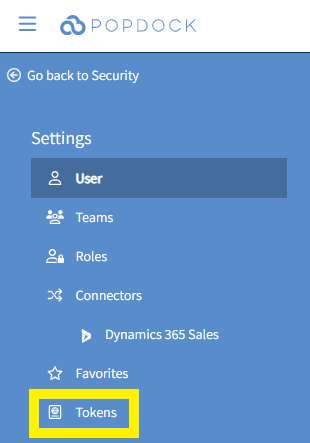
2. From your list of Users, click the Pencil Icon to the right of the user you want to assign a token to. This will open up the User’s security profile. Click on Tokens under the Settings menu on the left side of the page.
3. Select the Click here to add a token hyperlink.

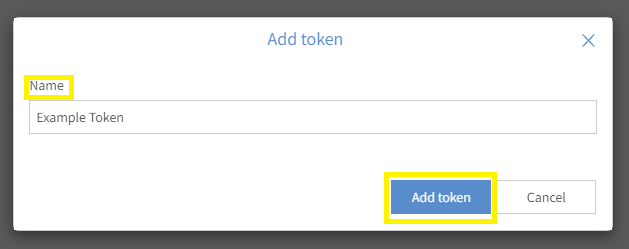
4. Use the Name field in the Add token window to give your token a name. Then click Add token.
5. This token is now available for use to the user.

Method 2: Inside a Widget
The second method for creating a token is more suited for utilizing token security within your widgets, as it makes it easier to create tokens for multiple users quicker than the Method 1.
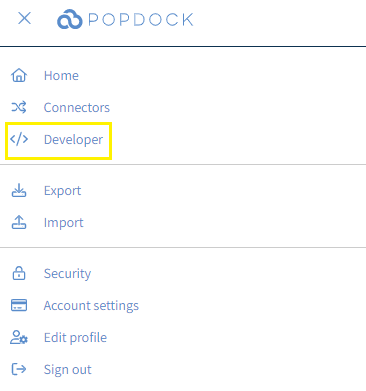
1. Click on the triple bar menu in the upper left corner of the Popdock homepage and click on Developer within the dropdown menu.
2. From the Widgets section, locate the widget you would like to add a security token to and click the Pencil icon to the right of that widget. From within the Edit Widget page, click on Security under the Settings Menu.
3. Click on + Add Token in the upper right corner of the page.

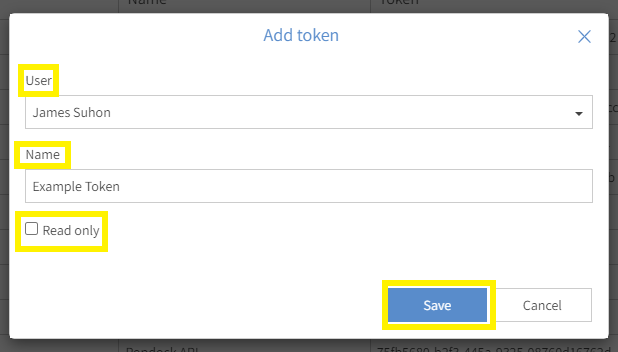
4. Use the User drop down field in the Add token window to locate the User you want to assign the token to. Then use the Name field to give your token a name. Then click Add token. You also have the option to make this token Read Only, which prevents the user from making calls with Actions within the widget. Read Only is exclusive to widgets as well. Click the Save button once all fields are complete.
5. This token is now available for use to the user. It can be used to enforce token security on any widget the user has access to.

Method 3: API Users
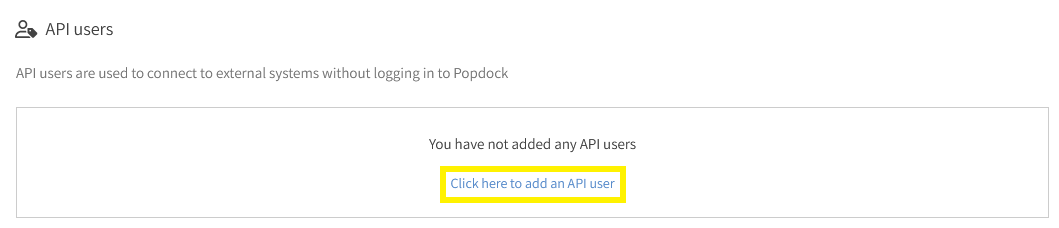
An API User is a special type of user who does not have login access to the Popdock web application, but rather can consume data via Popdock through widgets or API calls. To learn how to create an API User visit the following article: Understanding API Users – Applying Security to Popdock Widgets and API Calls.
1. On the Popdock home page, click the triple bar menu in the upper left corner of the page and click on Security from the drop down menu.
2. From the Security: Users page, scroll down to the API users section and click on the Click here to add an API user hyperlink.
3. The Add API User window will pop up, where you can use the Name field to give your API user a name. You can click on the box next to Add an API token to generate an API token for this user from this window. If you select to add an API token, an additional field will appear to create a Token name. Once all fields are complete, click Add.
Note: You have the option of generating an API token after the API User is created as well. Once your API User is created, follow Method 1 Steps 2-5 to create an API token for your API User.

Questions on creating tokens? Contact support@eonesolutions.com.