- On the Integration tab click on ‘Additional Columns’ tab.
- Click on the ‘Add Additional Column’ Button.
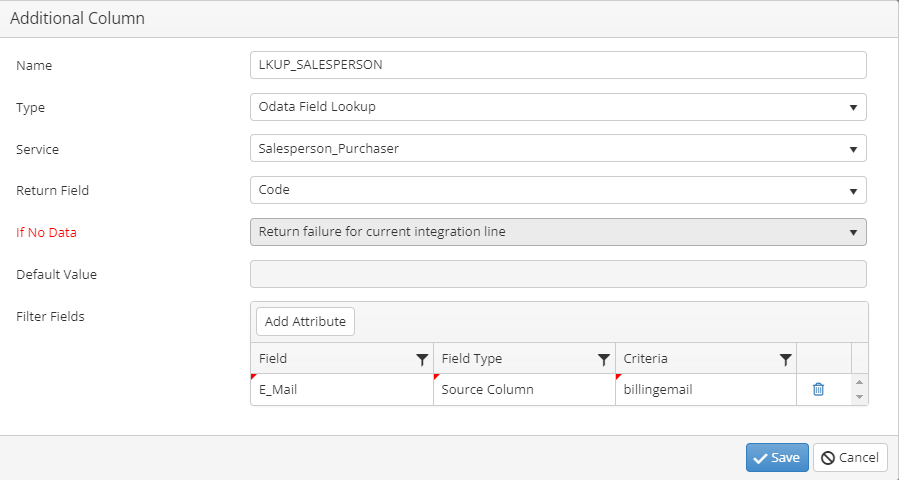
- Name – Enter a unique name for the column.
- Type – Set type to ‘Odata Field Lookup’.
- Service – Select the Web Service to use.
- Return Field – The field to return from the lookup.
- If No Data – The action to take if data is not found based on the criteria setup
- Continue – Continue without passing a value into this field.
- Return default value – Return the value in the ‘Default Value’ field.
- Return failure for current integration line – Return an error for the record and don’t send data to the target system.
- Stop processing integrations – Stop processing records.
- Default Value – Default Value to return if lookup fails to find a record.
- Filter Fields – click Add Attribute to enter the matching details for the lookup.
- Field – Select the source Field column that contains the data to be matched to the Business Central Data.
- Field Type – select the field type for the selected Field.
- Criteria – select the criteria field that matches the source field.
- Add additional criteria rows as required.
- Click Save.
- Click on the ‘Target Integration’ tab.
- Column Type – Change to ‘Odata Field Lookup’.
- Source Name – Select the Additional Column.
