Integrate Shopify and Dynamics 365 Business Central (BC) using a combination of bulk and scheduled processes to keep your BC and Shopify data in sync. These templates are a two-way integration solution, allowing data to flow in both directions between the two systems. You are not required to use all of the templates provided and can decide which components meet your needs and adapt them to your specific scenario. The integration includes the following record types:
- BC Items and Shopify Products
- BC Customers and Shopify Customers
- BC Sales Invoices and Shopify Orders
- BC Sales Credit Memos and Shopify Refunds
What is included
The following integration processes are available in these templates and can be used as downloaded or as a starting point to customize further:
- Shopify Customers to BC
- Shopify Products to BC
- Shopify Orders to BC
- Shopify Refunds to BC
- BC Items to Shopify
- BC Item Inventory to Shopify
- BC Credit Memos to Shopify
Multiple Stores
These templates are configured for one Shopify Store and can be modified to integrate with multiple Shopify Stores. Each Shopify Store will require a separate Connection and a copy of each integration used.
These templates do require that the latest version of the Shopify Connection is installed and setup within SmartConnect.com. The Shopify Connection is included in the download file with these templates.
For every integration, a bulk version and on-going/change option is available. The set of bulk maps are intended for an initial synchronization of the data between the two systems. After the initial bulk maps are run, the on-going/change maps are designed to be scheduled as an ongoing process to keep the two systems in sync.
All the mappings can be modified and configured to meet your specific needs after they are imported to SmartConnect. Feel free to add additional fields or logic required.
The definition for the Shopify REST Connection focuses on four Resources in Shopify: Customers, Orders, Refunds and Products. The existing endpoint definitions can be modified and new endpoints can be defined using the Shopify API documentation.
- SmartConnect.com subscription
- Configured Business Central Odata Connection
- SmartConnect eCommerce Extension
- Shopify website
Files Included:
Shopify REST Definition
A unique integration file for each integration process (11 total)
The process for integrating Shopify and Microsoft Dynamics 365 Business Central:
- Install the eOne Solutions SmartConnect eCommerce Extension
- Import and customize the Connection methods. The Shopify API will have fields related to authorization and access that are specific to your system.
- Configure the Business Central Odata Connection
- Import and Configure the Shopify – Microsoft Dynamics 365 Business Central Maps.
- Run bulk maps to synchronize historical data and set up on going maps to keep the systems in sync.
This integration will work with Online, On-premise, and hosted Business Central deployments.
Some of the integrations will require customizations to Business Central to hold unique identifiers from Shopify. Documentation of the extension components can be found here.
The .app file included in the downloaded zip folder will make the changes required. You can choose to either install the extension directly into your system, or you can use the code located here to create your own extension with the needed components.
The extension will automatically publish the below web services for use by the integrations:
| Object Type | Object Id | Service Name | Custom |
|---|---|---|---|
| Page | 30 | ItemCard | False |
| Page | 21 | CustomCard | False |
| Page | 43 | SalesInvoice | False |
| Page | 44 | SalesCreditMemo | False |
| Page | 132 | PostedSalesInvoice | False |
| Page | 5733 | ItemCategoryCard | False |
| Page | 63000 | SCShippingAddress | True |
| Query | 63000 | SCCreditMemosQuery | True |
Guest Checkouts
Shopify automatically creates a new Customer for every checkout. So even if the customer doesn’t create an account a new Customer will be created in Shopify.
Multiple Stores
If you need to integrate with multiple Shopify stores, you will need to add a second Shopify Connector that points to the other Shopify store name. This will allow you to integrate multiple Shopify Stores with one or more Business Central companies.
Filtering Shopify Sources
To add filters to Shopify data sources, you will need to modify the parameters on the Service Entity used by the Data Source. You can modify these by going to SmartConnect > Maintenance > REST Services > Shopify > Service Entities > “Your Service Entity” > Parameters
Check the Shopify documentation for a list of available query parameters.
Install the SmartConnect eCommerce Extension
The first step is to install the “eOne Solutions_SmartConnect eCommerce Extension_1.0.0.1.app” as an extension in Business Central using the steps outlined here.
Importing Shopify REST methods
The REST settings define how SmartConnect.com makes calls to the Shopify API. After the methods are imported, the Connection needs to be added.
Steps to Import
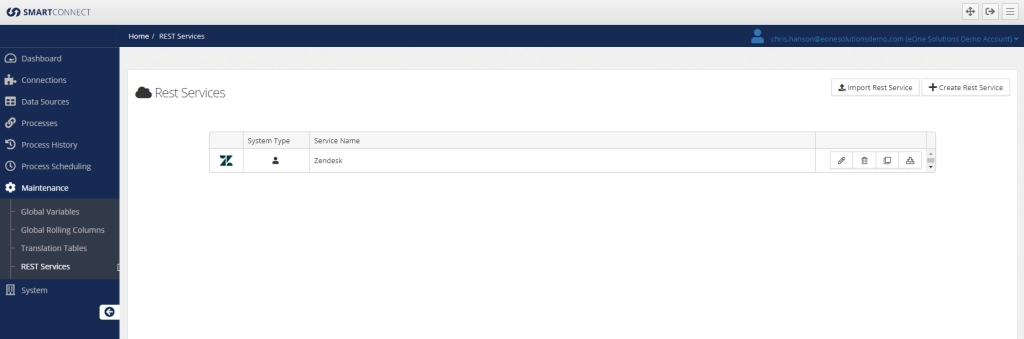
- Click on the “Maintenance” tab within SmartConnect.com
- Click the “REST Services” button within the REST Connection section
- Click the “Import REST Service” button at the top-right section
- Browse to and select the “Shopify_1.0.0.0.json” file for the import
- Click the “Process Import” button to bring in the definition
Configuring the Shopify Connection
The newly imported Shopify REST connection and the Dynamics 365 Business Central connection have to be setup and tied to specific tenants before any integrations can be imported. Each system will require 1 connection in SmartConnect.com
Configuring the Shopify Connection
- Click on the “Connections” tab within SmartConnect.com
- Click on the “Create Connection” button
- Select the Shopify option from the list
- Follow the steps outlined in the Instructions section of the connection
- Click Save to complete the connection
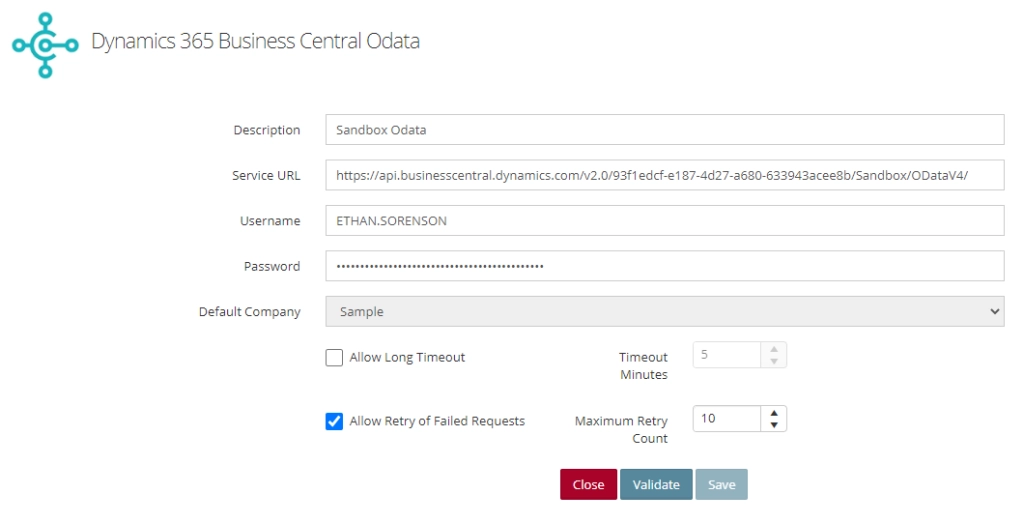
Configuring the Microsoft Dynamics 365 Business Central Odata Connection
- Click on the “Connections” tab within SmartConnect.com
- Click on the “Create Connection” button
- Select the “Dynamics 365 Business Central Odata” option from the list
- Configure the connection
- Click Save to complete the connection
Importing the SmartConnect Maps
- Click on the “System” tab within SmartConnect
- Click the “Import” button within the SmartConnect Maintenance section
- Select each integration file and import its contents
It is likely all the integrations included are not required for your scenario. Below are two possible deployment options.
Existing Shopify store to new BC deployment
If the BC deployment is new and you just need to import starting Items, Customers, and orders then the processes can be run in this order:
- BULK SHOPIFY CUSTOMERS TO BC
- BULK SHOPIFY PRODUCTS TO BC
- BULK SHOPIFY ORDERS TO BC
- ONGOING SHOPIFY CUSTOMERS TO BC
- ONGOING SHOPIFY PRODUCTS TO BC
- ONGOING COMPLETED SHOPIFY ORDERS TO BC
- ONGOING SHOPIFY REFUNDS TO BC CREDIT MEMOS
Existing BC to new Shopify deployment
If setting up a new Shopify store with items from BC you can run the processes in this order:
- BULK BC ITEMS TO SHOPIFY
- ONGOING SHOPIFY CUSTOMERS TO BC
- ONGOING COMPLETED SHOPIFY ORDERS TO BC
- ONGOING SHOPIFY REFUNDS TO BC CREDIT MEMOS