Integrate Zendesk and Microsoft Dynamics 365 Sales using a combination of bulk and scheduled processes to keep your Microsoft Dynamics 365 Sales and Zendesk data in sync. The templates are a two-way integration solution, allowing data to flow in both directions between the two systems. Decide which components of each system should be synced with the other using the provided integration processes.
The integration will sync up the following record types:
- Zendesk Organizations and Microsoft Dynamics 365 Sales Accounts
- Zendesk Users and Microsoft Dynamics 365 Sales Contacts
- Zendesk Tickets and Microsoft Dynamics 365 Sales Cases
The integration processes can be used as downloaded, as a starting point to customize further, or by showing techniques on how SmartConnect interacts with Zendesk and Microsoft Dynamics 365 Sales. The integration processes make use of several key Zendesk and Microsoft Dynamics 365 Sales features such as:
- Run integrations that utilize paging to pull more than 100 records at a time from Zendesk
- Run incremental integrations, which allow only processing records after a specific time
- Run integrations that utilize custom entities in Microsoft Dynamics 365 Sales
These templates do require that the latest version of the Zendesk Connection is installed and set up within SmartConnect.com. The Zendesk Connection is included in the download file with these templates.
The definition for the Zendesk REST Connection focuses on the three main entities in Zendesk: Organizations, Users and Tickets. There are methods for both sending and receiving all three entity types.
For pulling data from Zendesk, there are options to pull all the data in bulk, or to use the incremental endpoints to retrieve a set of updated/inserted records.
The existing endpoint definitions can be modified if needed, and new endpoints can be defined using the Zendesk API documentation to fit specific scenarios.
There are 12 integration processes included in the template pack. The main functionality allows bi-directional integrations between Organizations/Accounts and Users/Contacts. It also allows Tickets to sync to Cases as a one-way bulk and ongoing process and a bulk sync of Cases to Tickets.
The set of bulk integration processes are intended for an initial sync of data. Once that is complete, the change processes are designed to be scheduled as an ongoing process to keep the two systems synced up.
Any of the mappings can be changed or configured once the integrations are imported into SmartConnect.com, so additional fields can be included, and new maps can be added to fit specific needs.
The process for integrating Zendesk and Microsoft Dynamics 365 Sales:
- Import and customize the Connection methods. The Zendesk API will have fields related to authorization and access that are specific to your system.
- Import and Configure the Zendesk – Microsoft Dynamics 365 Sales Maps.
- Run bulk maps to synchronize historical data and set up ongoing maps to keep the systems in sync.
The prerequisites to using these templates are as follows:
- Have a valid Microsoft Dynamics 365 Sales and Zendesk instance/organization
- SmartConnect.com subscription
Files Included:
- REST Definition
- A unique integration file for each integration process (12 total)
Import and customize the Connection methods
Importing Zendesk REST methods
The REST settings define how SmartConnect.com makes calls to the Zendesk API. After the methods are imported, the authorization key needs to be imported and several constants need to be set before any successful API calls can be made.
Steps to Import
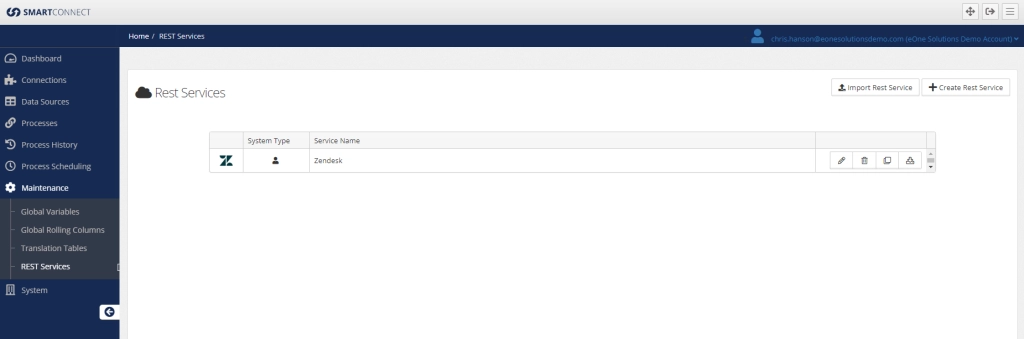
- Click on the “Maintenance” tab within SmartConnect.com
- Click the “REST Services” button within the REST Connection section
- Click the “Import REST Service” button at the top-right section
- Browse to and select the “REST Definition – Zendesk.json” file for the import
- Click the “Process Import” button to bring in the definition
Configuring the Zendesk and Microsoft Dynamics 365 Sales Connections
The newly imported Zendesk REST connection and the Dynamics CRM connection have to be setup and tied to specific tenants before any integrations can be imported. Each system will require 1 connection in SmartConnect.com
Configuring the Zendesk Connection
- Click on the “Connections” tab within SmartConnect.com
- Click on the “Create Connection” button
- Select the Zendesk option from the list
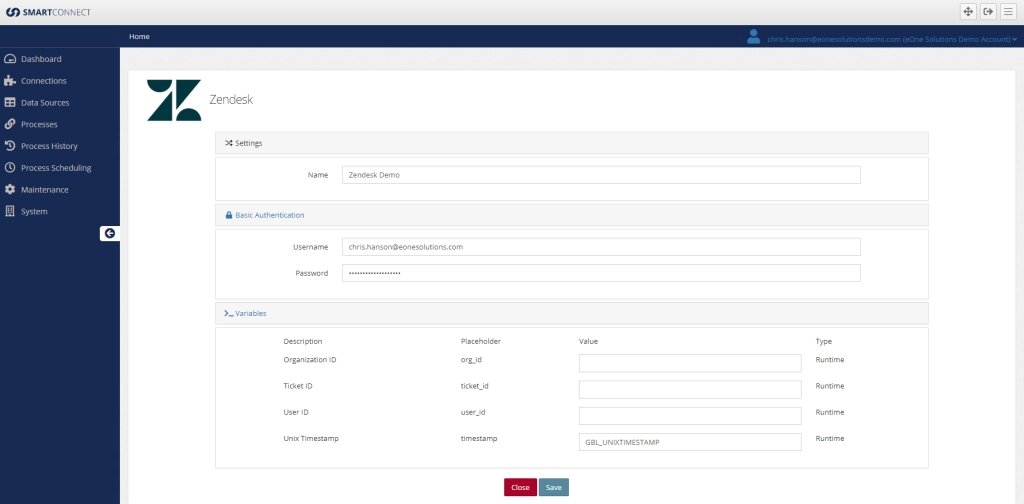
- Enter a Name for the connection, and then a valid Username and Password that is used to login to Zendesk – this account should be an admin within Zendesk.
- The Variables can be left at their default values
- Click Save to complete the connection
Configuring the Microsoft Dynamics 365 Sales
- Click on the “Connections” tab within SmartConnect.com
- Click on the “Create Connection” button
- Select the Microsoft Dynamics 365 Sales option from the list
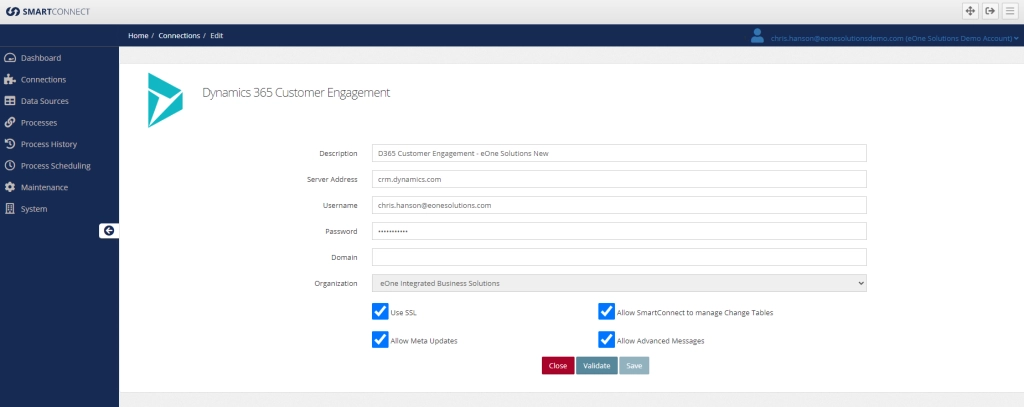
- Enter a Description for the connection
- The Server Address should be entered as “crm.dynamics.com” in the NA region, other regions will use some form of crmX.dynamics.com where X is a differing numeric value.
- Enter a valid Username and Password that is used to login to Microsoft Dynamics 365 Sales – this account should be an admin within Microsoft Dynamics 365 Sales.
- Mark all the checkboxes on the setup window
- Click Validate and then select the correct Organization to connect to.
- Click Save to complete the connection
Importing the SmartConnect Maps
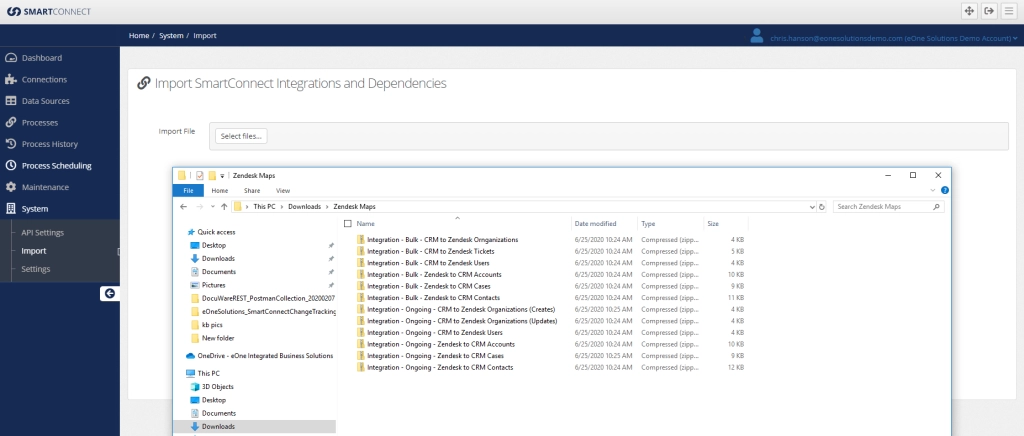
- Click on the “System” tab within SmartConnect
- Click the “Import” button within the SmartConnect Maintenance section
- Select each integration file and import its contents
Map List:
| ID | Name |
| ZD_TO_CRM_ORGS | Zendesk Organizations to Microsoft Dynamics 365 Sales Accounts (bulk create) |
| ZD_TO_CRM_ORGS_ONGOING | Zendesk Organizations to Microsoft Dynamics 365 Sales Accounts (ongoing sync) |
| CRM_TO_ZD_ORGS | Microsoft Dynamics 365 Sales Accounts to Zendesk Organizations (bulk create) |
| CRM_TO_ZD_ORGANIZATIONS_ONGOING | Microsoft Dynamics 365 Sales Accounts to Zendesk Organizations – Updates (ongoing sync) |
| CRM_TO_ZD_ORGANIZATIONS_ONGOING_CRE | Microsoft Dynamics 365 Sales Accounts to Zendesk Organizations – Creates (ongoing sync) |
| ZD_TO_CRM_USERS | Zendesk Users to Microsoft Dynamics 365 Sales Contacts (bulk create) |
| ZD_TO_CRM_USERS_ONGOING | Zendesk Users to Microsoft Dynamics 365 Sales Contacts (ongoing sync) |
| CRM_TO_ZD_USERS | Microsoft Dynamics 365 Sales Contacts to Zendesk Users (bulk create) |
| CRM_TO_ZD_USERS_ONGOING | Microsoft Dynamics 365 Sales Contacts to Zendesk Users (ongoing sync) |
| ZD_TO_CRM_CASES | Zendesk Tickets to Microsoft Dynamics 365 Sales Cases (bulk create) |
| ZD_TO_CRM_CASES_ONGOING | Zendesk Tickets to Microsoft Dynamics 365 Sales Cases (ongoing sync) |
| CRM_TO_ZD_TICKETS | Microsoft Dynamics 365 Sales Cases to Zendesk Tickets (bulk create) |
Organizations/Accounts:
- CRM_TO_ZD_ORGS: Create Orgs in Zendesk that do not exist in Microsoft Dynamics 365 Sales (matched on name).
- ZD_TO_CRM_ORGS: Sync the Orgs to the Accounts, passing the Org ID over as the Account Number
- Note: It is common to create a custom field to hold the Org ID in Microsoft Dynamics 365 Sales vs using the Account Number field
- CRM_TO_ZD_ORGANIZATIONS_ONGOING: ongoing process for updated records to Zendesk from Microsoft Dynamics 365 Sales.
- CRM_TO_ZD_ORGANIZATIONS_ONGOING_CR: ongoing process for new records to Zendesk from Microsoft Dynamics 365 Sales.
- ZD_TO_CRM_ORGS_ONGOING: ongoing process for records to Microsoft Dynamics 365 Sales from Zendesk.
Users/Contacts:
- ZD_TO_CRM_USERS: Create Users as Contacts that do not exist in Microsoft Dynamics 365 Sales yet
- By default, matches on Email Address
- CRM_TO_ZD_USERS: Sync all contacts from Microsoft Dynamics 365 Sales to Zendesk users
- By default, matches on Email Address
- ZD_TO_CRM_USERS_ONGOING: ongoing process for syncing updated/created Users to Contacts
- CRM_TO_ZD_USERS_ONGOING: ongoing process for syncing updated/created Contacts to Users
Tickets/Cases:
- ZD_TO_CRM_CASES: create all existing Zendesk Tickets as Microsoft Dynamics 365 Sales cases
- Note: It is common to adjust the data source from Zendesk to pull a smaller subset of tickets, rather than sync all tickets entirely
- ZD_TO_CRM_CASES_ONGOING: sync new/updated Zendesk Tickets to Microsoft Dynamics 365 Sales Cases
- CRM_TO_ZD_TICKETS: create all existing Microsoft Dynamics 365 Sales Cases as Zendesk Tickets
Process flow to sync initial records:
Run the integrations in the following order:
- CRM_TO_ZD_ORGS
- ZD_TO_CRM_ORGS
- ZD_TO_CRM_USERS
- CRM_TO_ZD_USERS
- (if syncing all tickets to cases) ZD_TO_CRM_CASES
- (if syncing all cases to tickets) CRM_TO_ZD_TICKETS
Setup an ongoing schedule for the following integrations (every 5 minutes as the most frequent, or whatever schedule is required):
- ZD_TO_CRM_ORGS_ONGOING
- ZD_TO_CRM_USERS_ONGOING
- (if syncing tickets to cases) ZD_TO_CRM_CASES_ONGOING
Schedules are created using the Process Scheduling section in SmartConnect.com, and then clicking the button to add a new schedule for each of the integrations listed above.
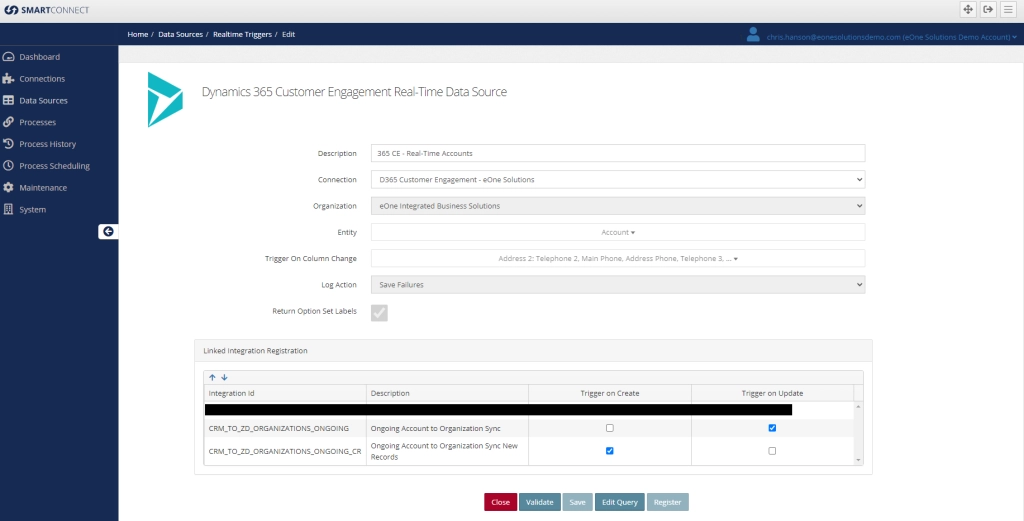
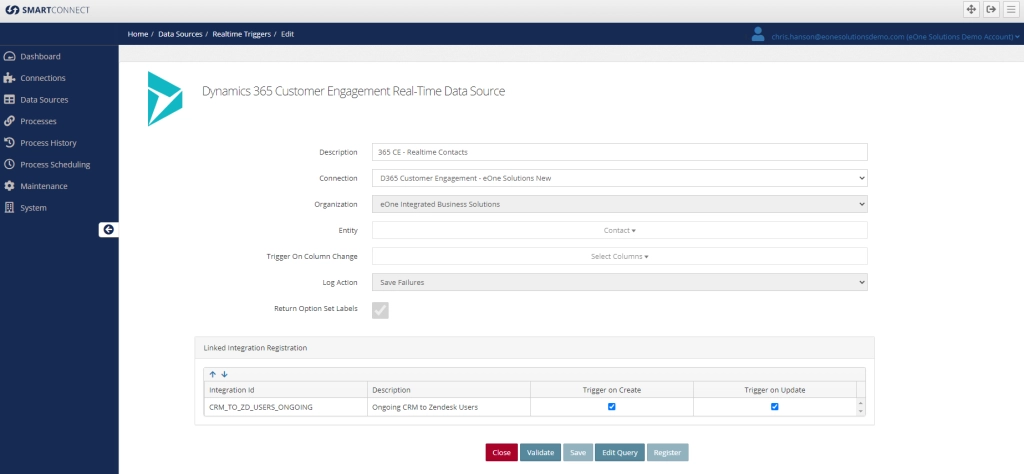
Register the real-time plugins for the following integrations:
| Entity | Integration | Event(s) |
| Account | CRM_TO_ZD_ORGANIZATIONS_ONGOING | Update |
| Account | CRM_TO_ZD_ORGANIZATIONS_ONGOING_CR | Create |
| Contact | CRM_TO_ZD_USERS_ONGOING | Create, Update |
That can be done by navigating to the Data Source section in SmartConnect.com and selecting the Real-Time Triggers option. There will be two sources to register: D365 Account, D365 Contacts.
They will look like the following:
Global Variables
There is one main global variable used for the ongoing integrations from Zendesk to Microsoft Dynamics 365 Sales – it is named GBL_UNIXTIMESTAMP. On each of the 3 ongoing integrations from Zendesk, this global variable is calculated in a pre-map script to determine the timestamp from 5 minutes prior to the integration running. That variable is then used in the call to Zendesk to retrieve only the records that were modified in the last 5 minutes.
This is setup with the expectation that the integrations are scheduled to run every 5 minutes, if a different schedule is set then the pre-map scripts will need to be modified to accommodate for that. The scripting is done in JavaScript, and the timestamp is in Unix format. Detailed instructions on how Unix timestamps work is outside the scope of this document, however plenty of information can be found online around timestamps or the professional services team can be engaged to assist.
Custom Fields in Microsoft Dynamics 365 Sales
These templates were designed as to not force any customizations into Microsoft Dynamics 365 Sales to have them function. However, many fields could be best served as a custom attribute on the Account, Contact, and Case entities. If a custom field is added to an entity, once it is published it can be used in the destination or source of any integration. If field mappings are changed in one integration, ensure the fields referenced are changed in the other integrations as well. IE – if Organization is set to be sent to a custom field rather than the default Account Number field, ensure that the contact integrations are updated as well to reference the custom field rather than account number when trying to set a relationship between the contact and account.
Custom Fields in Zendesk
Custom fields in Zendesk are handled uniquely by the Zendesk API. They are not a straightforward mapping exercise after adding them in. SmartConnect can detect custom fields but adjustments will need to be made to the Zendesk REST definition as well as the integration mappings and groupings to handle custom fields being passed through. It is recommended the professional service team be engaged to assist with that process.